• Shop
    • Antiques
    • Home Decor
    • Jewelry
      • Necklaces
      • Bracelets
      • Earrings
      • Rings
      • Pins
    • Upcycled handmade
      • upcycled womens tops
      • upcycled womens jackets
      • Upcycled womens pants
      • upcycled pillows
      • Upcycled Pickleball Shirts
      • upcycled purses
    • MacKenzie-Childs
      • MacKenzie-Childs Taylor Dinner Plate
      • MacKenzie-Childs Taylor Luncheon Plate
      • MacKenzie-Childs small oval dish
      • MacKenzie-Childs Taylor Bread & Butter
      • MacKenzie-Childs Taylor Mugs
      • MacKenzie-Childs Taylor Saucers
      • MacKenzie-Childs Taylor Breakfast Bowls
      • MacKenzie-Childs Taylor Berry Bowl
      • MacKenzie-Childs Taylor Chowder Bowls
      • MacKenzie-Childs Wallcourt pieces
      • MacKenzie-Childs Enamelware
      • MacKenzie-Childs Torquay dinnerware
      • MacKenzie-Childs MacLachlan Dinnerware
      • MacKenzie-Childs Taylor Serving Ware
      • MacKenzie-Childs Glass Goblets
      • MacKenzie-Childs glass tumbler
      • MacKenzie-Childs Glass Serving pieces
      • MacKenzie-Childs Decor pieces
      • MacKenzie-Childs Placemats & Coaster sets
      • MacKenzie-Childs Paper Products
      • MacKenzie-Childs Tile
    • Shoes
  • Home
  • About
    • I believe…
  • Gallery
    • Custom Design
    • Interior Design
      • Bath
      • Bedroom
      • Dining Room
      • Entry Way
      • Kitchen
      • Laundry
      • Living Room
      • Office
      • Mudroom
      • Themed Rooms
  • Color CCE
  • Services
    • Services
    • Design Process
    • New Construction
  • Journal
    • DIY
    • Repurposed
    • Art
    • Interior Design Room
    • Holiday
    • Theme Room
  • Press
  • Contact

Room chosen for Good Housekeeping article

Taylor
17 Mar 2015
Custom Design, DIY, Interior Design Room, Kids Room, Theme Room
Home Decor, Home Design, Home Interior Designs, jungle, TayRose Design, theme room

Do you know how when you receive a nice compliment, or when you hear some good news that your heart does a little happy dance?  Well, while scrolling through the numerous daily emails one day, one caught my eye.  It was from a Rebecca, and the title was,

From Rebecca  Re: Feature on GoodHousekeeping.com – Kids’ Bedrooms

I thought to myself, this looks interesting and opened it.

Hi Taylor!

 I hope you’re doing well! I am a writer for GoodHousekeeping.com and I am putting together a round-up of the coolest kids’ bedroom ideas. I love your jungle bedroom, and I was wondering if I could use an image of it in my round-up.  Please let me know ASAP if this would be alright.

 Thanks so much!

 Rebecca

All right???  Happy Dance!  What a feeling of appreciation that my design work is to be recognized in this way.   Of course I emailed her right back and included my blog page about working on the room.  http://tayrose.com/2015/02/08/its-a-jungle-in-here/ .

Jungle Room at the 2014 Parade of Homes

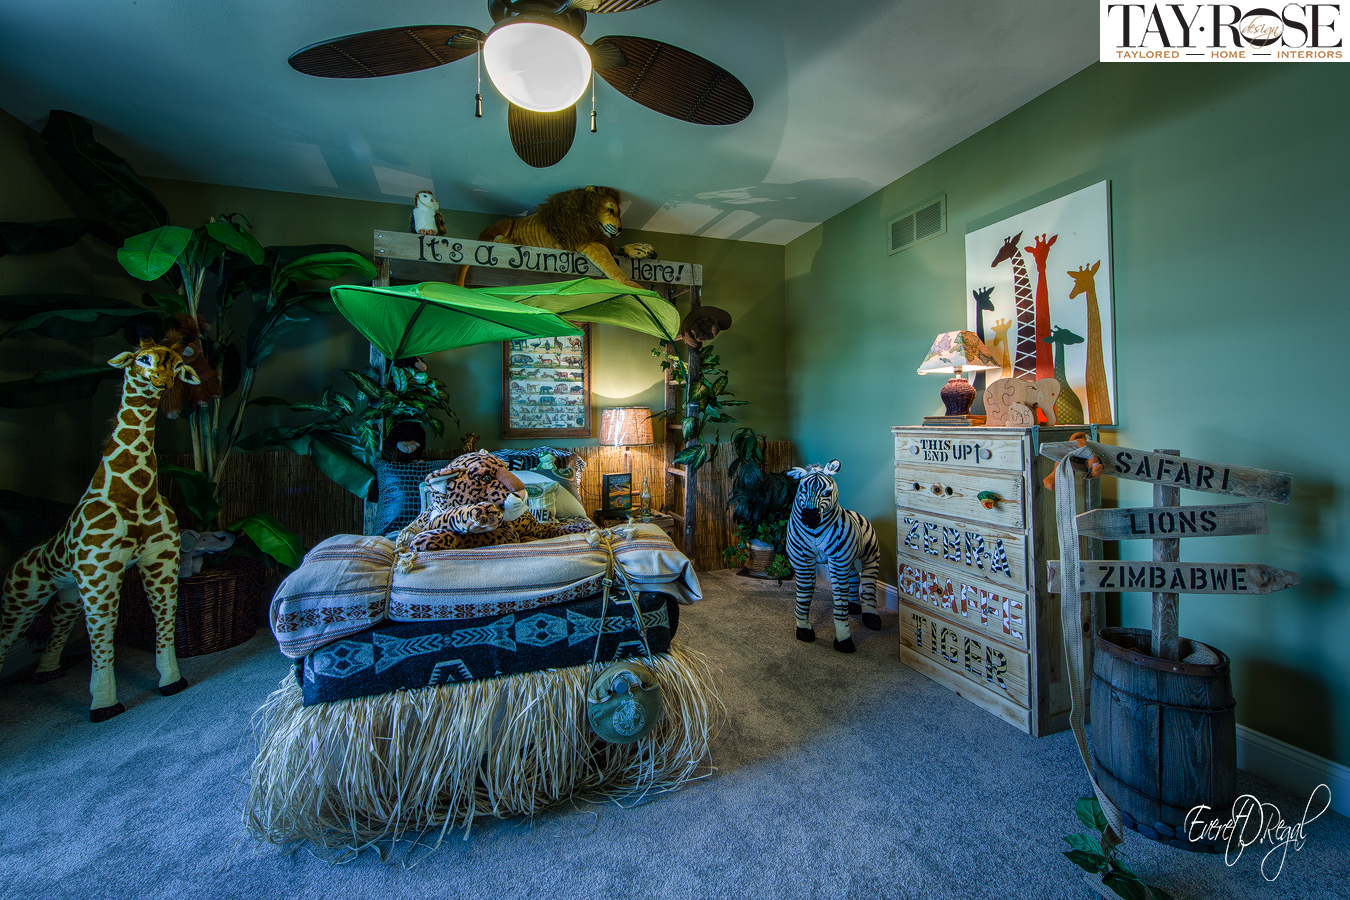
It’s a Jungle in here! Parade of Homes Pigliavento Builder, TayRose Designs

A week later, Rebecca emailed me with the link to her article.  There were 10 kids rooms she featured and you can find the Jungle room as #7 as you scroll through the pictures here: http://www.goodhousekeeping.com/love-your-space/themed-kids-rooms#slide-1

It’s a start…baby steps, and each step a rewarding leap!!

Thank you Rebecca!

“Watch” how these items can be made in no time!

Taylor
08 Mar 2015
Interior Design Room

I apologize that I don’t have any instructions for these items, but they only need a few materials….well, actually, you will need a lot of watch parts.

watch parts for mirror

When you go to auctions, at least auctions around where I live, I’ve picked up a lot of box lots of things from houses that are a mish mosh of whatever you can think of….kind of like someone’s junk drawer.  I scored on a box that was full of old watch parts.  Not sure why anyone had these many watch parts, maybe he was in the watch repair business, I don’t know, but I won the box…now what do I do with it?

Mirror made from watch parts

I knew I wanted to do a collage of some sort, and I wanted to make jewelry as well, so I sorted out piles and thought about my collage first.  A collage is nice for wall art, but if something can be functional as well, all the better.  I looked at my frame collection, thinking I could make a frame, then spied a plain round mirror and thought a rim of watch parts would turn this plain mirror into a “timeless” piece to hang on the wall.

Putty used on shell mirror

I again turned to my Laticrete mastic adhesive that can be found in any Home Improvement store, and I scooped out some and put into a container and added a few drops of black acrylic paint, stirred it to a nice gray color.  I worked small sections on the mirror rim at a time, spreading the putty with a putty knife thick enough to set the watch part in but not too thick that it oozed up and the watch part got lost.  I also layered parts on top of parts using just a little of the putty under each piece enough to hold it.  Read the drying instructions from the putty container before trying to hang.    The small mirror was hung mixed with other frames and art on the wall and looked great!

Watch part flower stem

For the flower stem, I used lots of different found objects.  I broke off the metal leaves from a wall piece that was past its prime and curved the stems to loop through an old metal gear part (you could use anything that is small and has holes, preferable round) For the stem, I had an old metal spatula that I removed the flipper part with metal cutters leaving a small square area that I folded over to wire the flower head to.  I had found some metal wire covering tube called loom, I think, that was rusted and I have no idea what it was off of, but I liked how I could bend it as leaves and wired them to the stem.  The face of the flower was a broken pocket watch that was used as is and wired to the gear part.  For the stamen of the flower, I used a pinch of wire shavings, just tucked it in and let it hang. This flower has more of a steampunk feel to it, and I mixed the flower in as a “timeless” bouquet.

Watch part floral stem in bouque

Keep “watch” for any loose parts of things laying around, they could be the perfect component to add on a mirror,  frame or box for a new functional use or as a decorative piece.   Some things so simple can take no “time” at all!

To receive posts via email click HERE Subscribe in a reader or signup in Subscription box in sidebar.


Sea Shells far from the Sea Shore…..A mirrored view

Taylor
02 Mar 2015
Bathroom, Craft Project, Custom Design, DIY, Interior Design Room, Repurposed
Baldwinsville NY, beadboard, box, Clay NY, consultation, contemporary, custom, decorator, designer, DIY, eclectic, Home Interior Designs, Liverpool NY, mastic adhesive, mementos, mirror, Phoenix NY, repurpose, reuse, shells, Syracuse NY, TayRose Design, white paint

One can’t say enough about shells….their shapes; colors; and sizes from a tiny spiral to a large conch- shells have been a part of decorating through out history.  Shells add beauty whether displayed in a dish, or on a shelf or, in my case, adhered to an old mirror.

vintage shell mirror in shop

I have 2 examples of mirrors and a memento box that I have made that changed their entire look just by adding shells.  On one mirror,  I painted the shells, and the other, I left the shells in their original colors.   Both I feel have done shells proud…

The first mirror I had a large oval gold-painted mirror that had some rose bas relief along the rim but only in a few places so I wanted to fill in the whole rim to make the mirror more sculptural looking.

oval gold mirror before shell addition


Whenever I see shells at garage sales, or thrift stores, I try to scoop them up for I know they will be used one day, in one way or another.  Or I just admire them in a bowl or jar- reminded of the waves from whence they came.

shells in bowl


I used a putty type product called Laticrete to apply the shells to the rim, working in small sections so the adhesive wouldn’t dry out too fast.

Putty used on shell mirror

It’s waterproof and used to set tiles.  It has a creamy consistency and I used a putty knife to apply then set the shells into the soft putty.

putty in shells on mirror

After the putty was dry, I decided to paint the mirror plus the shells in white, with several coats, using up some white paint I had leftover in my basement.

painted shell mirror white


I thought white was an appropriate color, where I could envision the mirror in a beach house at the Cape, or in a contemporary loft in the City, or cozied up Shabby Chic style in a vintage cottage.   I love the mirror in white, it’s so sculptural with the shells, and you really have to walk up and look closely to verify they are shells, which makes it all the more interesting.

For the 2nd mirror, I decided to keep the shells in their original forms, and I again used putty to attach the shells, but I added some black acrylic paint to the putty to darken it to a gray color so the shells would stand out more.  I also painted the inside rim in black so the shell color would pop, and give a nice contrast rim around the mirror.

colored shell mirror rim

I worked with the putty in small sections at a time, fitting shells and adding tiny shells into small openings, filling as many gaps as I could find with more shells. This mirror was in pretty bad shape, so by covering it with the shells, the life was saved with a little hint of it’s history at the top.  The mirror too is timeless, and really fits into any style of decor be it eclectic to contemporary.  It has found a spot in my bathroom, and if I tire of it there, it will find another wall in the house to be appreciated.

colored shell mirror on bath wall

(And yes, the mirror is hanging on some bead board that I painted the wall color and then hand painted the seams of the bead board slats in gray….call me crazy, but for this accent wall in the bath, it works really well and didn’t take all that long to do.)

The last piece I did with shells, but certainly not the last piece I will use shells on, was a memento box I had covered in shells as a card box for my wedding.  This box now holds trinkets and memories and the shells encircled a favorite photo of ours on the lid.

shell memento box

Shells will always be a part of my home decor, and though I may not live by the seashore, the sea is remembered by the tiny treasures found on beaches and in thrift stores that share their natural beauty… off shore.

closeup shell memento box

To receive posts via email click HERE Subscribe in a reader or signup in Subscription box in sidebar.

Who doesn’t like a tree in the shower?

Taylor
23 Feb 2015
Interior Design Room

The trends for bathrooms it seems, is that they keep getting larger and larger with huge walk in showers, steam rooms and even spa lap tubs. Gone are the large whirlpool tubs that take forever to fill up, they cool off quickly and in most cases, hard to get into safely. In comes the large walk in showers….walk in, as in no door, just walk in to one end with usually 2 or more shower heads, body sprays, benches, niches and even full length windows.
Master shower in Parade of Homes 2014 TayRose Design

I don’t think I would miss a shower door actually, and this new trend in showers makes the most of one whole wall in a bathroom. I was fortunate to have designed the tile layout for one such shower in a master bath, and I knew I wanted something dramatic….not that this huge shower with full length glass windows wasn’t enough drama, I wanted more..

Master vanity in Parade House 2014 TayRose Design

The builder uses Cambria Quartz products for his countertops, islands, and fireplace surrounds, and since I had to choose the colors for the vanity top and threshold to the shower, I went to the showroom to see what pattern would best fit with design palette I was working with. While in the showroom waiting for the salesperson to come, I noticed they had the Cambria mascot, a dragon, inset like a mosaic into a piece of Quartz. My aha moment, there was the drama I was looking for…a mosaic of some kind in the shower. I was jittery from excitement to discuss the possibilities with the salesperson…yes, they could do it…they have never done one in a residential install before…I would just have to supply the template…..whoa-what? I would have to make the template? I was thinking of a 5’8″ tree with leaves on the entrance wall all in different quartz patterns…a mosaic that will be showcased, and not inexpensive, and I have to draw it? All of a sudden my jitters burst like a balloon!

I couldn’t get this idea out of my head, and once something is in my head and won’t leave me alone, I know I have to find a way to make it work. Step in my artistic friend, Amy. I called Amy up and described the idea and she was ready to try. Oh, did I mention, we were on a deadline too, the showroom needed the template asap for they had to put it into production in order to get it finished to be installed before the opening…no pressure here!

Making tree template for shower mosaic

I cut down several large cardboard boxes that I had in the garage and drew a simple outline of a tree and a simple leaf pattern to use. I’m not good with scale, so I knew Amy would be able to help me with that. We spread out the cardboard on Amy’s living room floor and she did her magic, scaling the tree to the perfect proportions. Then there were the leaves- drawing them then cutting them out so the template would work. I decided on 3 different Quartz patterns to make up the leaves and the tree. After several attempts of figuring out which color would go where with duplicate leaves, we had our template ready. That template was like gold…being oh so careful not to rip it, bend it or loose any of the leaves.

leaf cutouts for tree template shower mosaic

After dropping off the template to the showroom, the cutter had me go back into the design room while he scanned the template into his computer. There it was, up on the screen, and we sat and tweaked a couple of the leaf placements and it was set to go into production. Once I signed off on the design, out on the factory floor they have these huge machines that are cutters run by a computer.  They lay the large slab of quartz on top of the machine, then the cutters cut out the pattern in the quartz from the template design.  The machine not only cut out the tree design into the large slab of quartz, but it also cut the tree and leaves from different colored slabs of quartz so the those pieces fit into the outline shape in the large quartz slab like a puzzle.   All inlaid as one piece when finished. I have never been so nervous about anything like this for a long time-you know how you envision something in your head, and pray that it will turn out the same? Well, I was praying up until the last leaf was placed in the shower wall. There went that burst balloon feeling again only this time it was the breath I had been holding for hours as they carried the slab up a flight of stairs with 4 guys, passing just painted corners and newly installed doors to the Master bath.

tree mosaic in shower wall

Hallelujah! It fit perfectly and looks amazing! Did I say, ah-may-zing? Oh yes!

Master bath Parade 2014-7986

I picked the field tile and floor tile to be subtle and soft to not compete with the star of the room… the tree. The tree is tucked on the entrance wall of the walk in tiled shower and a glimpse can be seen from the full length windows to the shower.  I picked a tree for the mosaic design for it was universal and most people like trees plus it wasn’t something too specific…just simple…and amazing..ha!

Master bath mosaic tree Parade 2014-

It definitely was something unexpected, which I love to do…it was something that Cambria had never done before, and now they can say they have, which I’m glad, and it is a special unique detail for the homeowner to enjoy, which is most important.

So, from the reactions of thousands of patrons who visited this show home, I think many people like having a tree in the shower, wouldn’t you?

To receive posts via email click HERE Subscribe in a reader or signup in Subscription box in sidebar.

Taylor Regal in Phoenix, NY on Houzz

“Rev” Up your Home Decor with Car Parts!

Taylor
21 Feb 2015
Art, Custom Design, DIY, Interior Design Room, Repurposed
Baldwinsville NY, Clay NY, coil, consultation, crankshaft, custom, decorator, designer, DIY, Home Interior Designs, junkyard, Liverpool NY, Man Cave, mirror, Phoenix NY, repurpose, reuse, side table, spring, Syracuse NY, tassel, TayRose Design, vase

I  have been known to find “art” in the most unexpected places.  I was designing a showcase home, to show how furniture and wall art can be made by using everyday items; thrown out items; stuff that was found at  the curb; or in thrift stores.  I didn’t have far to go for this design plan….

Have you ever been to a Pick & Pull?  Oh boy, first be sure you wear your grungy clothes and shoes, bring gloves and I didn’t know this, but be aware that prices are not cheap for many items.  That was my biggest surprise.

I wandered up and down aisles of discarded cars, smashed up cars, and parts laying on the ground.  It was eery walking around all of those car shells…. what stories they would tell-not good ones in most cases.

As I turned a corner, I saw this awesome sculptural piece of metal just sitting in the middle of the aisle like it was saying, “hey, here I am, just what you were looking for!”    I had no idea what part of the car it was, it was heavy, but I could still carry it, (oh, btw, you have to carry everything out yourself!)  The piece had beautiful rusty patina, and I thought it would serve perfectly as a side table base.  Now, if I could just carry it to the check out counter!

crankshaft piece from junkyard

I also found I think it was called an air cleaner that was metal, and I thought I could turn that piece into a wall art design.  So, I dragged my pieces to the checkout counter, had a bit of a sticker shock (I was very naive to costs, I thought being a junkyard it would be pennies to the pound or something similar…..oh no, more like $’s to the pound)  Anyway, I was happy with my purchases and now to get to work on creating my vision.

air cleaner mirror & vase

I started with the air cleaner.  I don’t have pictures of the process, but I can briefly tell you about it.  The air cleaner was black already, but I cleaned it up and spray painted it black again just to keep any rust at bay.  I found a round piece of mirror at the Dollar Store and glued it under the opening that was in the middle, then positioned it on the wall with the “arm” facing up so I could put some dried floral, then hung a tassel to complete the look.  This piece was for my client’s entry where we hung metal siding on one indented wall, then had a bench with custom pillows. He was thrilled- he loved the whole industrial look especially since being a race car driver, having car related “art” was what he had hoped for.

car coil vases

I also used some large coiled springs from his garage to place on both sides of the fireplace.  I inserted  large glass vases to hold floral sprigs.

For the side table, I found out that I had picked up a crankshaft from a car, and by turning it on end vertically, I was able to put a round glass top and bolt it on to a wooden round disk, found at Home Depot that I stained a dark brown.  I had cleaned up the crankshaft removing the grease, then sprayed it with a satin clear coat spray.  Super simple, and so interesting looking.  Being a small table, this table fits just about anywhere.  I love how something so industrial works inside a home.  This table would be perfect for a Man Cave, or set as I have it, in a corner next to a chair.

crankshaft table TayRose Design

Pick and pull parts from lots of sources to create unique items, and “Rev” up your decor!
To receive posts via email click HERE Subscribe in a reader or signup in Subscription box in sidebar.

  • 1
  • 2
  • 3
  • 4
  • 5
  • 6
  • 7
  • 8
  • 9
Recent Posts
  • Owl Inspired Theme Toddler Bedroom
  • Painted trunk blends with Decor
  • Create a “trunk” inspired look for a Nightstand
  • Decorate fireplace wall “naturally” on a budget
  • How to Inspire Design with Pinterest Photos
Archives
  • February 2018
  • January 2018
  • October 2016
  • January 2016
  • June 2015
  • April 2015
  • March 2015
  • February 2015
  • January 2015
  • December 2014
  • November 2014
  • June 2014
  • May 2014
Newsletter subscription form

Enter your email address:

Delivered by FeedBurner

Categories
  • Art
  • Bathroom
  • Craft Project
  • Custom Design
  • Dining Room
  • DIY
  • Entry
  • Holiday
  • Interior Design Room
  • Kids Room
  • Kitchen
  • Living room
  • Master Bedroom
  • Mudroom
  • Office
  • Repurposed
  • Theme Room
Houzz
Remodeling and Home Design
Instagram
Instagram
HomeTalk
Featured on Hometalk.com
Follow me on Facebook
TayRose Design

Promote Your Page Too
315.224.4142
© 2014 k.linndesign. All Rights Reserved.