• Shop
    • Antiques
    • Home Decor
    • Jewelry
      • Necklaces
      • Bracelets
      • Earrings
      • Rings
      • Pins
    • Upcycled handmade
      • upcycled womens tops
      • upcycled womens jackets
      • Upcycled womens pants
      • upcycled pillows
      • Upcycled Pickleball Shirts
      • upcycled purses
    • MacKenzie-Childs
      • MacKenzie-Childs Taylor Dinner Plate
      • MacKenzie-Childs Taylor Luncheon Plate
      • MacKenzie-Childs small oval dish
      • MacKenzie-Childs Taylor Bread & Butter
      • MacKenzie-Childs Taylor Mugs
      • MacKenzie-Childs Taylor Saucers
      • MacKenzie-Childs Taylor Breakfast Bowls
      • MacKenzie-Childs Taylor Berry Bowl
      • MacKenzie-Childs Taylor Chowder Bowls
      • MacKenzie-Childs Wallcourt pieces
      • MacKenzie-Childs Enamelware
      • MacKenzie-Childs Torquay dinnerware
      • MacKenzie-Childs MacLachlan Dinnerware
      • MacKenzie-Childs Taylor Serving Ware
      • MacKenzie-Childs Glass Goblets
      • MacKenzie-Childs glass tumbler
      • MacKenzie-Childs Glass Serving pieces
      • MacKenzie-Childs Decor pieces
      • MacKenzie-Childs Placemats & Coaster sets
      • MacKenzie-Childs Paper Products
      • MacKenzie-Childs Tile
    • Shoes
  • Home
  • About
    • I believe…
  • Gallery
    • Custom Design
    • Interior Design
      • Bath
      • Bedroom
      • Dining Room
      • Entry Way
      • Kitchen
      • Laundry
      • Living Room
      • Office
      • Mudroom
      • Themed Rooms
  • Color CCE
  • Services
    • Services
    • Design Process
    • New Construction
  • Journal
    • DIY
    • Repurposed
    • Art
    • Interior Design Room
    • Holiday
    • Theme Room
  • Press
  • Contact

Quick and Easy Burlap Christmas Stocking with Pom-Pom Toe

Taylor
07 Dec 2014
DIY, Holiday, Repurposed
burlap, buttons, Christmas, Handmade, pom-pom, repurpose, stitching, stocking, TayRose Design


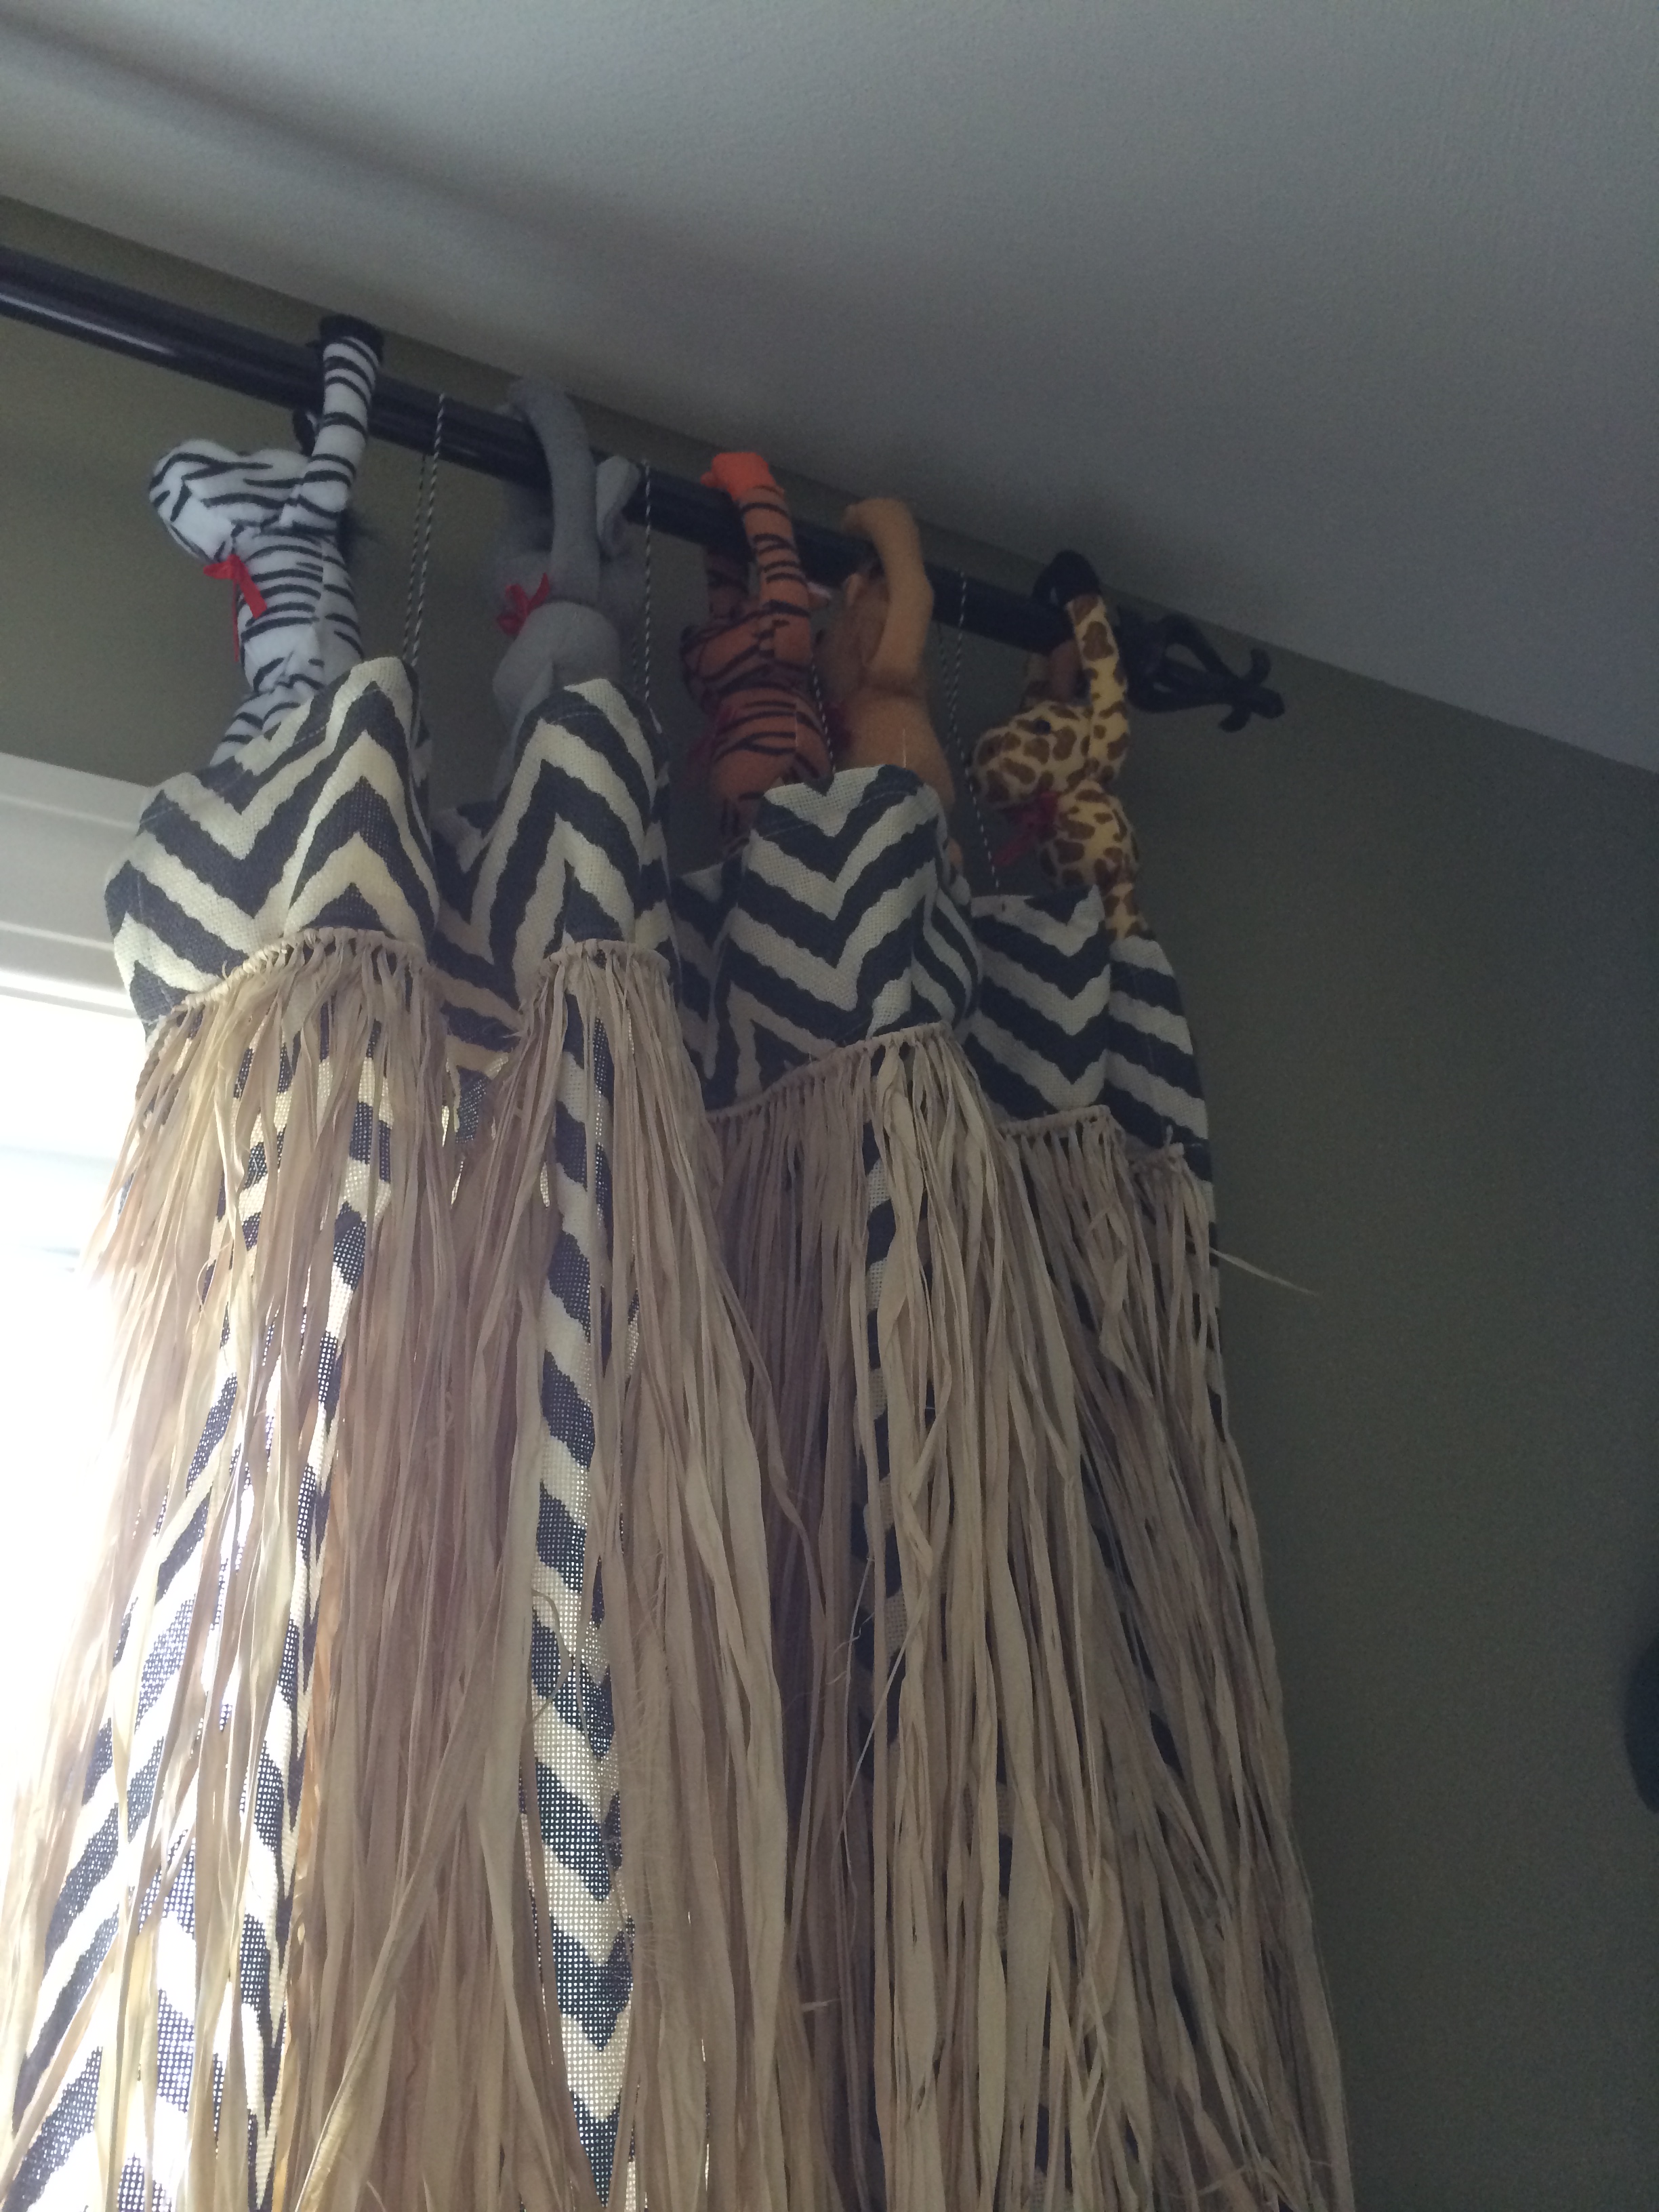
I had a request for a tutorial on how to make my quick and easy Burlap Christmas stocking.  The instructions are listed below, but first, a little background.

Burlap Christmas Stocking with pom-pom toe

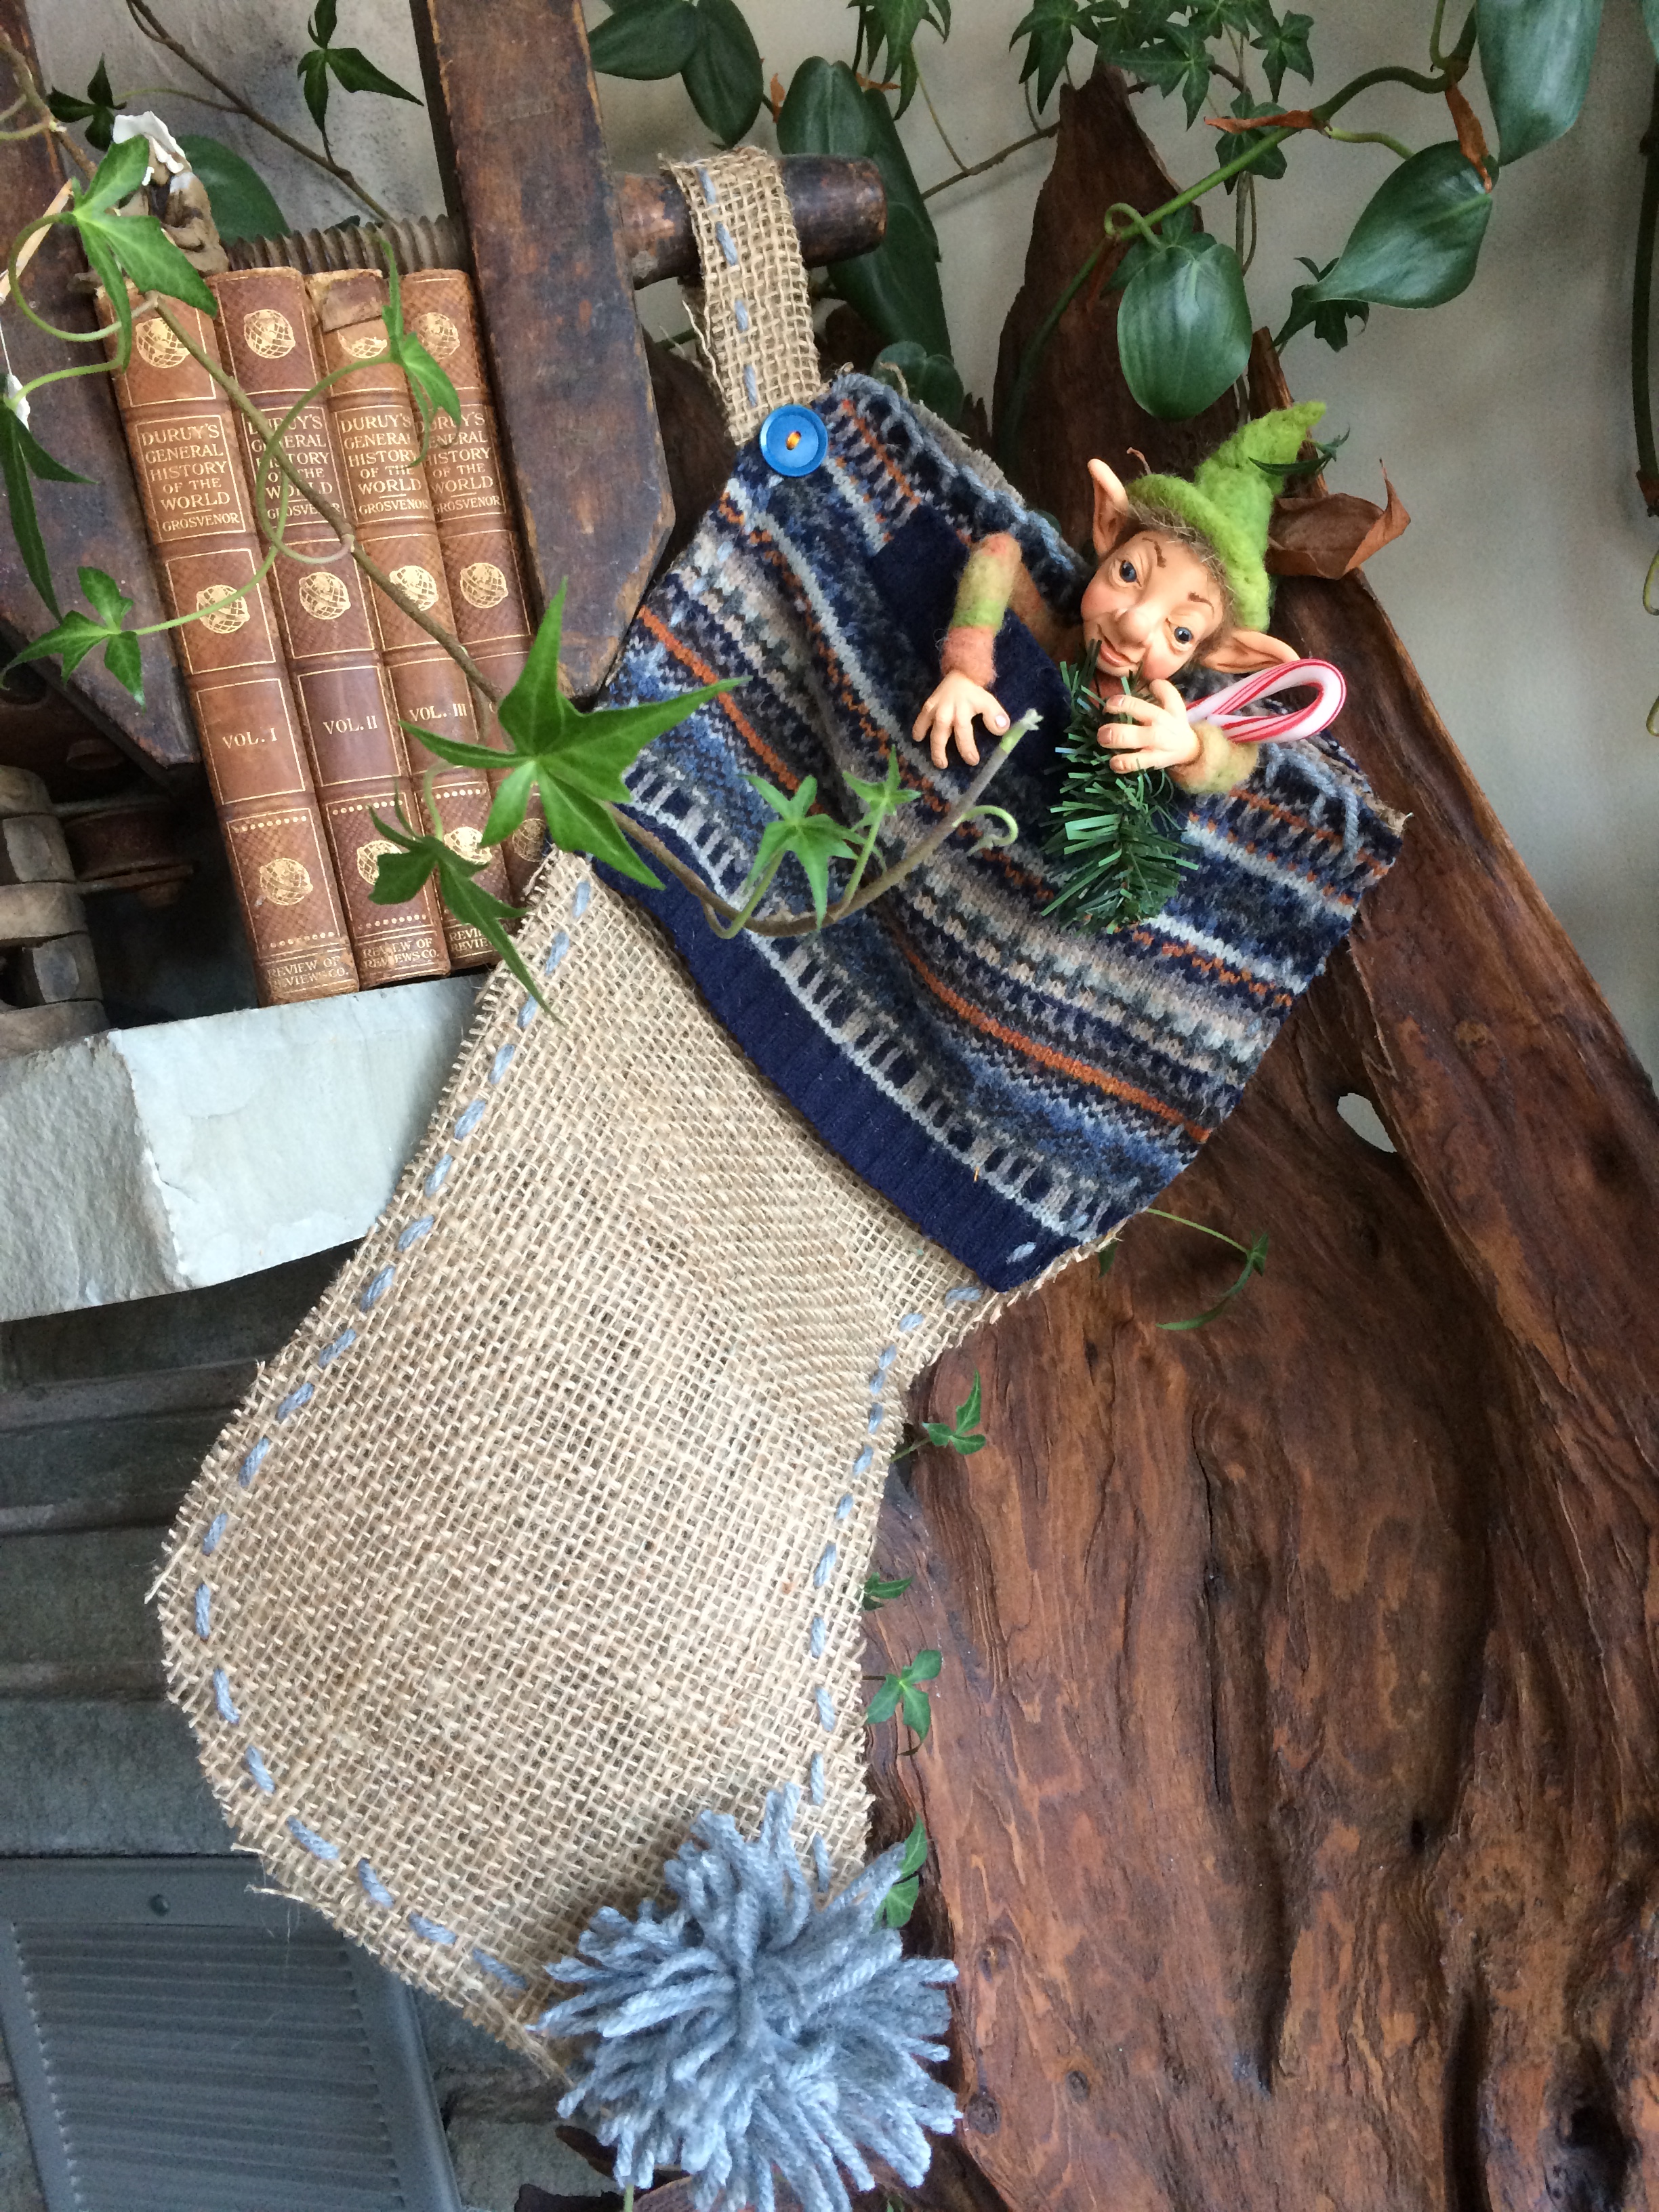
Quick and easy burlap Christmas stocking

I was at the shop,” Inspired”, in Liverpool, NY where I have many items that I have made, and some vintage finds.  My friend Judi and her husband purchased the shop about a year ago and I’ve helped them tear down walls, put up walls, sand, paint, help with workshops and fill it up with goodies.

Well this past week while I was working there, I like to bring something to work on to while away the time during slow periods…on this day I brought from home some 8″ wide burlap ribbon that I had purchased from Michael’s about a year ago and had used as garland for my Christmas tree last year and had a roll leftover.  I wanted something that would be quick and easy to put down in case a customer came into the shop.

Read more!

Inspired way to display earrings

Taylor
06 Dec 2014
DIY, Repurposed
decorator, display, DIY, earring display, earring holder, floorlamp, Handmade, Interior Design, repurposed, retail display, TayRose, TayRose Design

I’ve been rushing around to quickly make items to add to the shop both online and brick and mortar, and I had wanted another way to use up a lot of the paint chips I had laying around from my design business after working with clients.  I had already used some paint chips in wall art,(see my other post about the kite wall art), but I wanted to try something different that I hadn’t tried before, and that was jewelry.  Now, I’ve used paper in jewelry before here and there, recycling cereal boxes and butter tubs, but not paint chips.  So, with a handful of paint chips, rubber stamps, old postage stamps and beads, I started making some earrings.

I started with earrings, for I have never been able to wear all those beautiful dangle earrings and big bulky earrings, for the holes in my ears were placed too low and they are just too heavy to wear comfortably.  After I made my first paint chip pair of dangle earrings and tried them on…I was elated for it didn’t feel like I had anything in my ears!  This has opened up a whole new world for me!

So, here I was producing all these earrings, and I thought, how was I going to display them at the shop that would be creative, and fun, and warrant the quirky “ingredients” of these earrings?  For some reason, a lampshade popped into my head…yes, I could strip off the fabric, wire sections across the frame where I could clip the earrings to…brilliant…I love inspirations!

I just so happened to have an old floorlamp in my shed that I was one day going to rewire that was not very tall..more like eye level…perfect again…I just wired the shade onto the floorlamp after removing the socket that the glass shade was glued to, and voila, a perfectly inspired way to display the earrings that doesn’t take up too much space.  It would also work in a bedroom as well, I would wire a mesh fabric around the lampshade frame then hang the earrings on it.  Makes a great looking shade, HA!  To receive posts via email click HERE Subscribe in a reader or sign up in subscription box in sidebar.

Inspired earring display

Inspired earring display

Owls emerge from remnants

Taylor
16 Nov 2014
Art, Repurposed
fabric, Handmade, Home Decor, New York, one of a kind, owl, pillow, remnant, Taylor Regal, TayRose, unique

For the past couple of weeks, while trying to purge through piles of fabric remnants and trims, a thought came to me, why not take these remnants, and sew them up into “feathers” for owls to put on pillow covers and messenger bags. So, I drew up pattern pieces, and tried different ones as each owl emerged….I like the idea of each one being different, unique…taking on it’s own personality per se. I also love the concept of using up items I have laying around, spilling out of drawers, baskets, boxes up in my small sewing area to make room for other projects. I’m one for adding lots of detail…knowing unfortunately, that I will not be gaining any of my labor back when and if they sell, however, that doesn’t seem to daunt my efforts, for an item just doesn’t look finished unless some little detail is added (I’ve always loved accessorizing, so I guess this spills over into my designs)

Owl pillow from fabric scraps with buckles

Remnant Feathered Owl pillow

I love using different textures, and elements that make an item textural, 3D and with a little surprise thrown in…something unexpected.
I scrounge the thrift stores looking for feather pillow inserts that I remove from pillows and reuse at a really good price. Also, table runners make great pillow covers, or even messenger bags like the owl one I made that was found on the clearance rack with the jute loops just perfect for owl feathers!

Two owls perched on messenger bag

Two owls perched on messenger bag

Old zippers transformed into the beak and eyebrows, embroidery brought black felt circles to bright eyes, and buttons added another dimension to the pillow.
I bought a slew of purse patterns on sale that I hope to use to help me to cut a straight line and make good use of the remnants I have waiting for a purpose.
I’m always jumping from one project to another, and for now, purses and pillows are a new passion for me…soon I hope to get back to jewelry making now that I have organized all my bits and pieces.
I was able to sell one of the pillows 6 hours after posted on fb, and so glad it’s going to a good home!
Hoping to get more purses made and up in the store under Shop tab and Accessories. Also selling some in brick and mortar shop in Liverpool, NY called “Inspired” owned by my friend and her husband.   Read more!

Surprise hit of the Parade of Homes 2014 Pigliavento Builder Home

Taylor
16 Jun 2014
Art, Custom Design, DIY, Interior Design Room, Kids Room, Repurposed, Theme Room
Baldwinsville NY, Clay NY, consultation, custom, decorator, designer, DIY, Eregal Studio, Home Decor, Home Interior Designs, Interior Design, jungle, lion, Liverpool NY, netting, New York, Parade of Homes, Phoenix NY, Pigliavento, plush, raffia, repurpose, reuse, Syracuse NY, Taylor, Taylor Regal, TayRose, TayRose Design, theme room

It’s been a quick several months preparing for the Parade of Homes this year, in Clay, NY. Our builder got in to the Parade late, so he hit the ground running in March to have the 3,100 sq.ft home finished by June 5th. After strange weather, and having to re-varnish the red oak floors twice due to humidity changes, which pushed back the furniture delivery, I had just a mere week to furnish the whole house…but did it with a little time to spare.

Model Home Parade of Homes 2014, Clay, NY

2014 Parade of Homes model, Pigliavento Builders, TayRose Designer, Clay NY

I had an intern helping me from a local College, plus the builders wife for a day helping to hang wall art etc. So glad I had them!

Intern helping during Parade of Homes TayRose Designer

Intern helping at Parade of Homes TayRose Designer

The Realtors wanted interior photos the day the furniture arrived, so I managed to delay them a day while we rushed to make at least the major rooms photo ready….whew!

The house colors were inspired by a pillow, and I based the outside siding, stone, and interior colors with that pillow so everything felt connected in a way.

The kids rooms I always individualize, for kids all have their own personalities, so this year I did a nursery,

Nursery at Parade of Homes 2014 Clay, NY

Nursery designed by TayRose for Parade of Homes 2014, Clay, NY

A sports themed teen room, with handmade sports equipment headboard and pallet bed

Sports teen theme bedroom for Parade of Homes 2014 TayRose Designer

Sports themed teen room for Parade of Homes, Clay, NY 2014 TayRose Designer

Of all the rooms this year, the hit was the boys Jungle Room.

That room has had everyone giggle, and leave with a smile on their face. It was also the most fun and easiest room to complete. My husband even burned the song, “The lion sleeps tonight” on a cd for me to play continuously as background music in the room.

Jungle Room at the 2014 Parade of Homes

It’s a Jungle in here! Parade of Homes Pigliavento Builder, TayRose Designs

The ceiling fan makes the giant Ikea leaves sway up and down to the beat of the music. So fun! The arbor was made with old ladders and planks for the top. Raffia table skirting for bed skirt and around window panels.

Jungle Room

Jungle Room large leaves swaying for the 2014 Parade of Homes Pigliavento Builder, TayRose Designs

Plush animals with velcro feet hold up the curtains while hanging on the curtain rod.

Jungle room wild curtains

Jungle curtains with plush animals curtain “hooks” and raffia accent

Hand painted dresser using animal print in lettering on drawers by 1829 Farmhouse/Inspired.

Jungle Room crate dresser for 2014 Parade of Homes

Jungle Room animal crate designed dresser by 1829 Farmhouse for TayRose Designs Parade of Homes 2014 Clay, NY

A reading nook with handmade coffee bag cushions, an electric lantern and netted tent in the corner, brings a safari feel while sharing a story with a friendly tiger.  To receive posts via email click HERE Subscribe in a reader or sign up in subscription box in sidebar.

Reading nook in Jungle Room 2014 Parade of Homes TayRose Designer

Reading nook in Jungle Room 2014 Parade of Homes TayRose Designer

Changing up a dated dresser set

Taylor
13 May 2014
Custom Design, DIY, Master Bedroom
Baldwinsville NY, Clay NY, consultation, custom, decorator, designer, DIY, dresser, hardware, Home Decor, Home Interior Designs, Interior Design, Liverpool NY, Phoenix NY, repurpose, repurposed, reuse, staining, Syracuse NY, Taylor Regal, TayRose, TayRose Design, upcycle, update

Seven years after I got married, and while my husband was out of State on a golfing trip, I thought it was time to give his bedroom set from before we were married, an updated look. I didn’t want to paint it, for I couldn’t make up my mind on the color, and I didn’t want to shock my husband too much upon his return.

Makeover Bedroom dresser Before

Light Oak colonial look before sanding.

So, I opted to stain the drawer fronts and change the hardware. I think the hardest part was getting the drawers out…they were tough little buggers!

Bedroom dresser drawer fronts sanded

During stages of sanding and staining dresser fronts

After sanding off the poly on the drawer fronts and wiping off the sawdust, I used some stain that I had on hand, and with a rag, rubbed on the darker color.

It was love at first sight! I loved the 2 tones and with the new hardware, it transformed the whole look. I let the first coat dry for several hours and applied the 2nd coat, then brushed on a matte poly.

Finished Stained Dresser

Dresser after drawer fronts stained with new hardware

Since the previous pulls were a size that was difficult to find, I chose to use 2 small round knobs in place of a pull, and really liked the look.

After tackling the dresser, I did the high boy chest, and the 2 night stands. I still have to figure out what to do with the bed headboard and footboard, but that will be another day. I’m just glad my husband liked the results of the dressers when he returned. 🙂  To receive posts via email click HERE Subscribe in a reader or sign up in subscription box in sidebar.

  • 1
  • 2
  • 3
  • 4
  • 5
  • 6
  • 7
  • 8
  • 9
Recent Posts
  • Owl Inspired Theme Toddler Bedroom
  • Painted trunk blends with Decor
  • Create a “trunk” inspired look for a Nightstand
  • Decorate fireplace wall “naturally” on a budget
  • How to Inspire Design with Pinterest Photos
Archives
  • February 2018
  • January 2018
  • October 2016
  • January 2016
  • June 2015
  • April 2015
  • March 2015
  • February 2015
  • January 2015
  • December 2014
  • November 2014
  • June 2014
  • May 2014
Newsletter subscription form

Enter your email address:

Delivered by FeedBurner

Categories
  • Art
  • Bathroom
  • Craft Project
  • Custom Design
  • Dining Room
  • DIY
  • Entry
  • Holiday
  • Interior Design Room
  • Kids Room
  • Kitchen
  • Living room
  • Master Bedroom
  • Mudroom
  • Office
  • Repurposed
  • Theme Room
Houzz
Remodeling and Home Design
Instagram
Instagram
HomeTalk
Featured on Hometalk.com
Follow me on Facebook
TayRose Design

Promote Your Page Too
315.224.4142
© 2014 k.linndesign. All Rights Reserved.