• Shop
    • Antiques
    • Home Decor
    • Jewelry
      • Necklaces
      • Bracelets
      • Earrings
      • Rings
      • Pins
    • Upcycled handmade
      • upcycled womens tops
      • upcycled womens jackets
      • Upcycled womens pants
      • upcycled pillows
      • Upcycled Pickleball Shirts
      • upcycled purses
    • MacKenzie-Childs
      • MacKenzie-Childs Taylor Dinner Plate
      • MacKenzie-Childs Taylor Luncheon Plate
      • MacKenzie-Childs small oval dish
      • MacKenzie-Childs Taylor Bread & Butter
      • MacKenzie-Childs Taylor Mugs
      • MacKenzie-Childs Taylor Saucers
      • MacKenzie-Childs Taylor Breakfast Bowls
      • MacKenzie-Childs Taylor Berry Bowl
      • MacKenzie-Childs Taylor Chowder Bowls
      • MacKenzie-Childs Wallcourt pieces
      • MacKenzie-Childs Enamelware
      • MacKenzie-Childs Torquay dinnerware
      • MacKenzie-Childs MacLachlan Dinnerware
      • MacKenzie-Childs Taylor Serving Ware
      • MacKenzie-Childs Glass Goblets
      • MacKenzie-Childs glass tumbler
      • MacKenzie-Childs Glass Serving pieces
      • MacKenzie-Childs Decor pieces
      • MacKenzie-Childs Placemats & Coaster sets
      • MacKenzie-Childs Paper Products
      • MacKenzie-Childs Tile
    • Shoes
  • Home
  • About
    • I believe…
  • Gallery
    • Custom Design
    • Interior Design
      • Bath
      • Bedroom
      • Dining Room
      • Entry Way
      • Kitchen
      • Laundry
      • Living Room
      • Office
      • Mudroom
      • Themed Rooms
  • Color CCE
  • Services
    • Services
    • Design Process
    • New Construction
  • Journal
    • DIY
    • Repurposed
    • Art
    • Interior Design Room
    • Holiday
    • Theme Room
  • Press
  • Contact

Vintage Radio “Lights up” to a new tune

Taylor
08 Feb 2015
DIY, Interior Design Room, Office, Repurposed
Baldwinsville NY, bookcases, Clay NY, consultation, credenza, custom, decorator, designer, DIY, flicker bulb, Home Interior Designs, Home Office, lamp, Liverpool NY, Phoenix NY, radio, repurpose, reuse, Syracuse NY, TayRose Design, vintage

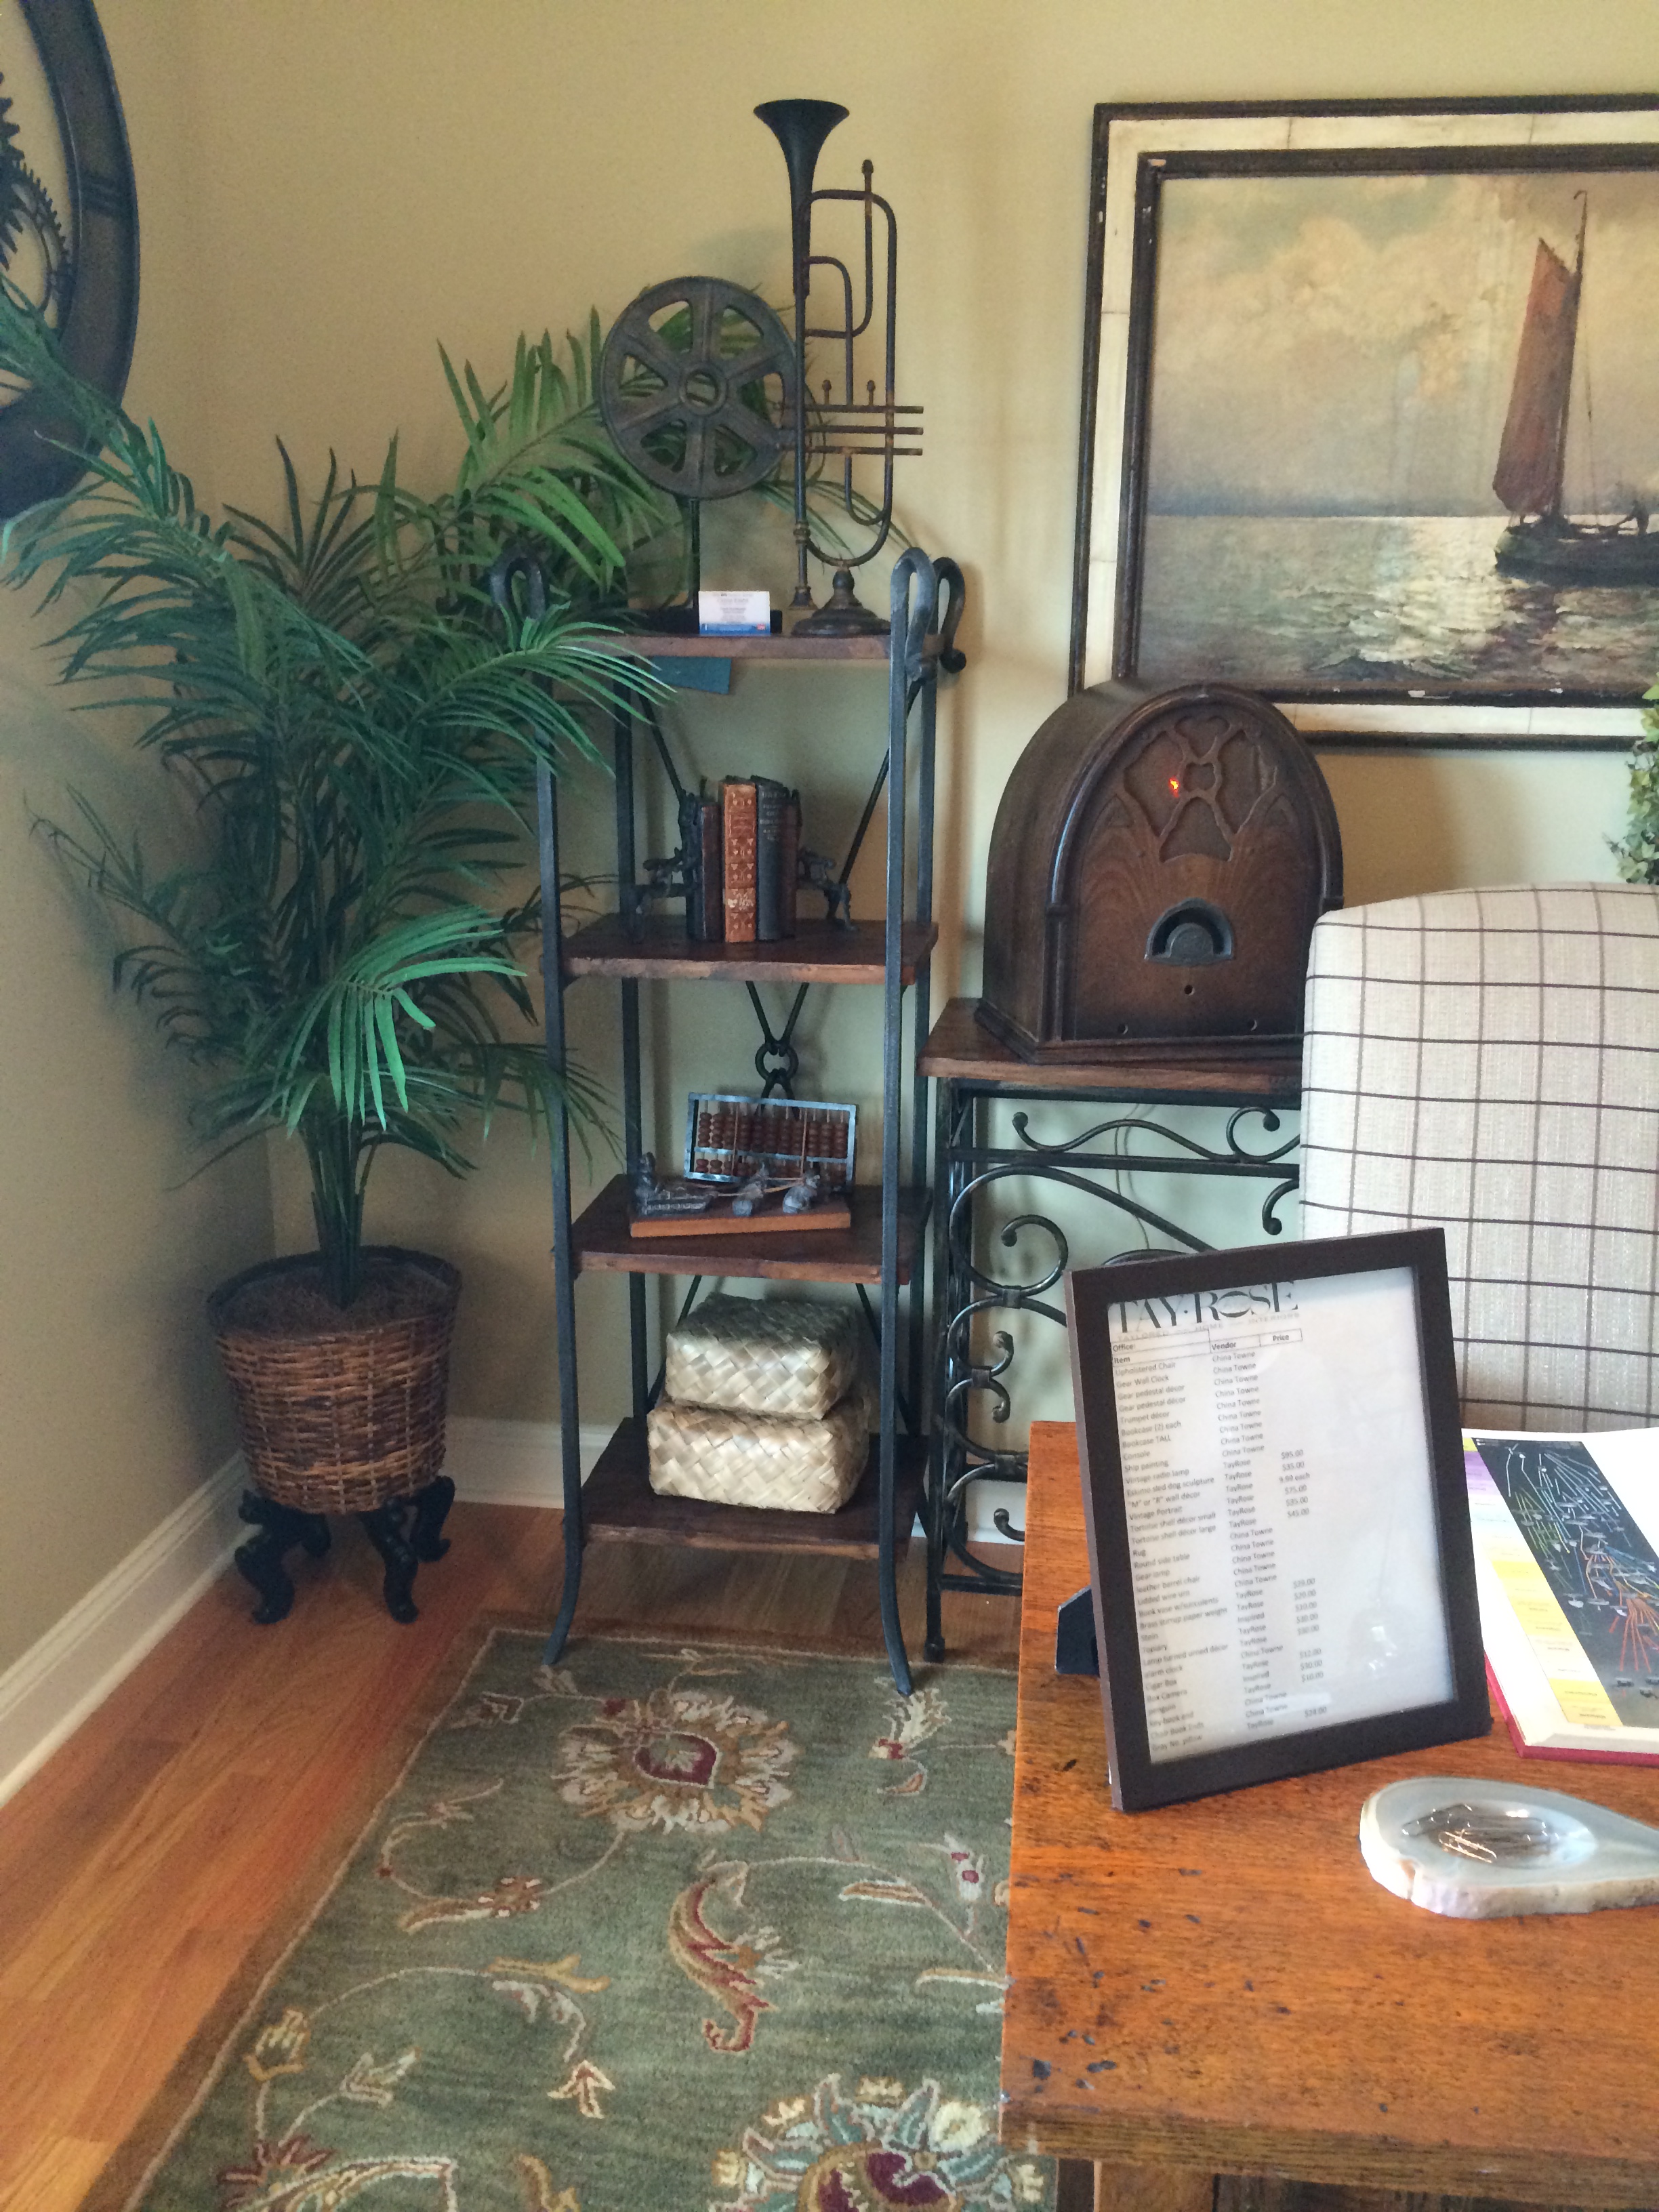
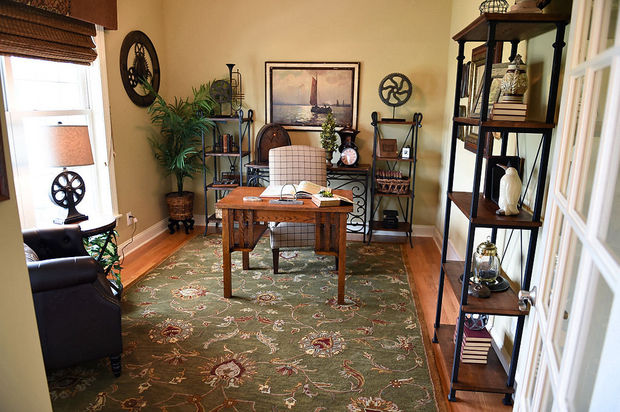
When I was designing this  home office, I was thinking about what I could put on the credenza that was going to be on the wall behind the desk.

office at Parade of Homes 2014 TayRose Design

At an auction I spied an old radio shell.  I loved the arched lines and vintage speaker fabric amazingly, in fairly good condition.  The knobs were missing, unfortunately, but I still thought I wanted to try and buy it and find a new purpose for this bygone piece.  I was able to get the radio, and it sat in my work room for a long time.  I even tried to sell it on Craigs List as is, but no one seemed to be interested.

old vintage radio shell


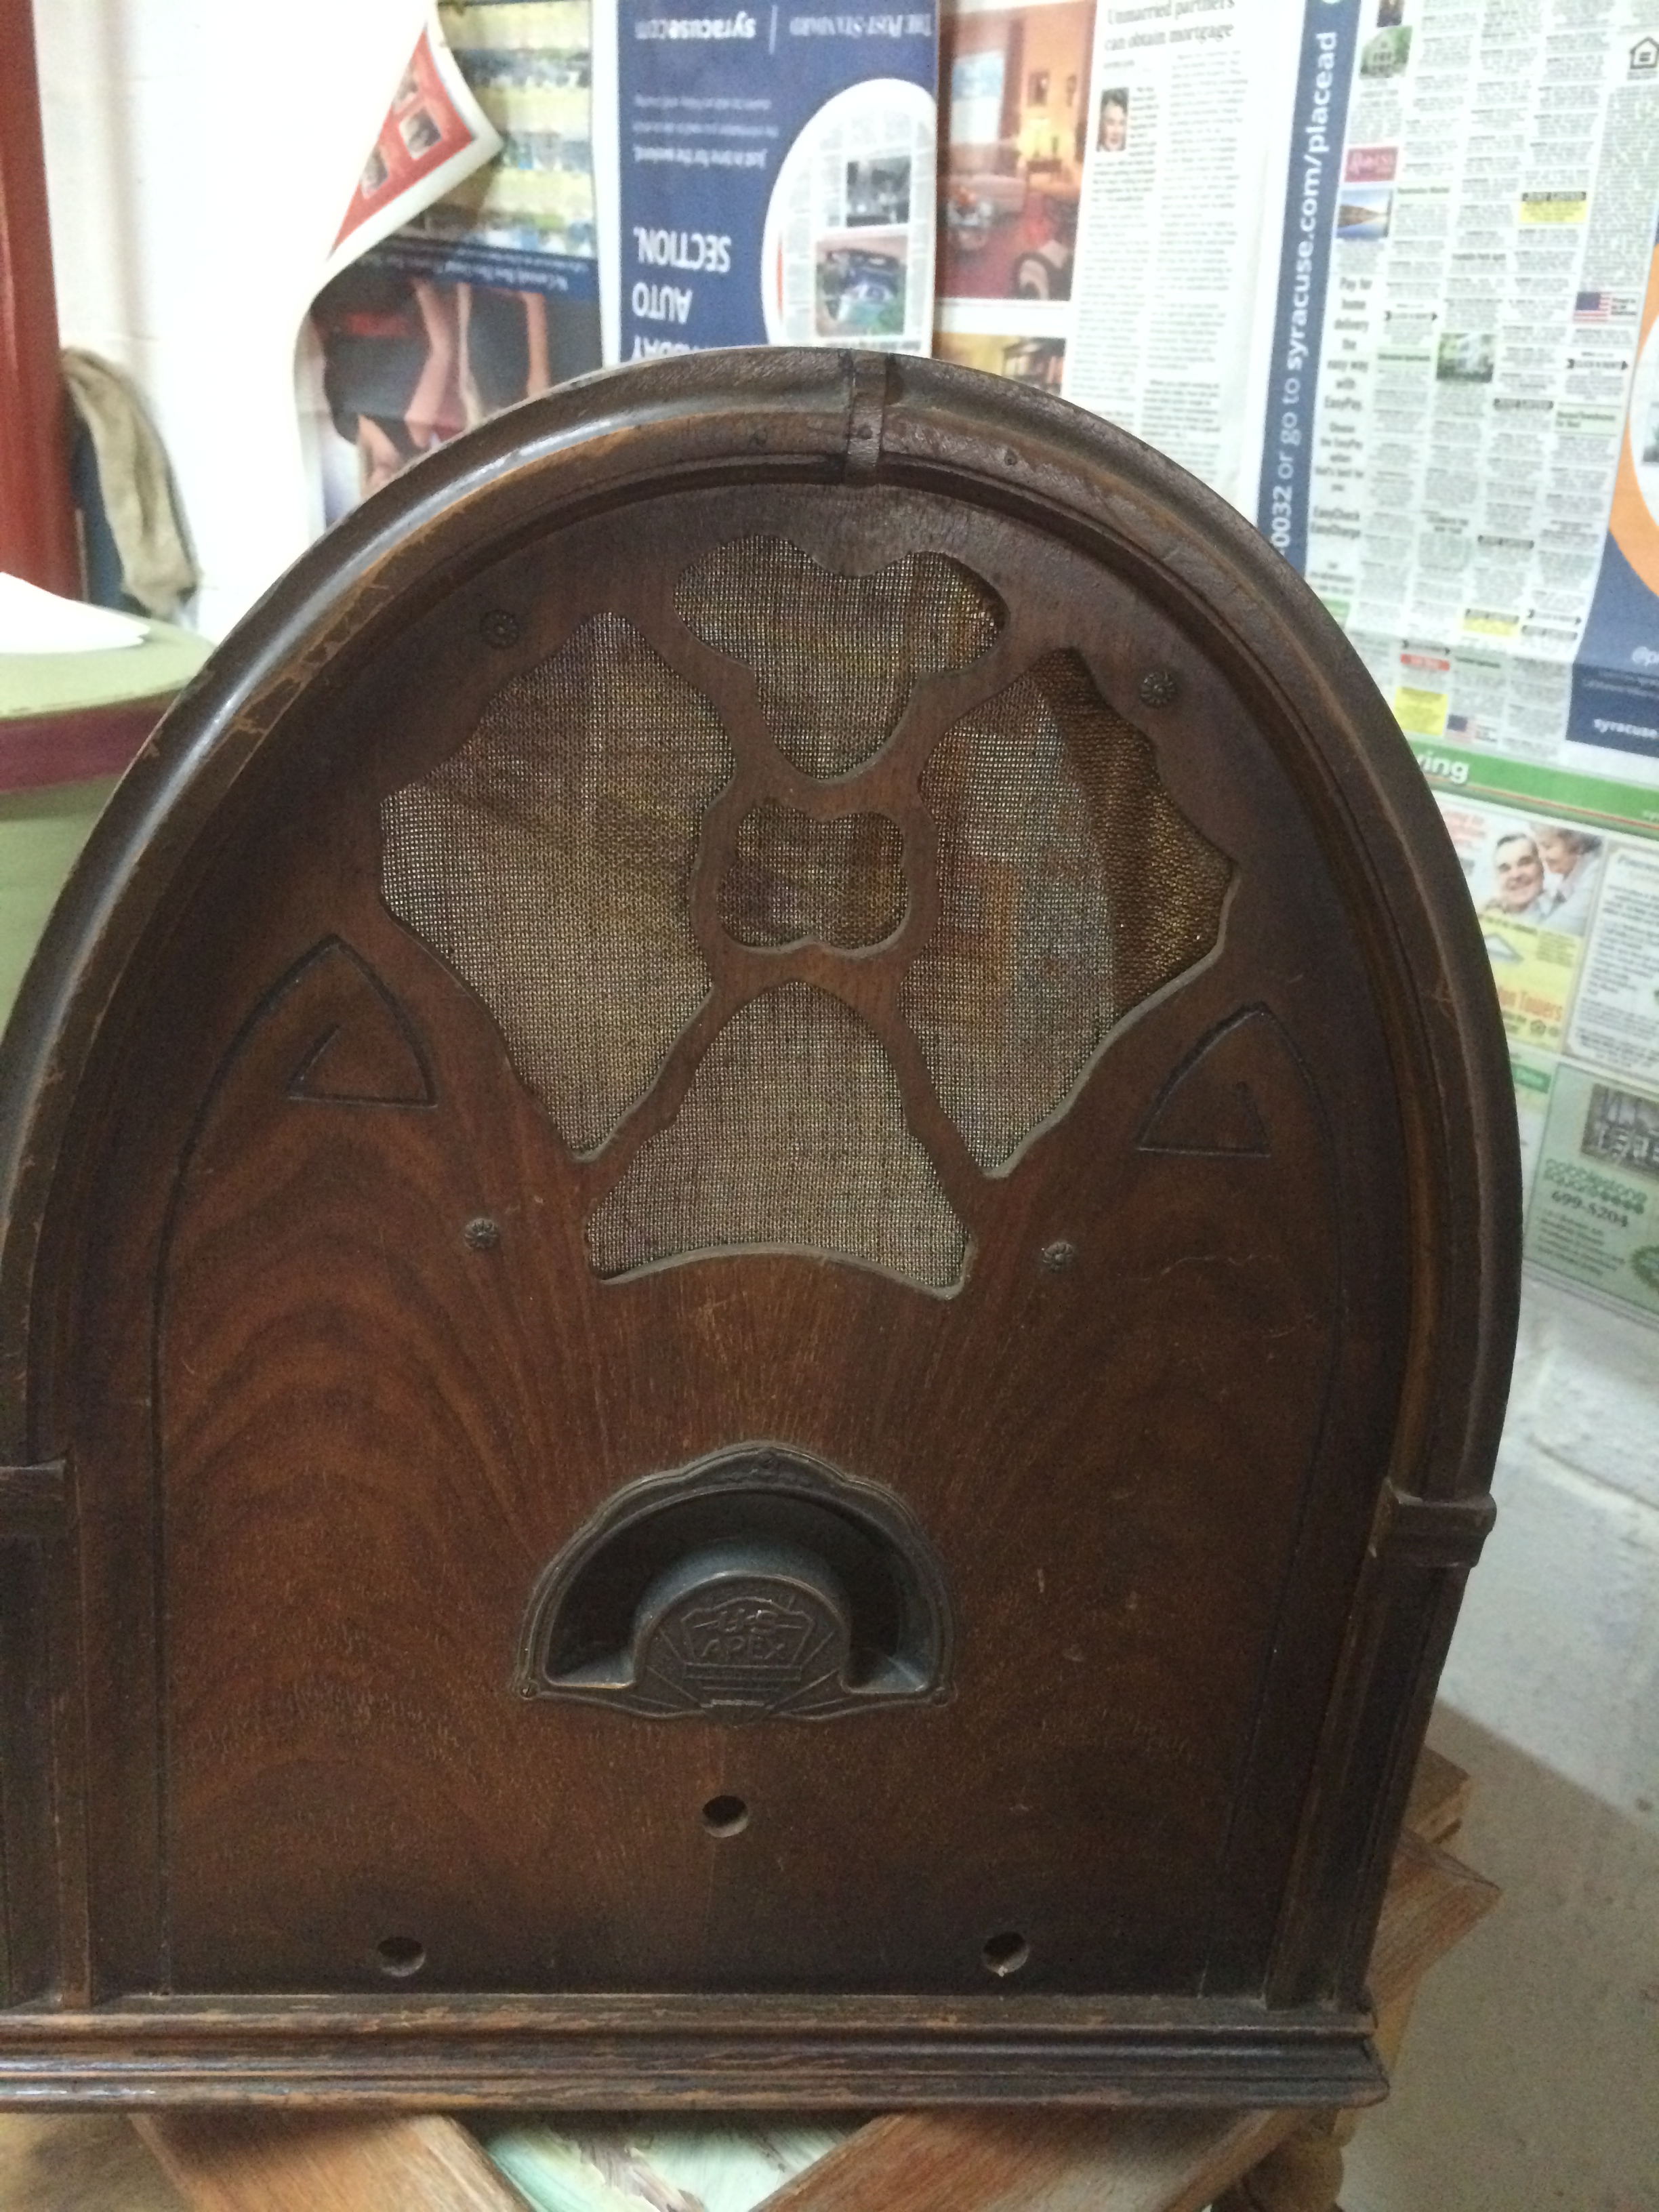
The design of the office was eclectic in feel, with framed old portraits, some beautiful turtle shells hung on the wall and wood with iron standing bookshelves.  There were old atlas books, and old cameras on the shelves, so when I remembered the old radio, I thought this would be a great addition to this office.  I didn’t want just the shell of a radio sitting there, I wanted it to have more of a purpose.  I looked at the back and removed the back panel of the radio….there was quite a bit of room in there, enough for a small lamp of some kind.  A lamp where the light could glow out through the speaker fabric on the front of the radio…and if the light flickered, like a candle….ooo so much the nicer!!

inside old radio shell

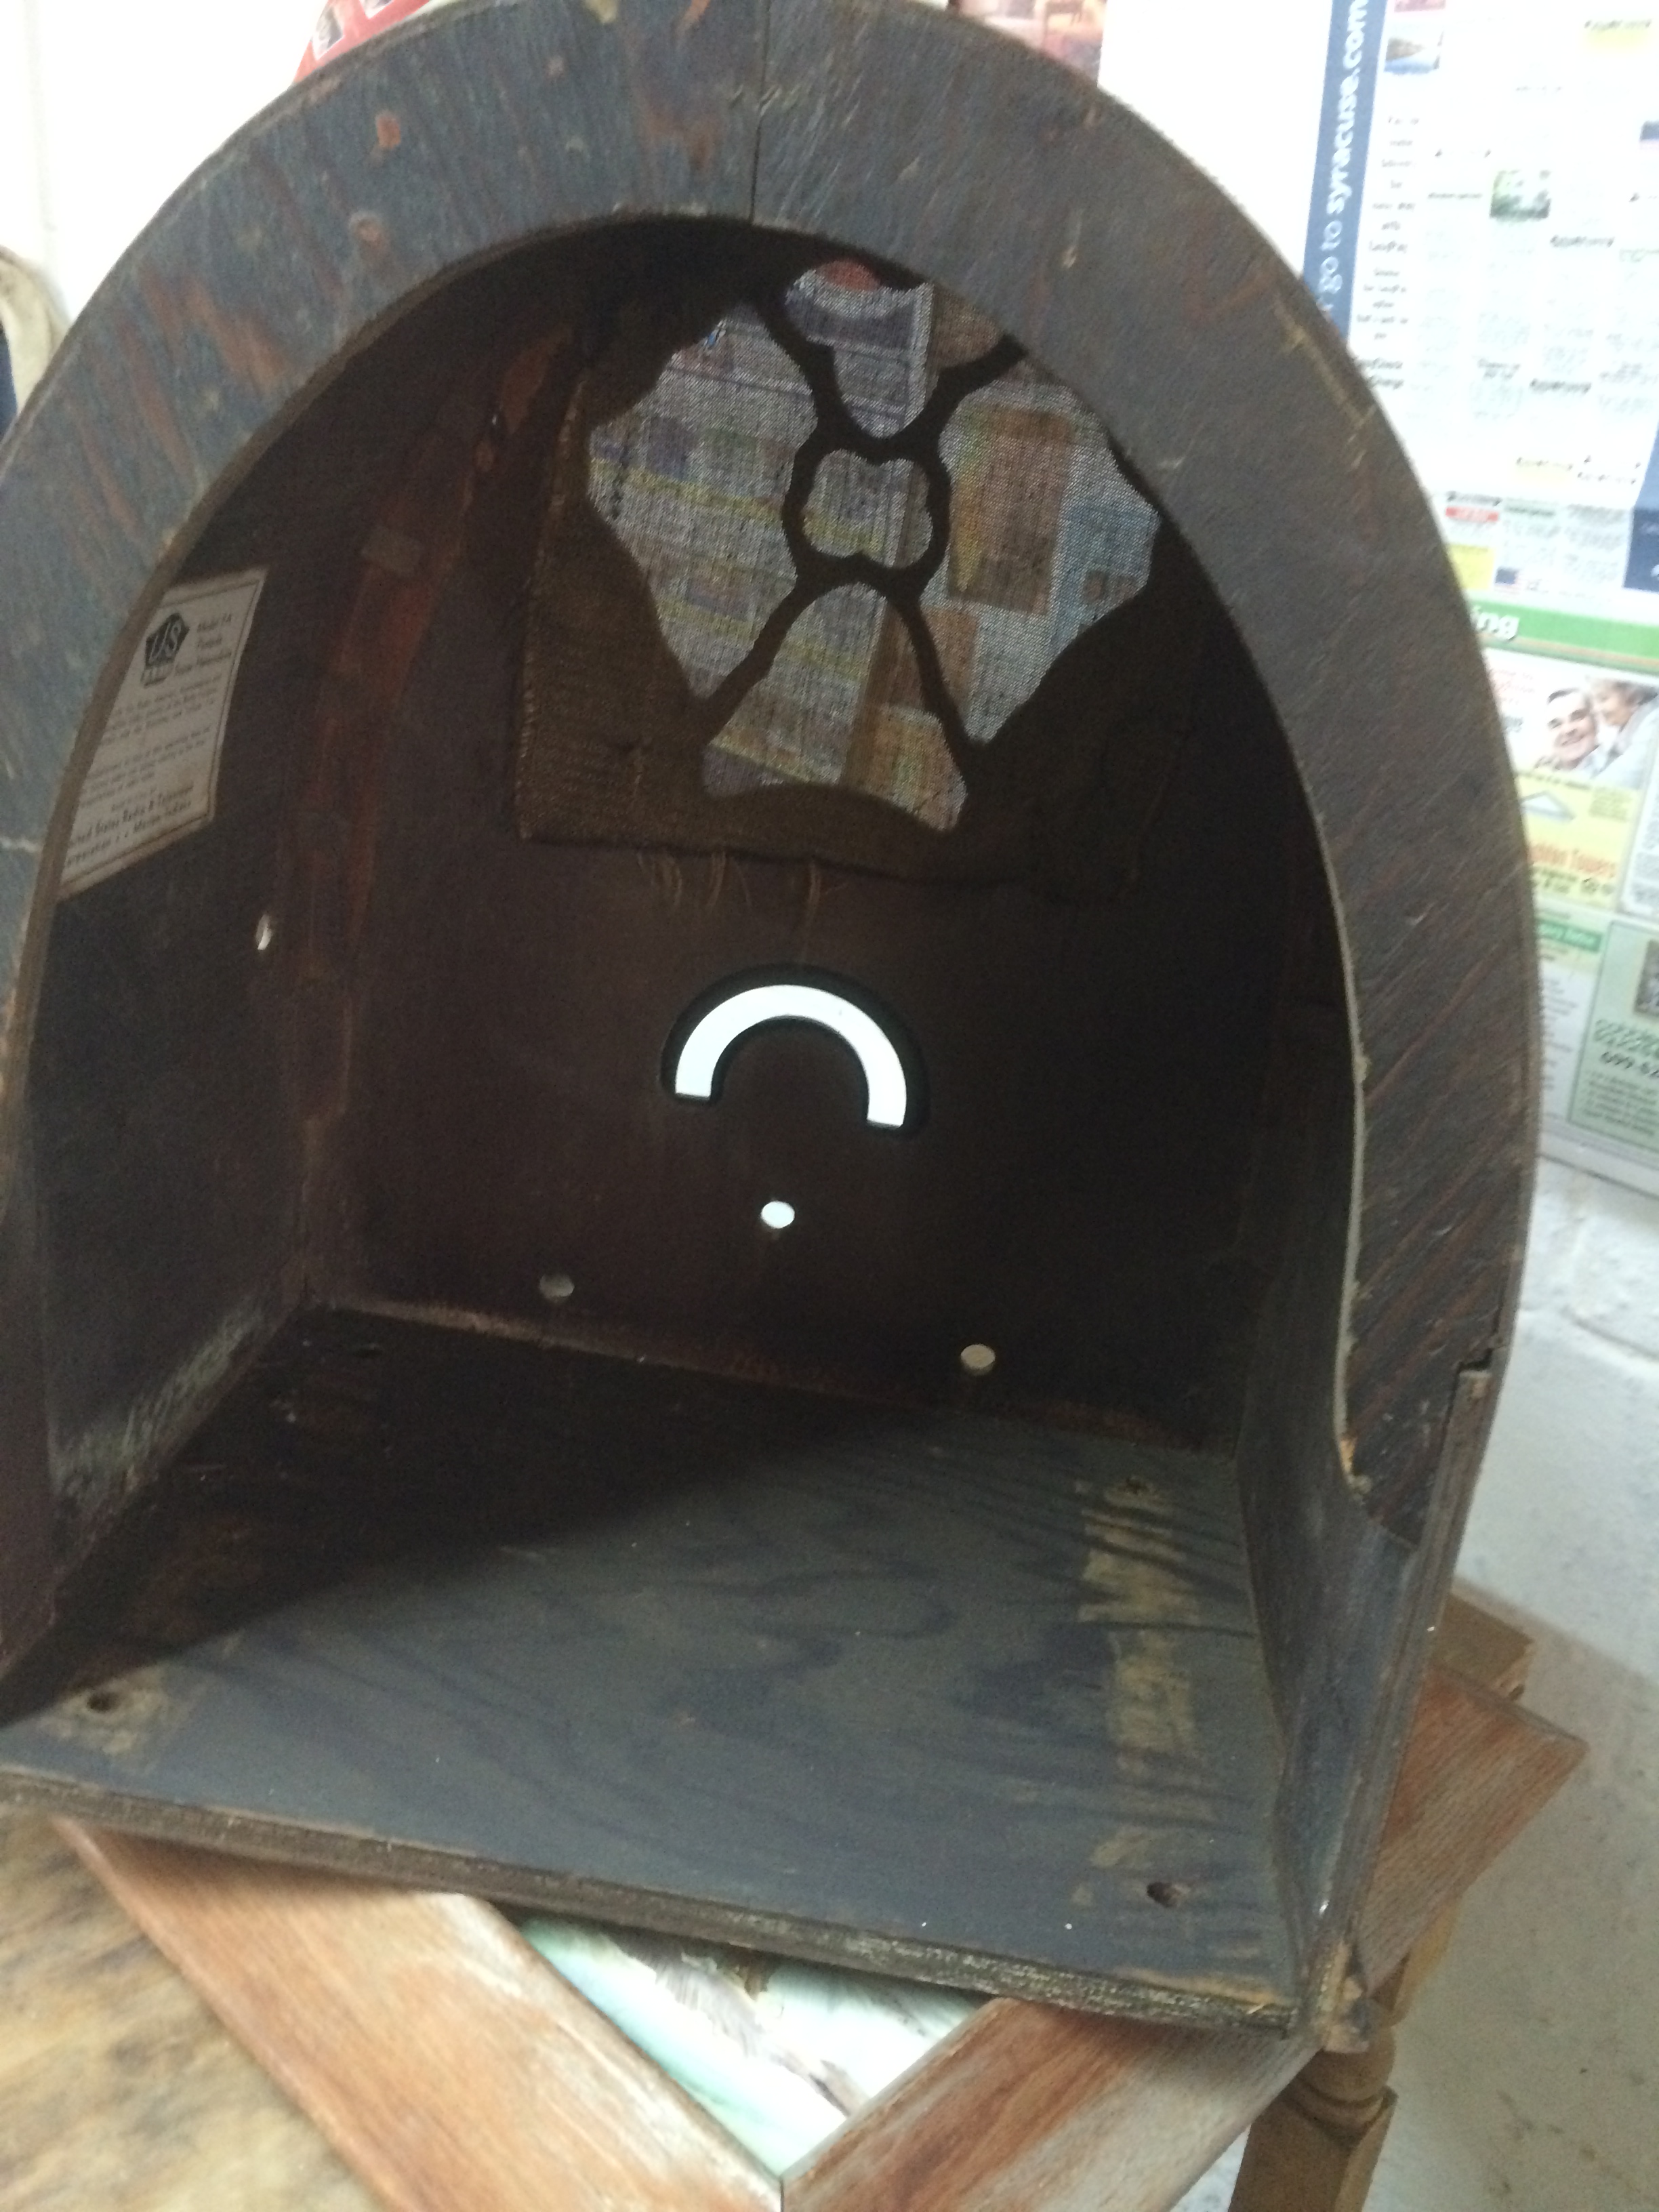
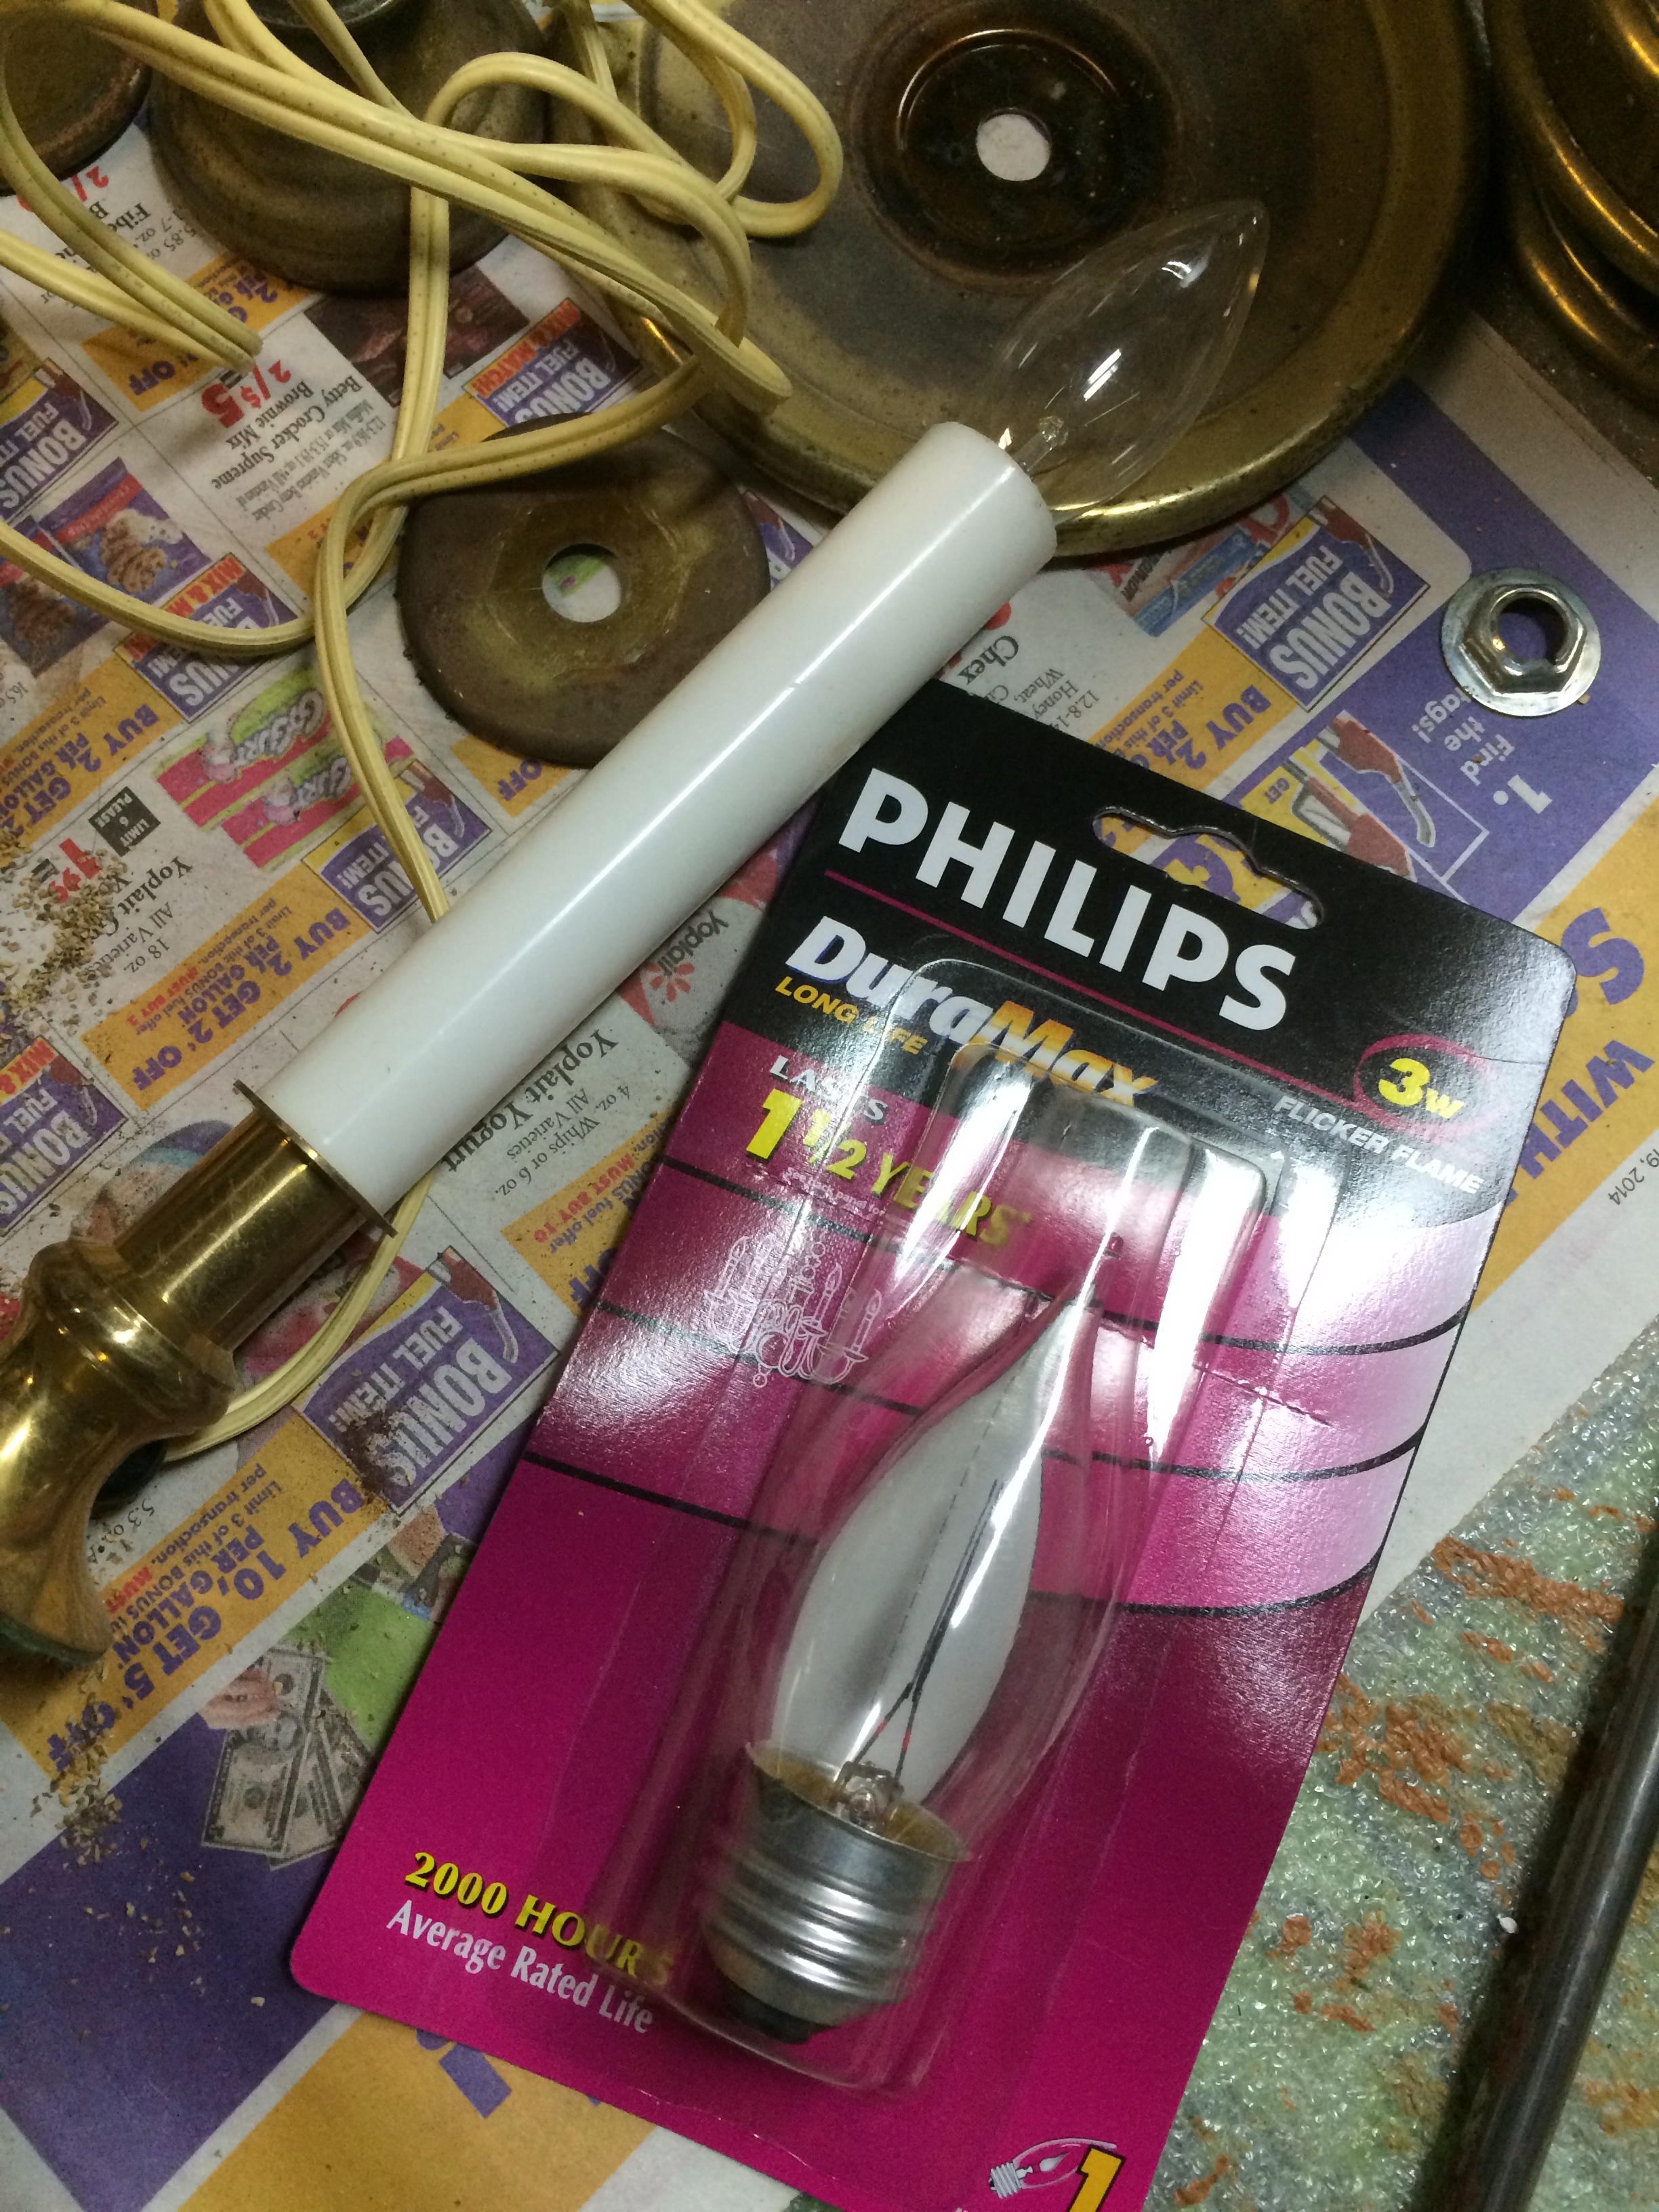
I cleaned out the inside of the radio really well and re-stained the radio shell after a light sanding.  Some of the wood veneer was chipped and missing, but most of the radio was in good shape, and that coat of stain made a wonderful difference.  All I had to do was set my small little lamp inside, add the flickering light bulb I found at the Dollar Store, and plug it in….the bulb was an orangey color, so it really looked like a flame, which was really just the animated touch that warmed up that already cozy office.

flicker bulb for radio


I was really happy with the outcome, so glad something that was just a shell of it’s former self, now stood renewed not with a tune but with a warm glow.

radio lamp in office

Footstool to server….riser to occasion

Taylor
02 Feb 2015
Custom Design, Dining Room, DIY, Repurposed
Baldwinsville NY, Clay NY, consultation, custom, decorator, designer, DIY, footstool, hand painted, Home Interior Designs, Liverpool NY, Parade of Homes, Phoenix NY, repurpose, reupholster, reuse, riser, serving tray, Syracuse NY, TayRose Design

During my usual scouting days at the Thrift Stores, I seemed to find quite a few small footstools. Some had storage and some had handles and some just spindley legs and all of them in need of some TLC. I couldn’t pass up the meager prices they were asking, and gathered them up knowing I would have a use for them sometime…and it didn’t take long before they solved a tablescape dilemma for me.
Interior design dining room  Parade Home by TayRose Design

I was designing for the Parade of Homes this past year, and since the formal dining room was the first room you noticed when walking through the front door, I wanted a real “wow” moment. The table setting would be over the top..not something that would be practical for a dinner with friends, but a really fun tablescape to keep on the table when not in use.
Tablescape Design dining room  TayRose Design

I had a china cabinet/buffet where I wanted to set various sized vegetable dishes and tureens, plus on the table, have different decor that I wanted to be at different heights so everything wasn’t all just sitting flat on the table. So, what could I use as a riser to lift up tableware so heights are staggered?…hmm…that stool over there is just the right height…I could reupholster the top to coordinate with my colors, and maybe paint the legs in a fun way.

Stool before with handles


So, over the next few days, I removed the old upholstery and replaced with new, adding some upholstery tacks along the edge for accent detail, painted designs on the wooden legs and handles, and sanded and restained the wood surface as needed. I even added wheels to the bottom of an extra storage stool lid I had leftover. storage stool for riser TayRose Design

The stools worked perfectly for risers both on the buffet and table. I was able to put dishes as well as centerpiece decor on top of the stools to create different heights but in a pretty way without having to stack books, or stick boxes under tablecloths. I love using my stools in different areas of the house, here is the after of that stool above where I reupholstered it and painted accent colors on the handles.   I use it to hold a tray of goblets ready for guests.
Stool holding goblets as riser TayRose Design

I will always look at a small footstool in the same way again…..

To receive posts via email click HERE Subscribe in a reader or signup in Subscription box in sidebar.

Accent Cabinet gets Island makeover

Taylor
30 Jan 2015
Custom Design, DIY, Interior Design Room, Kitchen, Repurposed
Baldwinsville NY, cabinet, Clay NY, consultation, countertop, custom, decorator, designer, DIY, Home Interior Designs, kitchen island, knobs, Liverpool NY, pegboard, Phoenix NY, Pier 1, pots and pans, recipe books, repurpose, reuse, Syracuse NY, TayRose Design

We all have read about similar dilemmas…small kitchens, wishes for that extra counterspace- dare we even dream of having room for an island?   

Kitchen Island cabinet TayRose Design

Well, I came across one of those kitchens…my own!  When I moved to my husband’s house, which was a small camp built in the 40’s on the river, I had to downsize from a 3 bedroom 2 bath house filled with furniture and decor I had been collecting for years.   I really had to think creatively on how to stretch what space I had in this kitchen.

Our kitchen is still a work in progress- a wish list for new cabinet fronts someday, but we did remodel ourselves adding a new back-splash and appliances with as much as we could at the time.   That is definitely another subject for a blog post…so on with the story..

During this whole semi-remodel, I really wanted something that would somehow partition the kitchen from the entry into the house since the mudroom comes right into the kitchen area.

Kitchen island storage view  TayRose Design

While out on one of my many shopping trips, this time at Pier 1, I was with my hubby (this doesn’t happen too often so fate was in our midst) we spied out of the corner of our eyes, this cabinet with an Asian theme which seemed to be just the right size.  Could this work?  Since it was on sale, and we were afraid it would be gone if we left it there to think about, we bought it and brought it home to try.  It was perfect, I loved it and I love the idea of repurposing an accent cabinet into a kitchen island.  Top Fabricators, the firm making our countertops http://www.countertopsbytopfab.com/had no trouble at all measuring and fitting the countertop onto the top of the cabinet….it fit like a glove!

I also wanted the island to be functional all the way around, so hubby got creative and got some peg board that I painted and we screwed to the back side facing the sink where I now can hang pots and pans at easy reach to the stove.  We also made great use of the ends of the cabinet, adding brass knobs over Chinese coins to hang up the pot lids, allowing for more room in the cabinets for other needs.  My recipe books are kept inside the cabinet and the drawers are perfect for our tools/junk, bottle openers, and cat treats.

Pot storage on Kitchen island

Although I didn’t have room for an island to sit at, I’m still very grateful for my island.  It not only didn’t take up much floor space, it gave me an additional surface for food prep, pot storage, and recipe book housing.

I’m so glad we opted to try an accent cabinet and not a standard kitchen cabinet for our kitchen…it’s more of a piece of furniture that greets you at the door and reveals it’s pretty practicalities!

To receive posts via email click HERE Subscribe in a reader or signup in Subscription box in sidebar.

From Garden Trellis to Master Headboard

Taylor
27 Jan 2015
DIY, Interior Design Room, Repurposed
arbor, Baldwinsville NY, Clay NY, consultation, custom, decorator, designer, DIY, eRegal Studio Photography, headboard, Home Interior Designs, Interior Design wall art, Liverpool NY, Lowes, Phoenix NY, repurpose, reuse, stain, Syracuse NY, TayRose Design, trellis

Ok, it’s time….time to re-style and re-design the bed.  The big, heavy, orangey colored oak bed set that my husband bought years ago, before I came on the scene, has just got to move on to greener pastures and let something interesting, clever and more in tune with the room style stand tall in it’s place.  arbor-headboard


The bed did match the bedroom dressers that were given a new look written about here http://tayrose.com/2014/05/13/changing-up-a-dated-dresser-set/ but the style of the bed just didn’t fit in with the rest of the set now, so it has moved out to the shed for a future project.old headboard oak


For the new headboard look, I wanted something tall, since we have vaulted ceilings, something with an Asian flair, something I could make that was budget friendly,  and not too difficult that would take weeks to make.  I remembered last summer while at Lowe’s shopping for plants, seeing these wooden trellis panels hanging on the back wall http://www.lowes.com/pd_6537-15173-8621262_0__?productId=3735495&Ntt=garden+trellis&pl=1&currentURL=%3FNtt%3Dgarden%2Btrellis&facetInfo=

There were several types, but the ones I really liked already had an Asian style to them, so I wouldn’t have to do anything but apply a finish to the raw wood and install.  I felt 2 panels would be wide enough for a Queen size bed especially if I split them up and hung wall art in-between.  So I bought them and brought them home.  I was doing the happy dance when I got them on sale at the end of the season so they met the budget friendly criteria…check, they had an Asian flair that I wouldn’t have to add…check….and if I stain them dark like the dresser fronts to match, how simple is that? Double check!!

garden arbor from Lowes


I used sand paper to lightly sand some of the rough edges and splinters, then proceeded to stain with Miniwax Jacobean color using a nylon bristle brush.  The soft wood really soaked up the stain which was great, but I did end up staining most of the parts twice for a darker coverage.  To install, I wanted them to be up high, so they are actually screwed to the walls and not attached to the bed frame itself.  I measured the wall pieces to be sure there was enough room on either side to hang the trellis so they didn’t hang past the bed width, then hubby screwed them into the wall.

arbor-headboard


I realize there may be some of you that wonder why in the world did I remove the matching oak headboard set for a garden trellis screwed to the wall…and I say, why not?  This was a simple DIY project that really makes a statement in the room… like a new kid on the block that has made a new friend 🙂

arbor-headboard

To receive posts via email click HERE Subscribe in a reader or signup in Subscription box in sidebar.

Ribboned sheers for Master Bedroom

Taylor
23 Jan 2015
Custom Design, DIY, Interior Design Room, Master Bedroom
Baldwinsville NY, cheap home decor, Clay NY, consultation, custom, decorator, designer, DIY, hand sewn, Home Decor, Home Interior Designs, Liverpool NY, Master bedroom, Phoenix NY, repurpose, reuse, ribbons, sheer curtains, Syracuse NY, TayRose Design

Ah, window treatments….just thinking about designing something fresh and new can be daunting for the Parade of Homes or for a client, and they can be inspired by bedding, a rug, pillow, a painting…which makes it such a relief when the answer presents itself.   While working on the Master bedroom design for the Parade of Homes, the budget for window treatments ran thin, so when it came to the Master,  I knew that I would end up doing something myself.  Master bedroom for Parade 2011 TayRose Design


I found online some beautiful rods that actually swing out when you want to let more light and air come in through the window, then swing the rod back to close the curtain over the window.  I ended up using 2 swing rods for each of the 2 larger windows, and opted for white sheers for a lighter feel for the room.  For the other 2 smaller windows, I split of pair of sheers for a draped swag and had trimmed the ends with black ribbon.  If I had had more funds I would have done cornices and shades for all the windows.

Swing-Arm-curtain rod for Master windows

The color scheme for the room, was black, cream, white, and gold.  The bedding was a white background with cream and gold and a black squiggle shaped design.  I knew I wanted to do something to the sheers, for I don’t do “solid” or plain very well…I love to layer, add texture, pattern etc most of the time. for to me, it’s more interesting and draws me in to a wonderful world!  I happened to be at the Dollar Store one day…I find myself there when looking for off beat items, and found rolls and rolls of narrow black ribbon.  I’m talking huge rolls…industrial rolls.  What a steal of a deal!  I wasn’t sure what I was going to do with all this mile of ribbon, but for a dollar, it was coming home with me!

Black ribbon for curtain projec

While I was laying out one of the sheer curtain panels across the table, I glanced over at the bedding.  My eyes kept going to the squiggle pattern, and then I looked at the black ribbon I just bought spewing out of the bag.  This was risky for I hadn’t tried this before, and the thought of hand sewing ribbon onto 4 panels of sheers…the little voice in the back of my head was saying, “are you crazy?”  So, with needle and thread and black ribbon in hand, I decided to tackle it and tack the ribbon free hand- patterning along the way, squiggling as I went up from the hem to about midway up the curtain.  I stood back to look, and I loved it…just enough pattern to balance the pattern from the bedding, but not too much design to take away from the light streaming through the sheers.  The Fabric Mill, who had been making the window treatments for me in the other rooms, graciously offered to add a black fabric edge at the bottom of the panels as a finishing custom touch, so sweet of them!   The panels were light and breezy, just what I was going for.

squiggle ribbon sheers by TayRose Design


I may not hand sew on every curtain project I design, but it does feel, that I usually do something to tweak them a bit….just to be a little bit more interesting!
To receive posts via email click HERE Subscribe in a reader or signup in Subscription box in sidebar.

  • 1
  • 2
  • 3
  • 4
  • 5
  • 6
  • 7
Recent Posts
  • Owl Inspired Theme Toddler Bedroom
  • Painted trunk blends with Decor
  • Create a “trunk” inspired look for a Nightstand
  • Decorate fireplace wall “naturally” on a budget
  • How to Inspire Design with Pinterest Photos
Archives
  • February 2018
  • January 2018
  • October 2016
  • January 2016
  • June 2015
  • April 2015
  • March 2015
  • February 2015
  • January 2015
  • December 2014
  • November 2014
  • June 2014
  • May 2014
Newsletter subscription form

Enter your email address:

Delivered by FeedBurner

Categories
  • Art
  • Bathroom
  • Craft Project
  • Custom Design
  • Dining Room
  • DIY
  • Entry
  • Holiday
  • Interior Design Room
  • Kids Room
  • Kitchen
  • Living room
  • Master Bedroom
  • Mudroom
  • Office
  • Repurposed
  • Theme Room
Houzz
Remodeling and Home Design
Instagram
Instagram
HomeTalk
Featured on Hometalk.com
Follow me on Facebook
TayRose Design

Promote Your Page Too
315.224.4142
© 2014 k.linndesign. All Rights Reserved.