• Shop
    • Antiques
    • Home Decor
    • Jewelry
      • Necklaces
      • Bracelets
      • Earrings
      • Rings
      • Pins
    • Upcycled handmade
      • upcycled womens tops
      • upcycled womens jackets
      • Upcycled womens pants
      • upcycled pillows
      • Upcycled Pickleball Shirts
      • upcycled purses
    • MacKenzie-Childs
      • MacKenzie-Childs Taylor Dinner Plate
      • MacKenzie-Childs Taylor Luncheon Plate
      • MacKenzie-Childs small oval dish
      • MacKenzie-Childs Taylor Bread & Butter
      • MacKenzie-Childs Taylor Mugs
      • MacKenzie-Childs Taylor Saucers
      • MacKenzie-Childs Taylor Breakfast Bowls
      • MacKenzie-Childs Taylor Berry Bowl
      • MacKenzie-Childs Taylor Chowder Bowls
      • MacKenzie-Childs Wallcourt pieces
      • MacKenzie-Childs Enamelware
      • MacKenzie-Childs Torquay dinnerware
      • MacKenzie-Childs MacLachlan Dinnerware
      • MacKenzie-Childs Taylor Serving Ware
      • MacKenzie-Childs Glass Goblets
      • MacKenzie-Childs glass tumbler
      • MacKenzie-Childs Glass Serving pieces
      • MacKenzie-Childs Decor pieces
      • MacKenzie-Childs Placemats & Coaster sets
      • MacKenzie-Childs Paper Products
      • MacKenzie-Childs Tile
    • Shoes
  • Home
  • About
    • I believe…
  • Gallery
    • Custom Design
    • Interior Design
      • Bath
      • Bedroom
      • Dining Room
      • Entry Way
      • Kitchen
      • Laundry
      • Living Room
      • Office
      • Mudroom
      • Themed Rooms
  • Color CCE
  • Services
    • Services
    • Design Process
    • New Construction
  • Journal
    • DIY
    • Repurposed
    • Art
    • Interior Design Room
    • Holiday
    • Theme Room
  • Press
  • Contact

Sea Shells far from the Sea Shore…..A mirrored view

Taylor
02 Mar 2015
Bathroom, Craft Project, Custom Design, DIY, Interior Design Room, Repurposed
Baldwinsville NY, beadboard, box, Clay NY, consultation, contemporary, custom, decorator, designer, DIY, eclectic, Home Interior Designs, Liverpool NY, mastic adhesive, mementos, mirror, Phoenix NY, repurpose, reuse, shells, Syracuse NY, TayRose Design, white paint

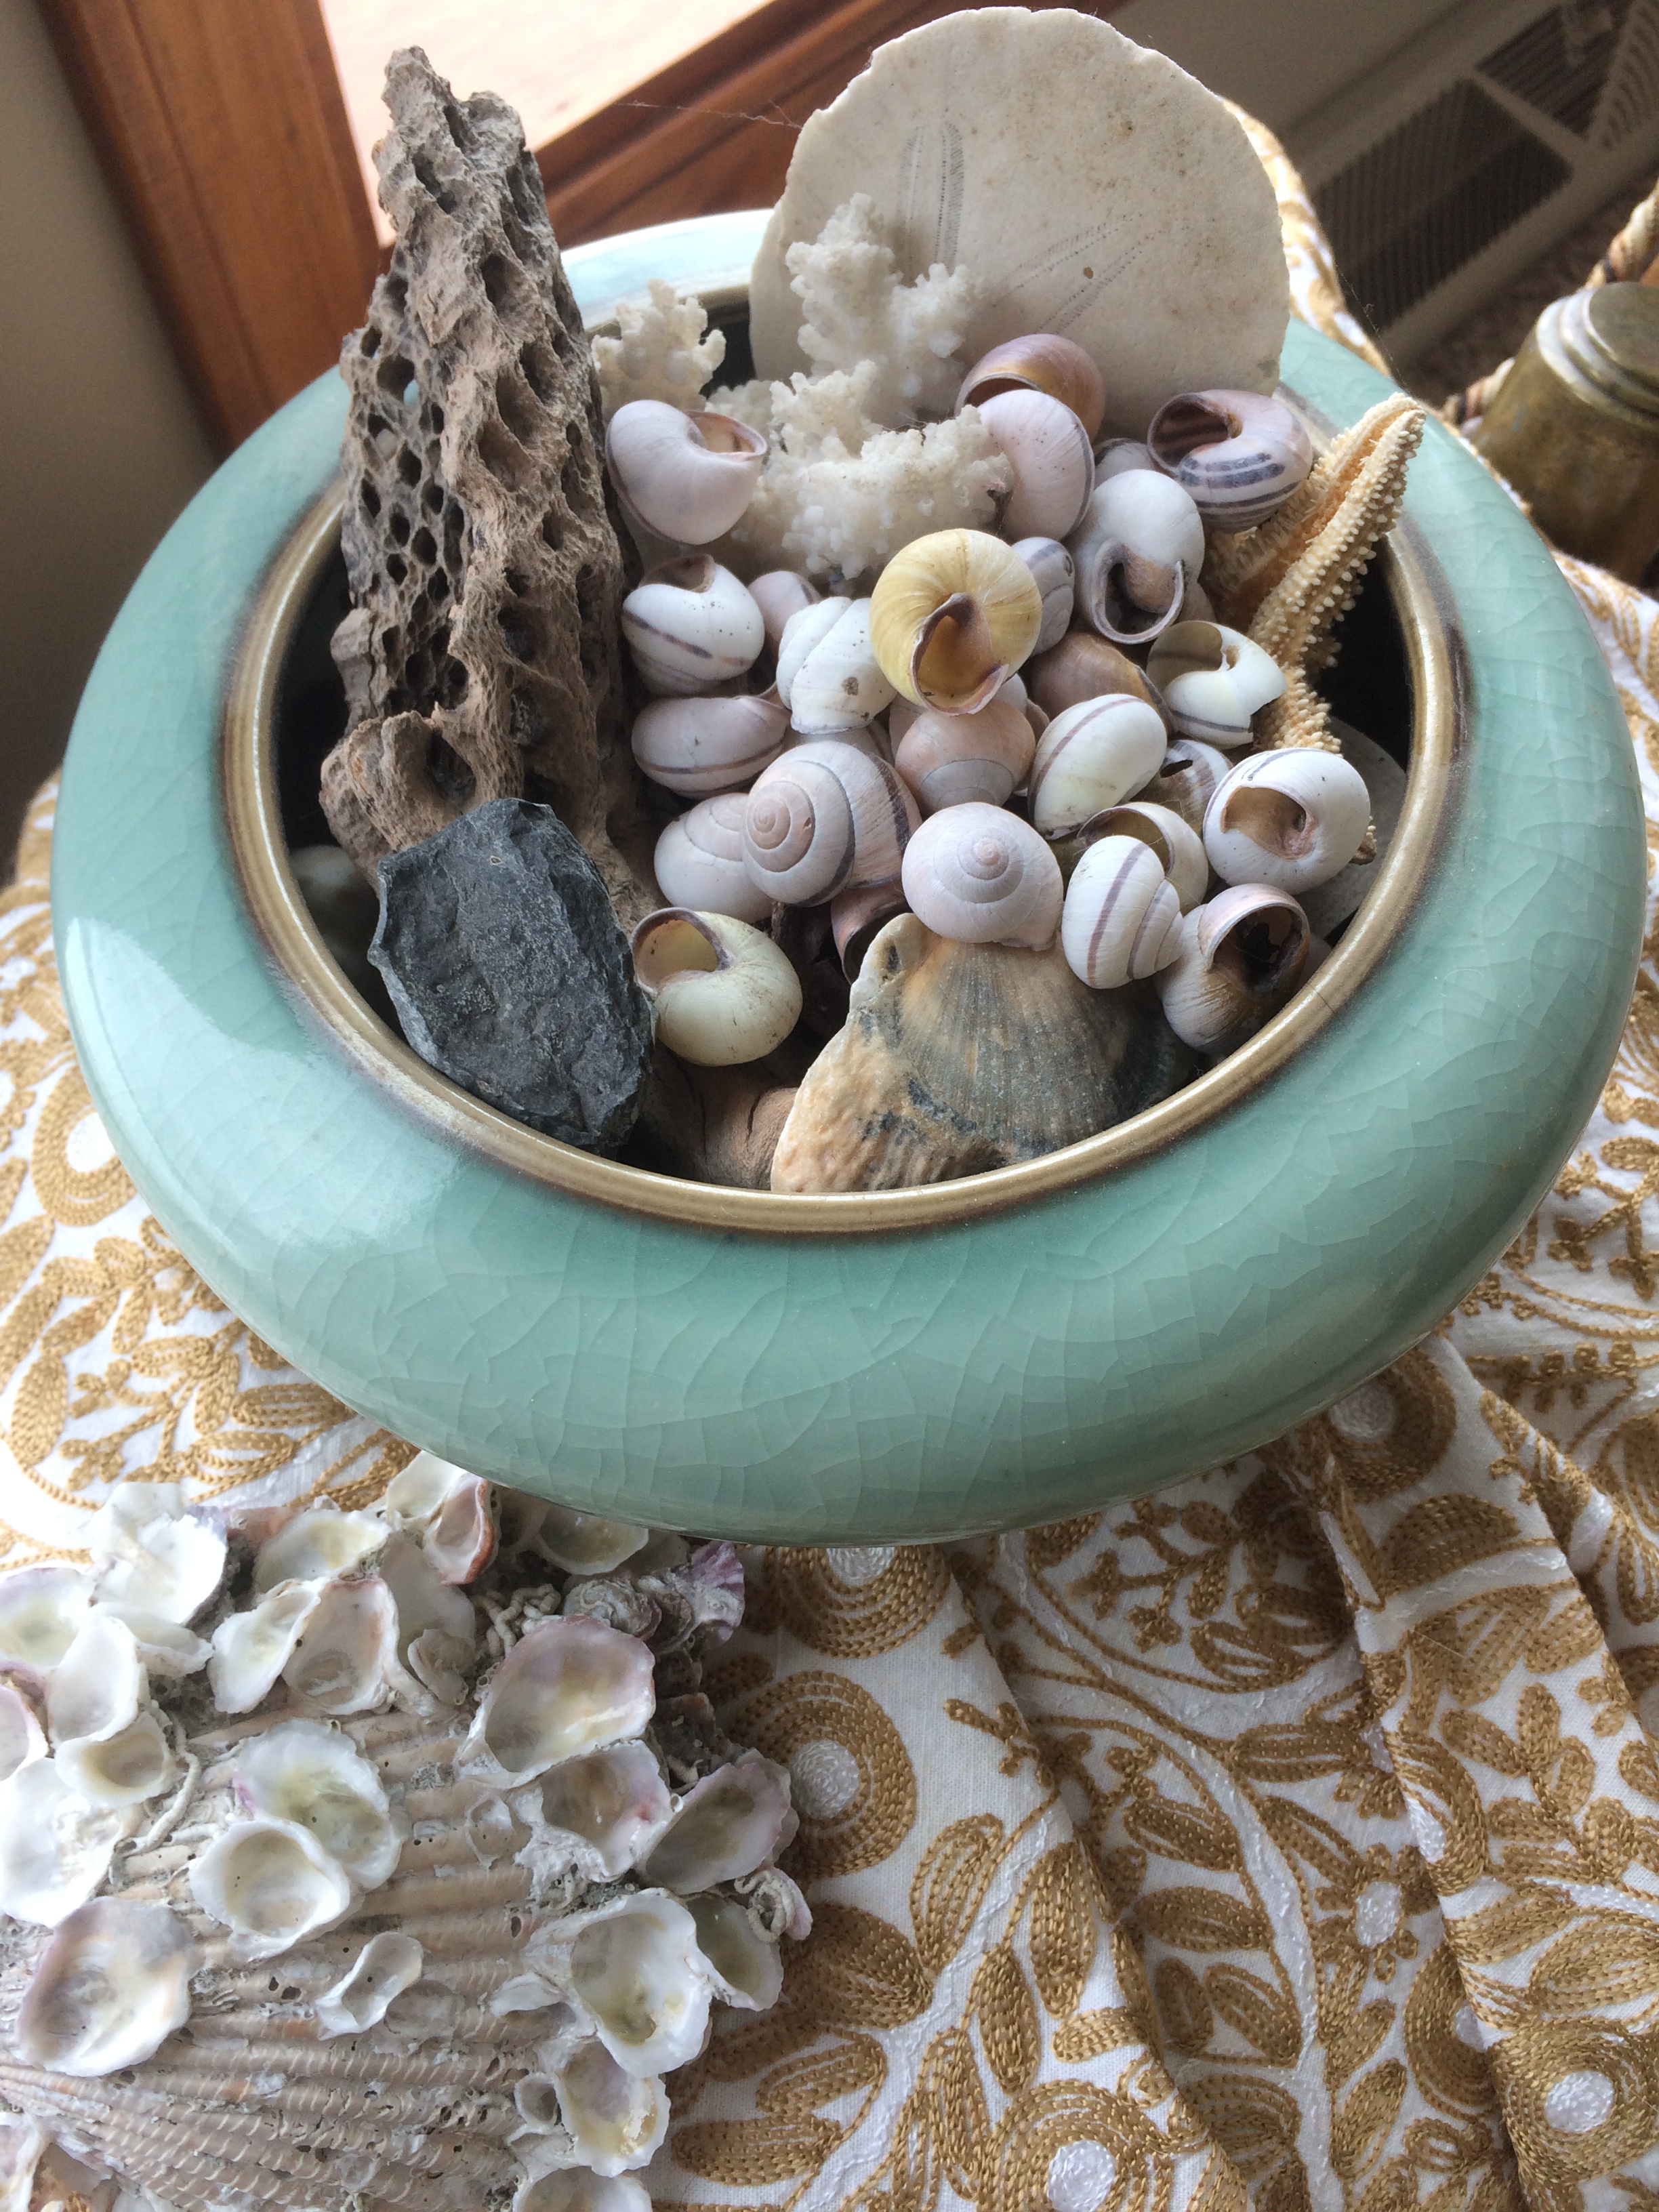
One can’t say enough about shells….their shapes; colors; and sizes from a tiny spiral to a large conch- shells have been a part of decorating through out history.  Shells add beauty whether displayed in a dish, or on a shelf or, in my case, adhered to an old mirror.

vintage shell mirror in shop

I have 2 examples of mirrors and a memento box that I have made that changed their entire look just by adding shells.  On one mirror,  I painted the shells, and the other, I left the shells in their original colors.   Both I feel have done shells proud…

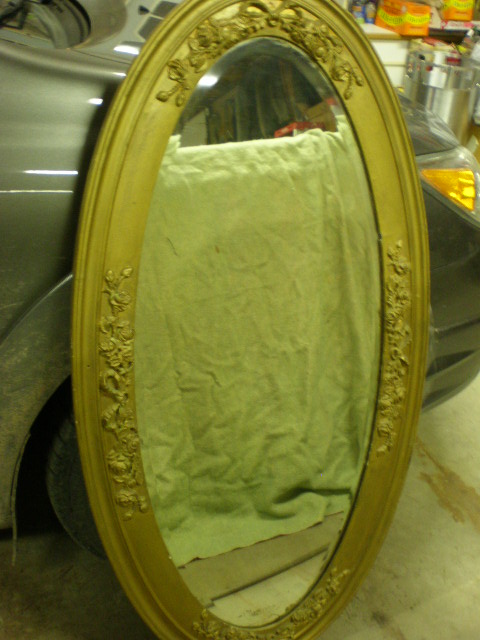
The first mirror I had a large oval gold-painted mirror that had some rose bas relief along the rim but only in a few places so I wanted to fill in the whole rim to make the mirror more sculptural looking.

oval gold mirror before shell addition


Whenever I see shells at garage sales, or thrift stores, I try to scoop them up for I know they will be used one day, in one way or another.  Or I just admire them in a bowl or jar- reminded of the waves from whence they came.

shells in bowl


I used a putty type product called Laticrete to apply the shells to the rim, working in small sections so the adhesive wouldn’t dry out too fast.

Putty used on shell mirror

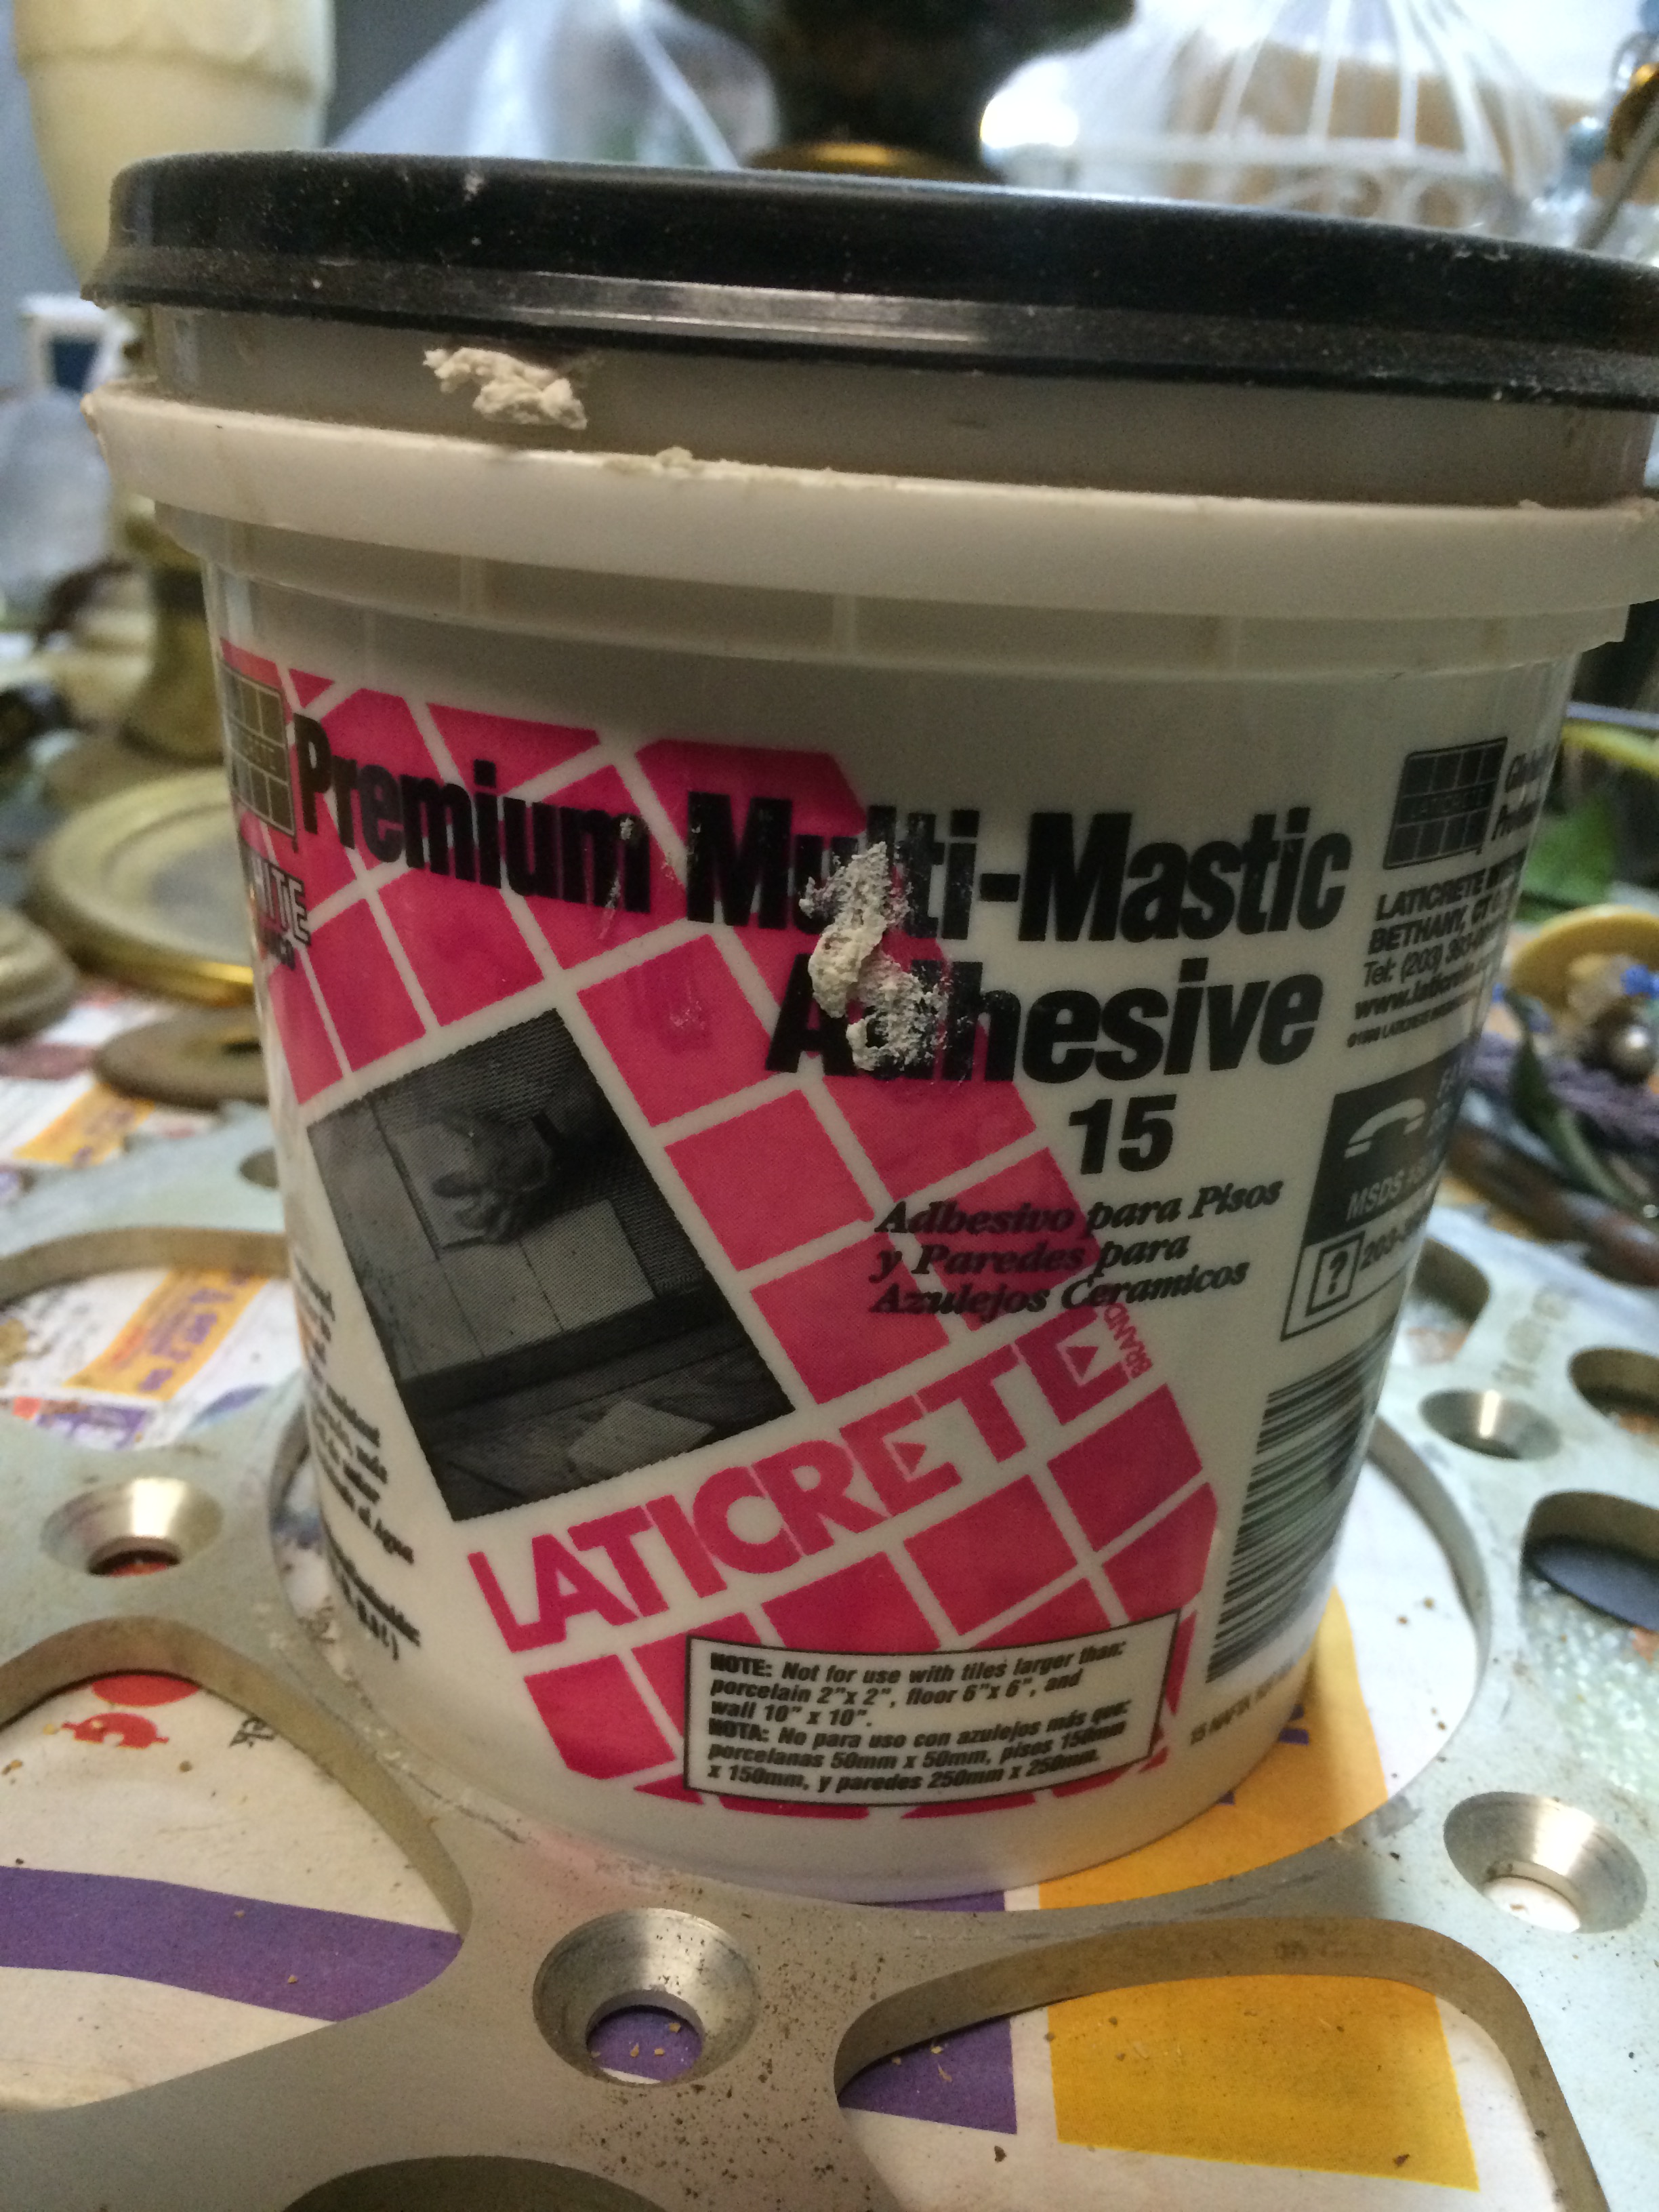
It’s waterproof and used to set tiles.  It has a creamy consistency and I used a putty knife to apply then set the shells into the soft putty.

putty in shells on mirror

After the putty was dry, I decided to paint the mirror plus the shells in white, with several coats, using up some white paint I had leftover in my basement.

painted shell mirror white


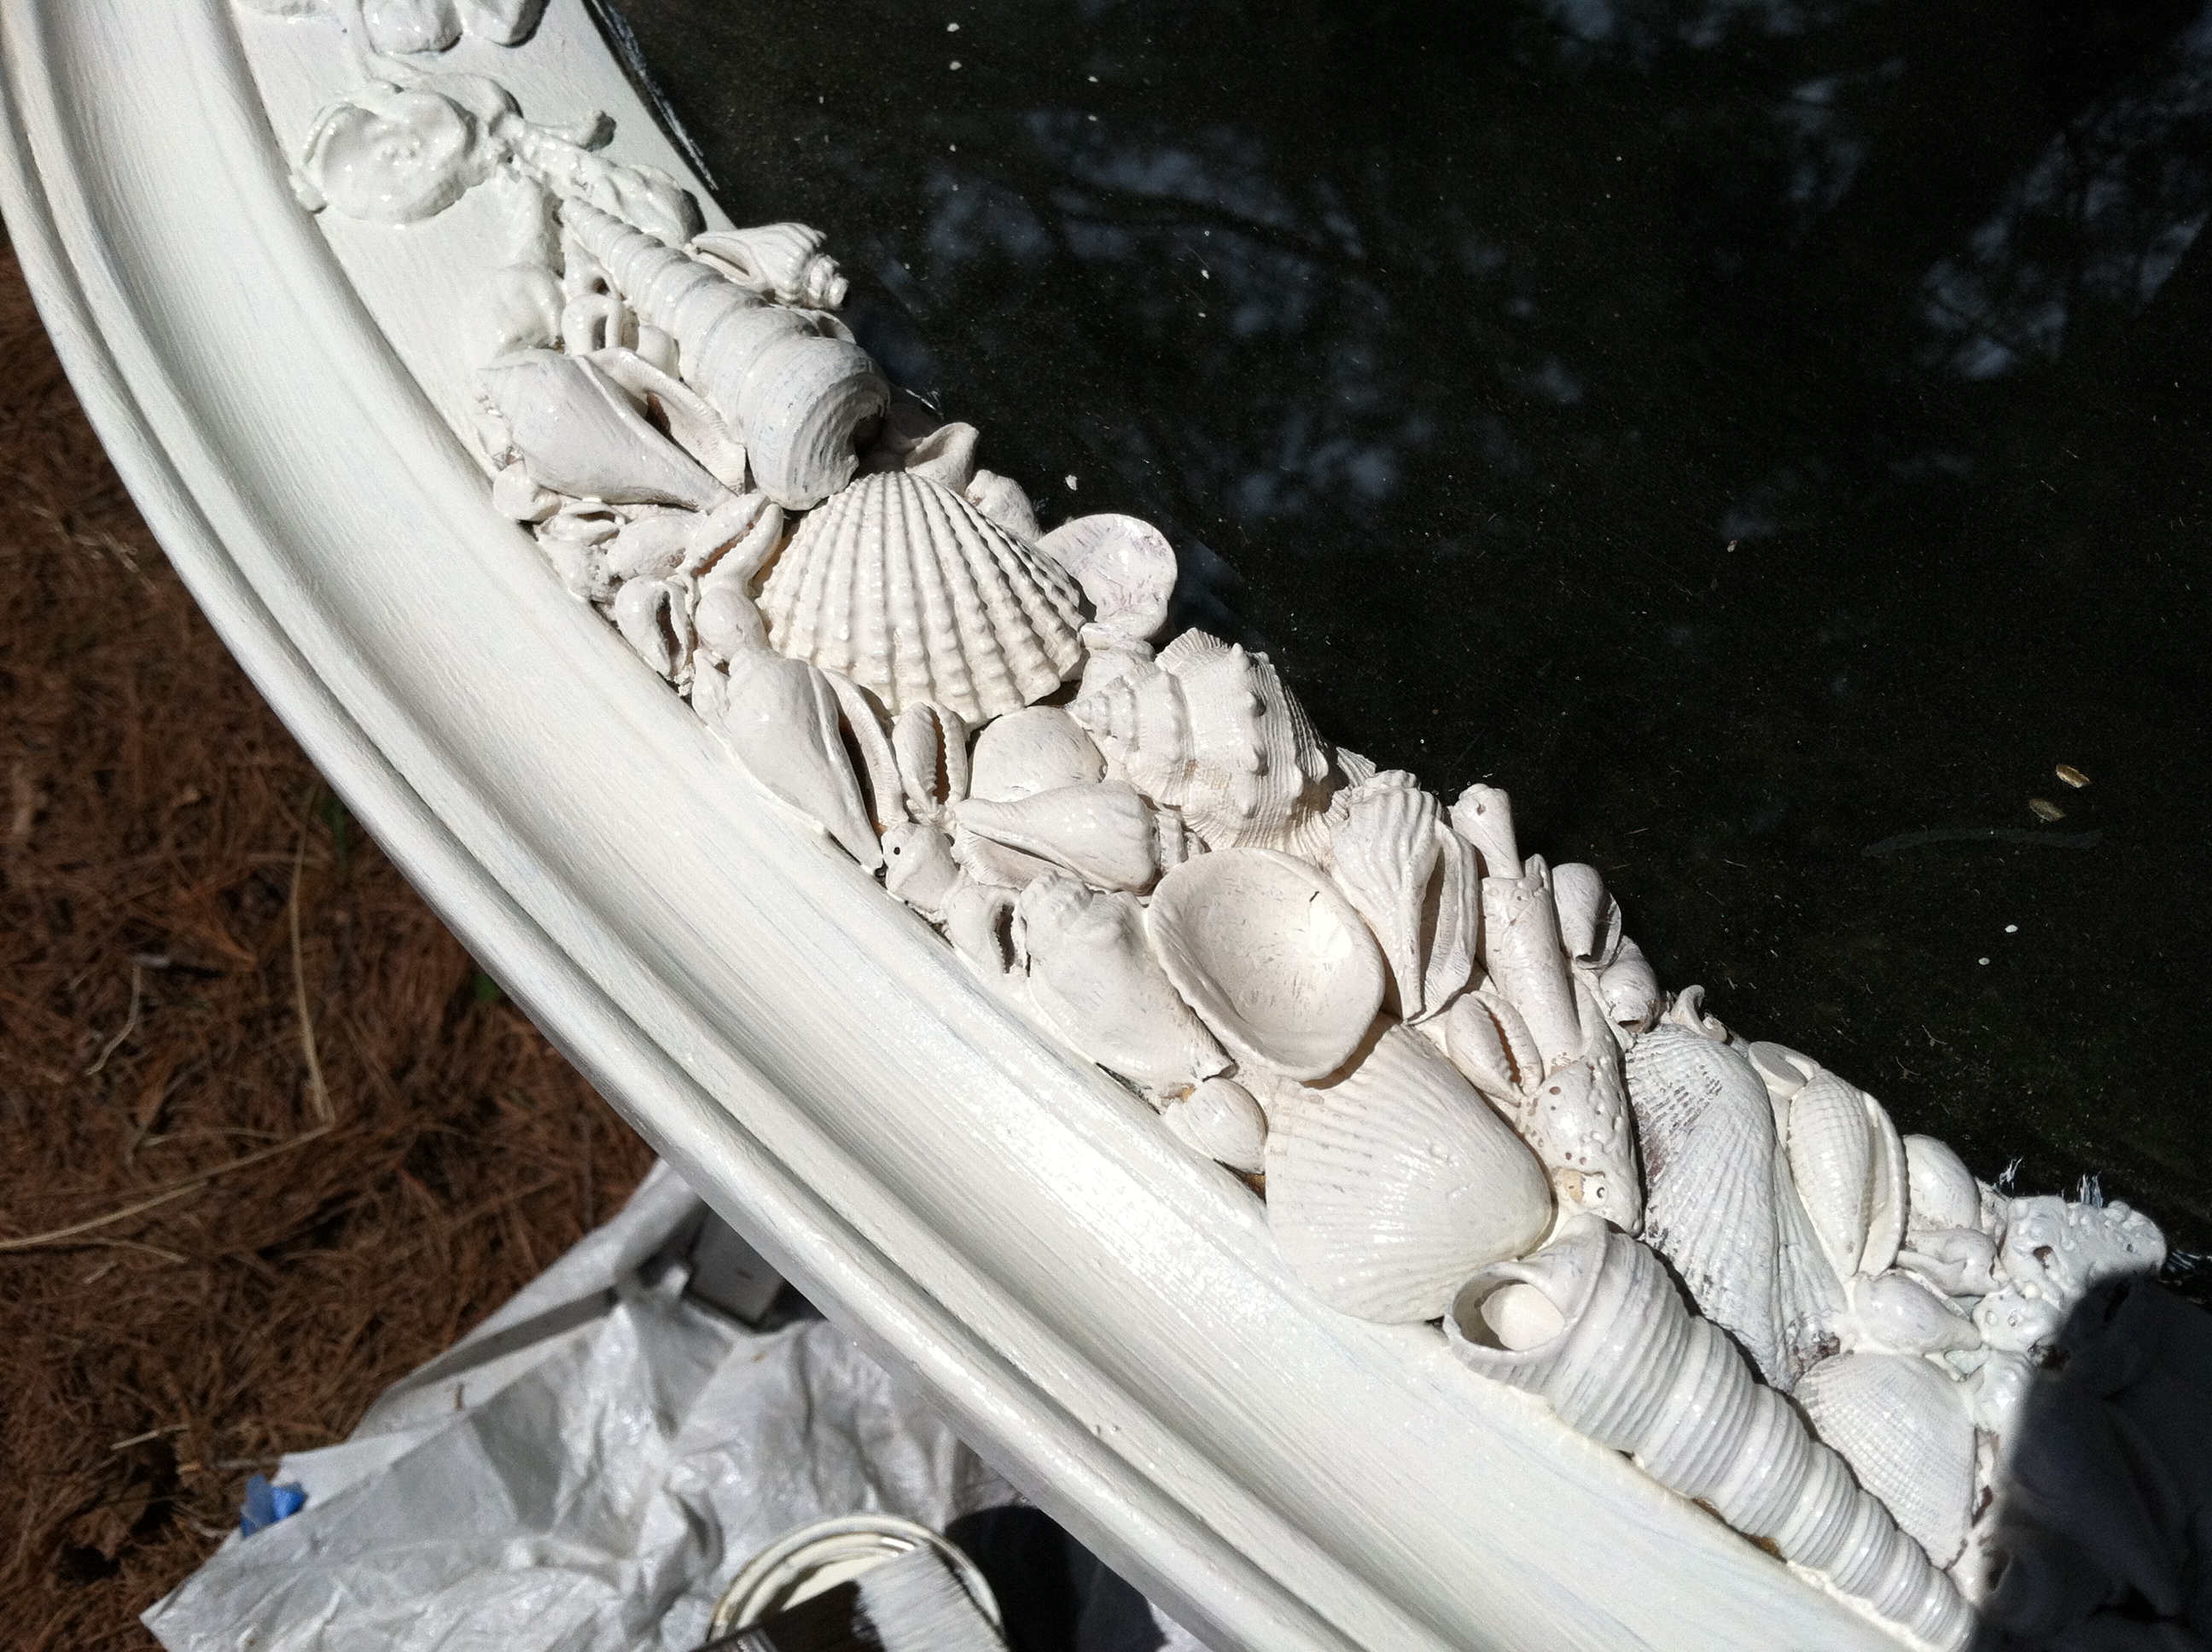
I thought white was an appropriate color, where I could envision the mirror in a beach house at the Cape, or in a contemporary loft in the City, or cozied up Shabby Chic style in a vintage cottage.   I love the mirror in white, it’s so sculptural with the shells, and you really have to walk up and look closely to verify they are shells, which makes it all the more interesting.

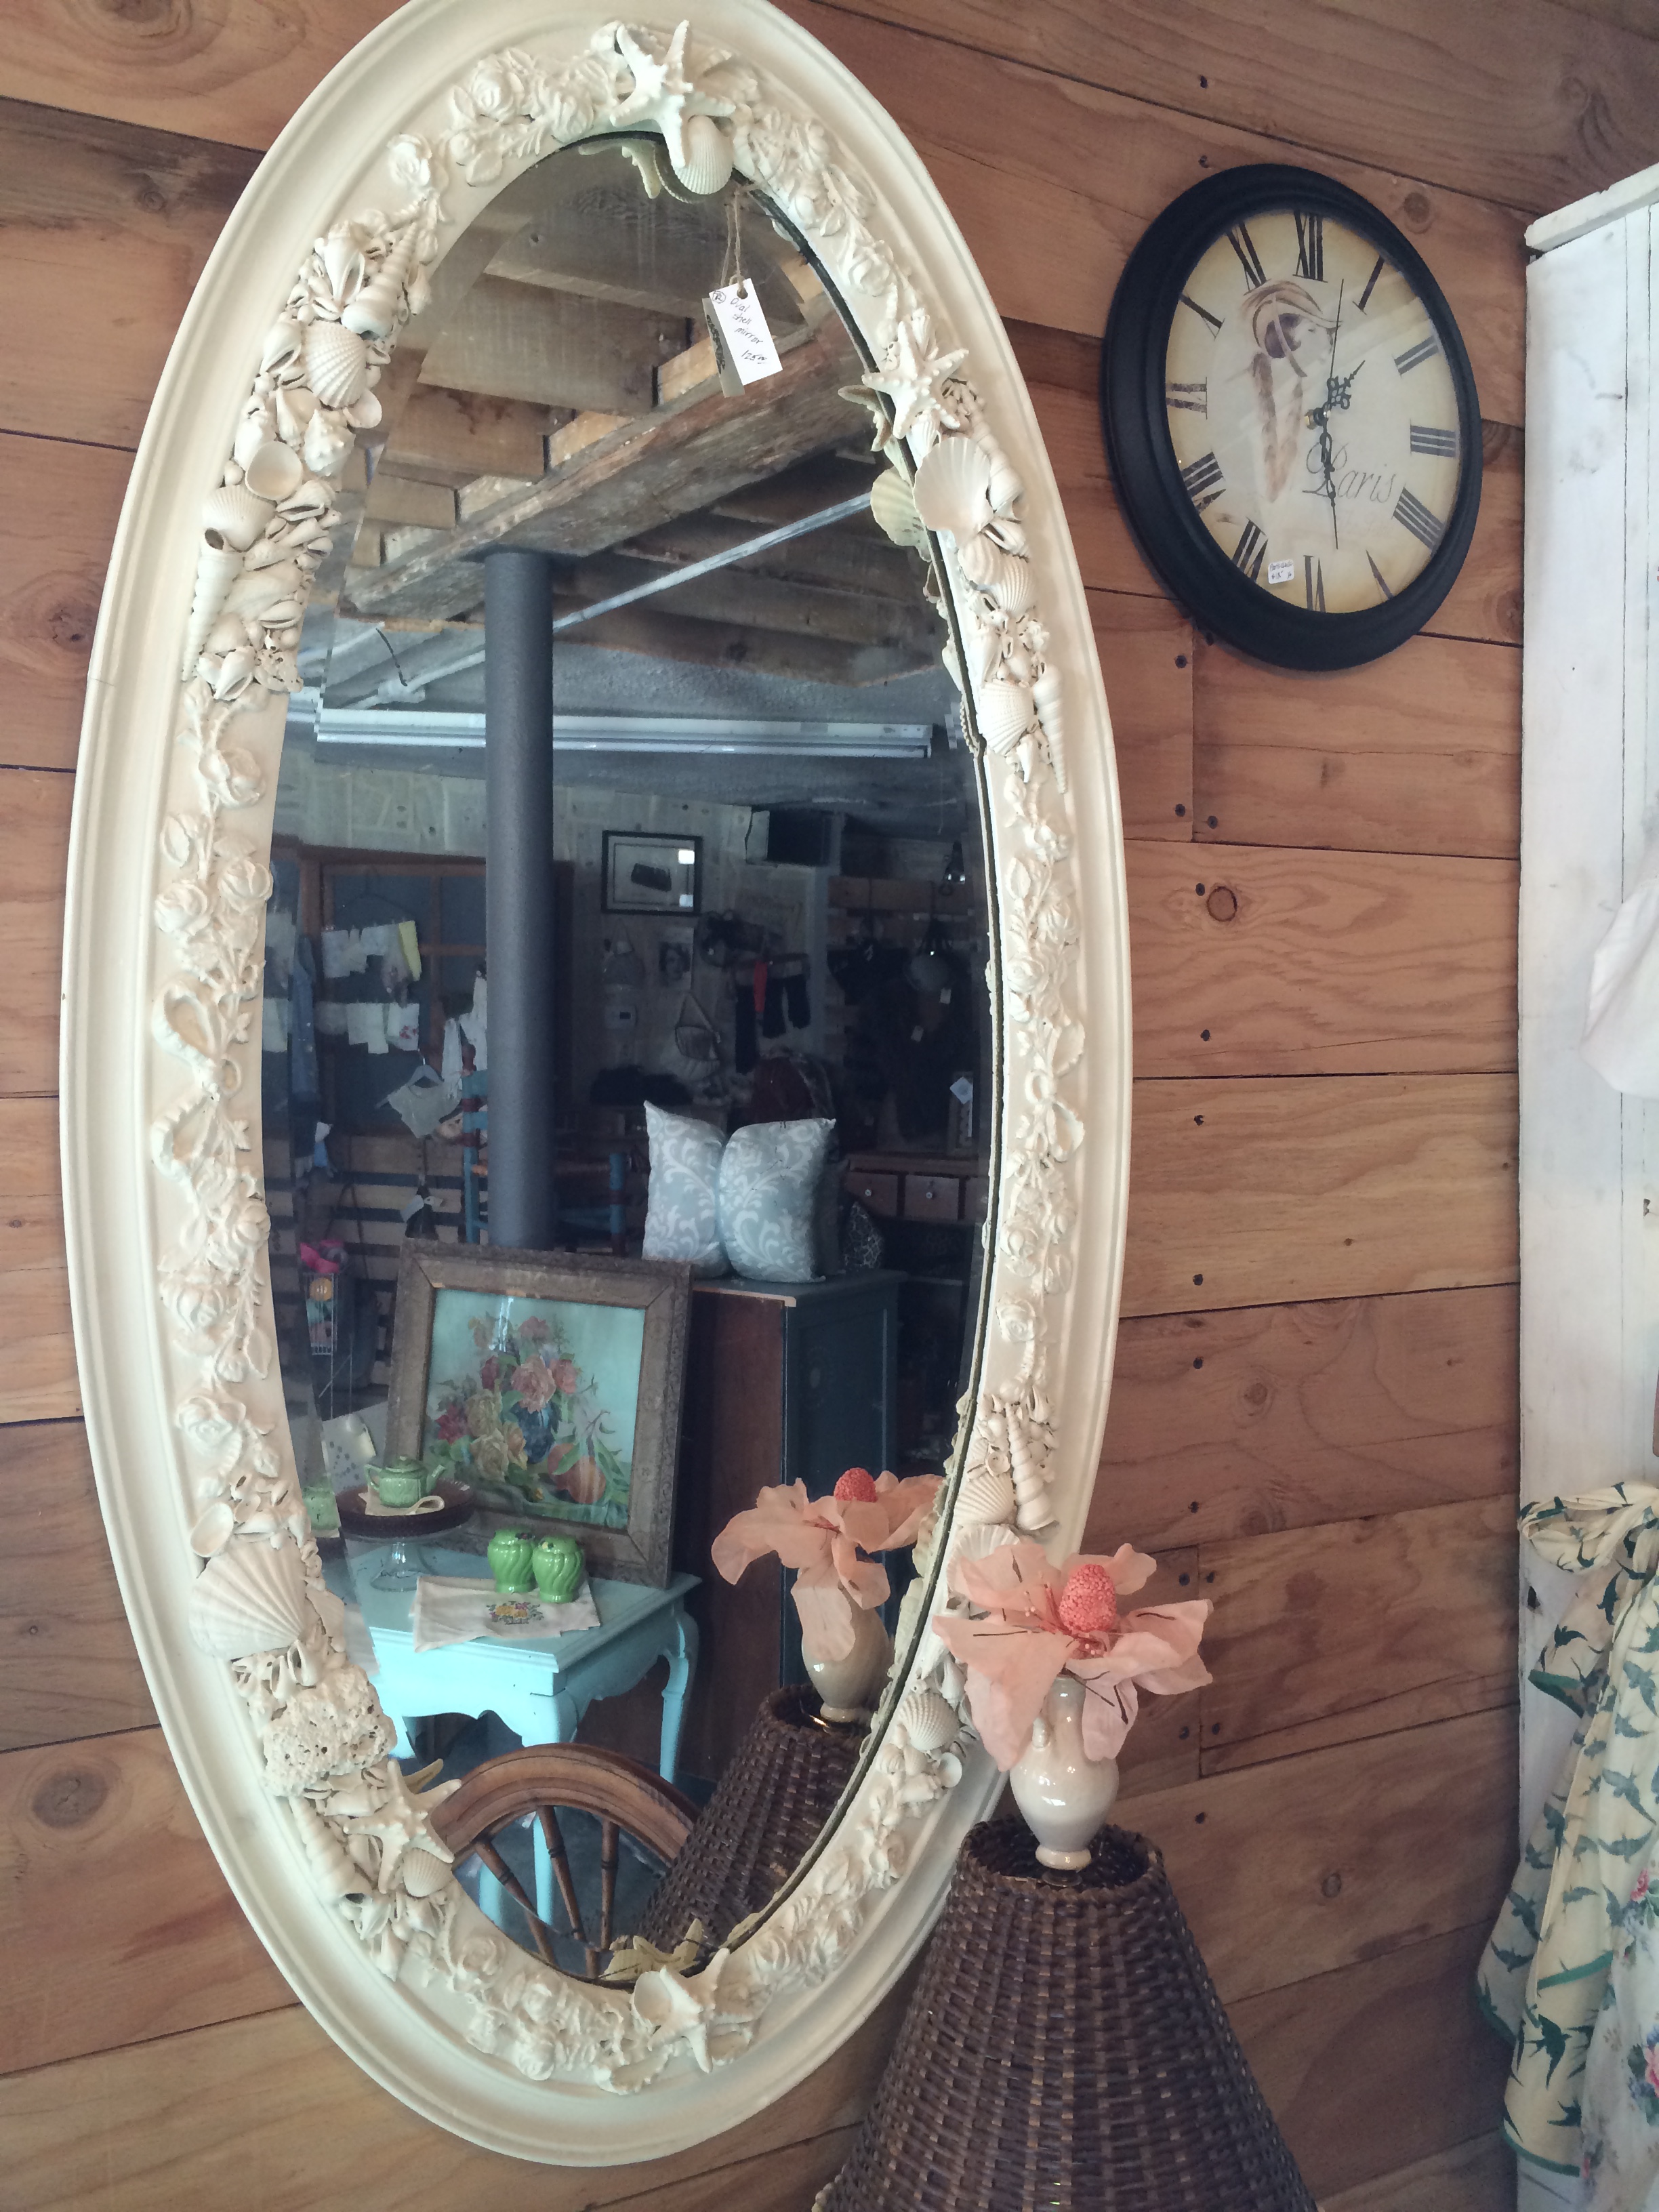
For the 2nd mirror, I decided to keep the shells in their original forms, and I again used putty to attach the shells, but I added some black acrylic paint to the putty to darken it to a gray color so the shells would stand out more.  I also painted the inside rim in black so the shell color would pop, and give a nice contrast rim around the mirror.

colored shell mirror rim

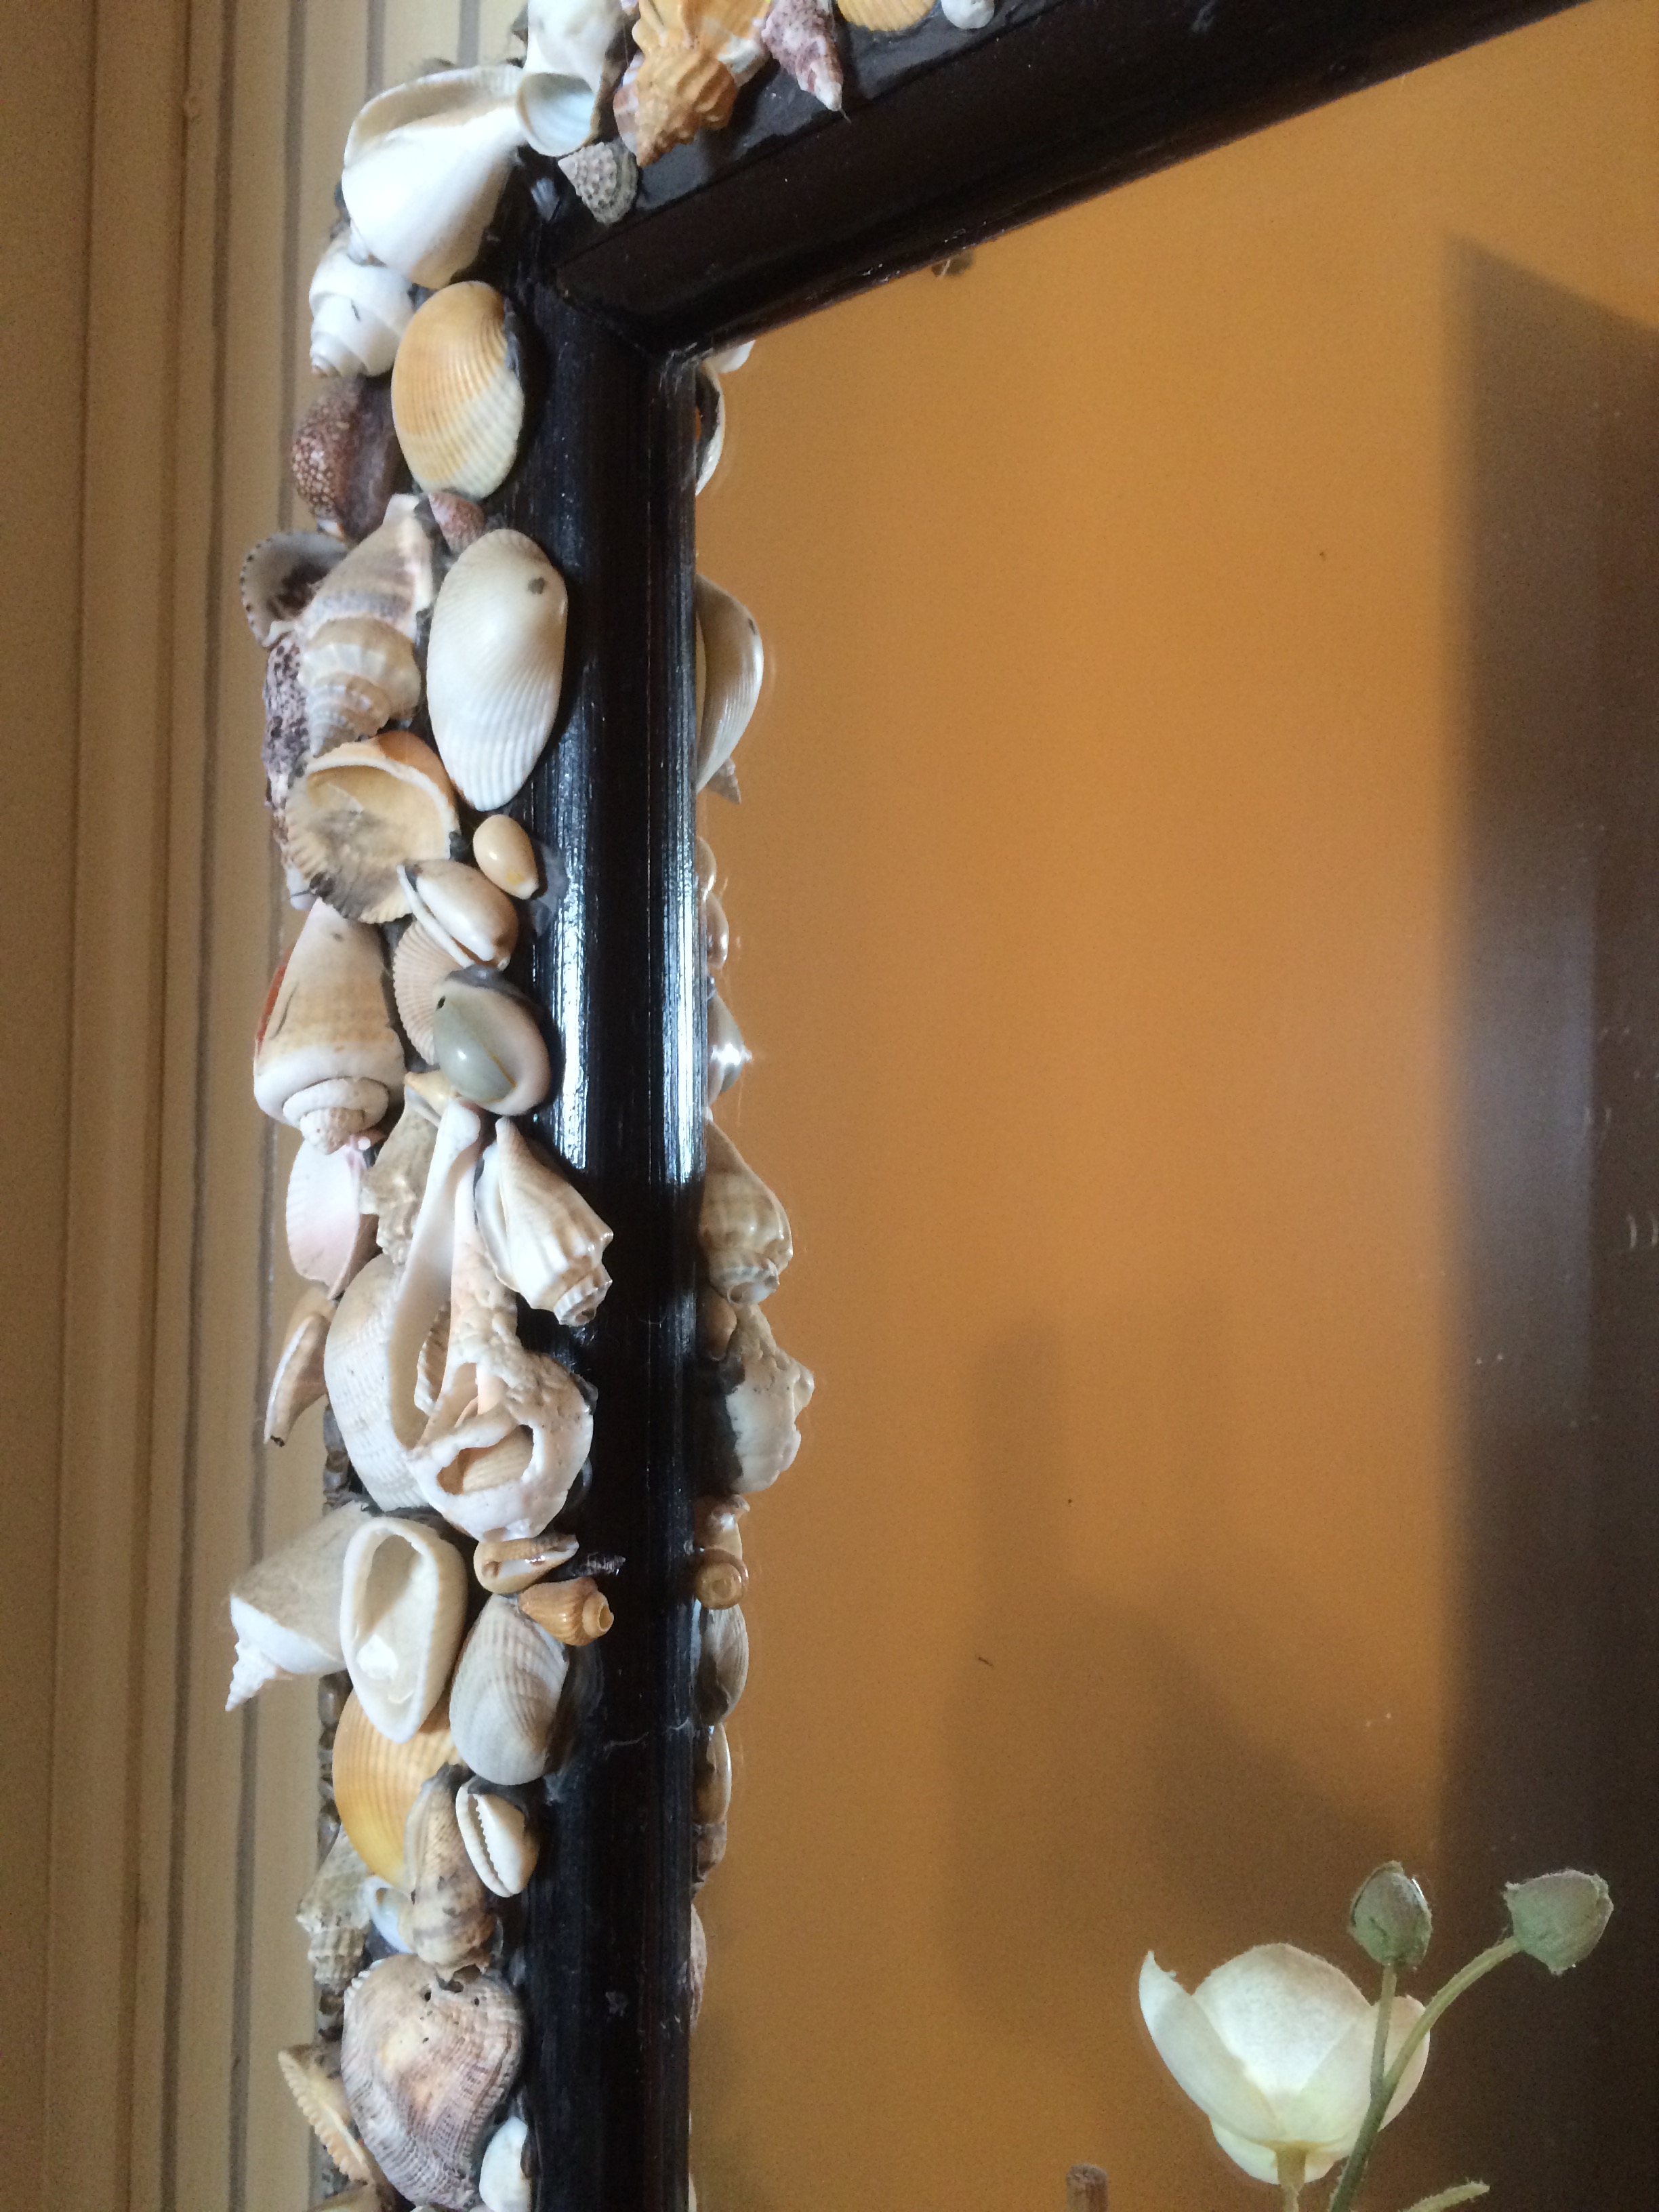
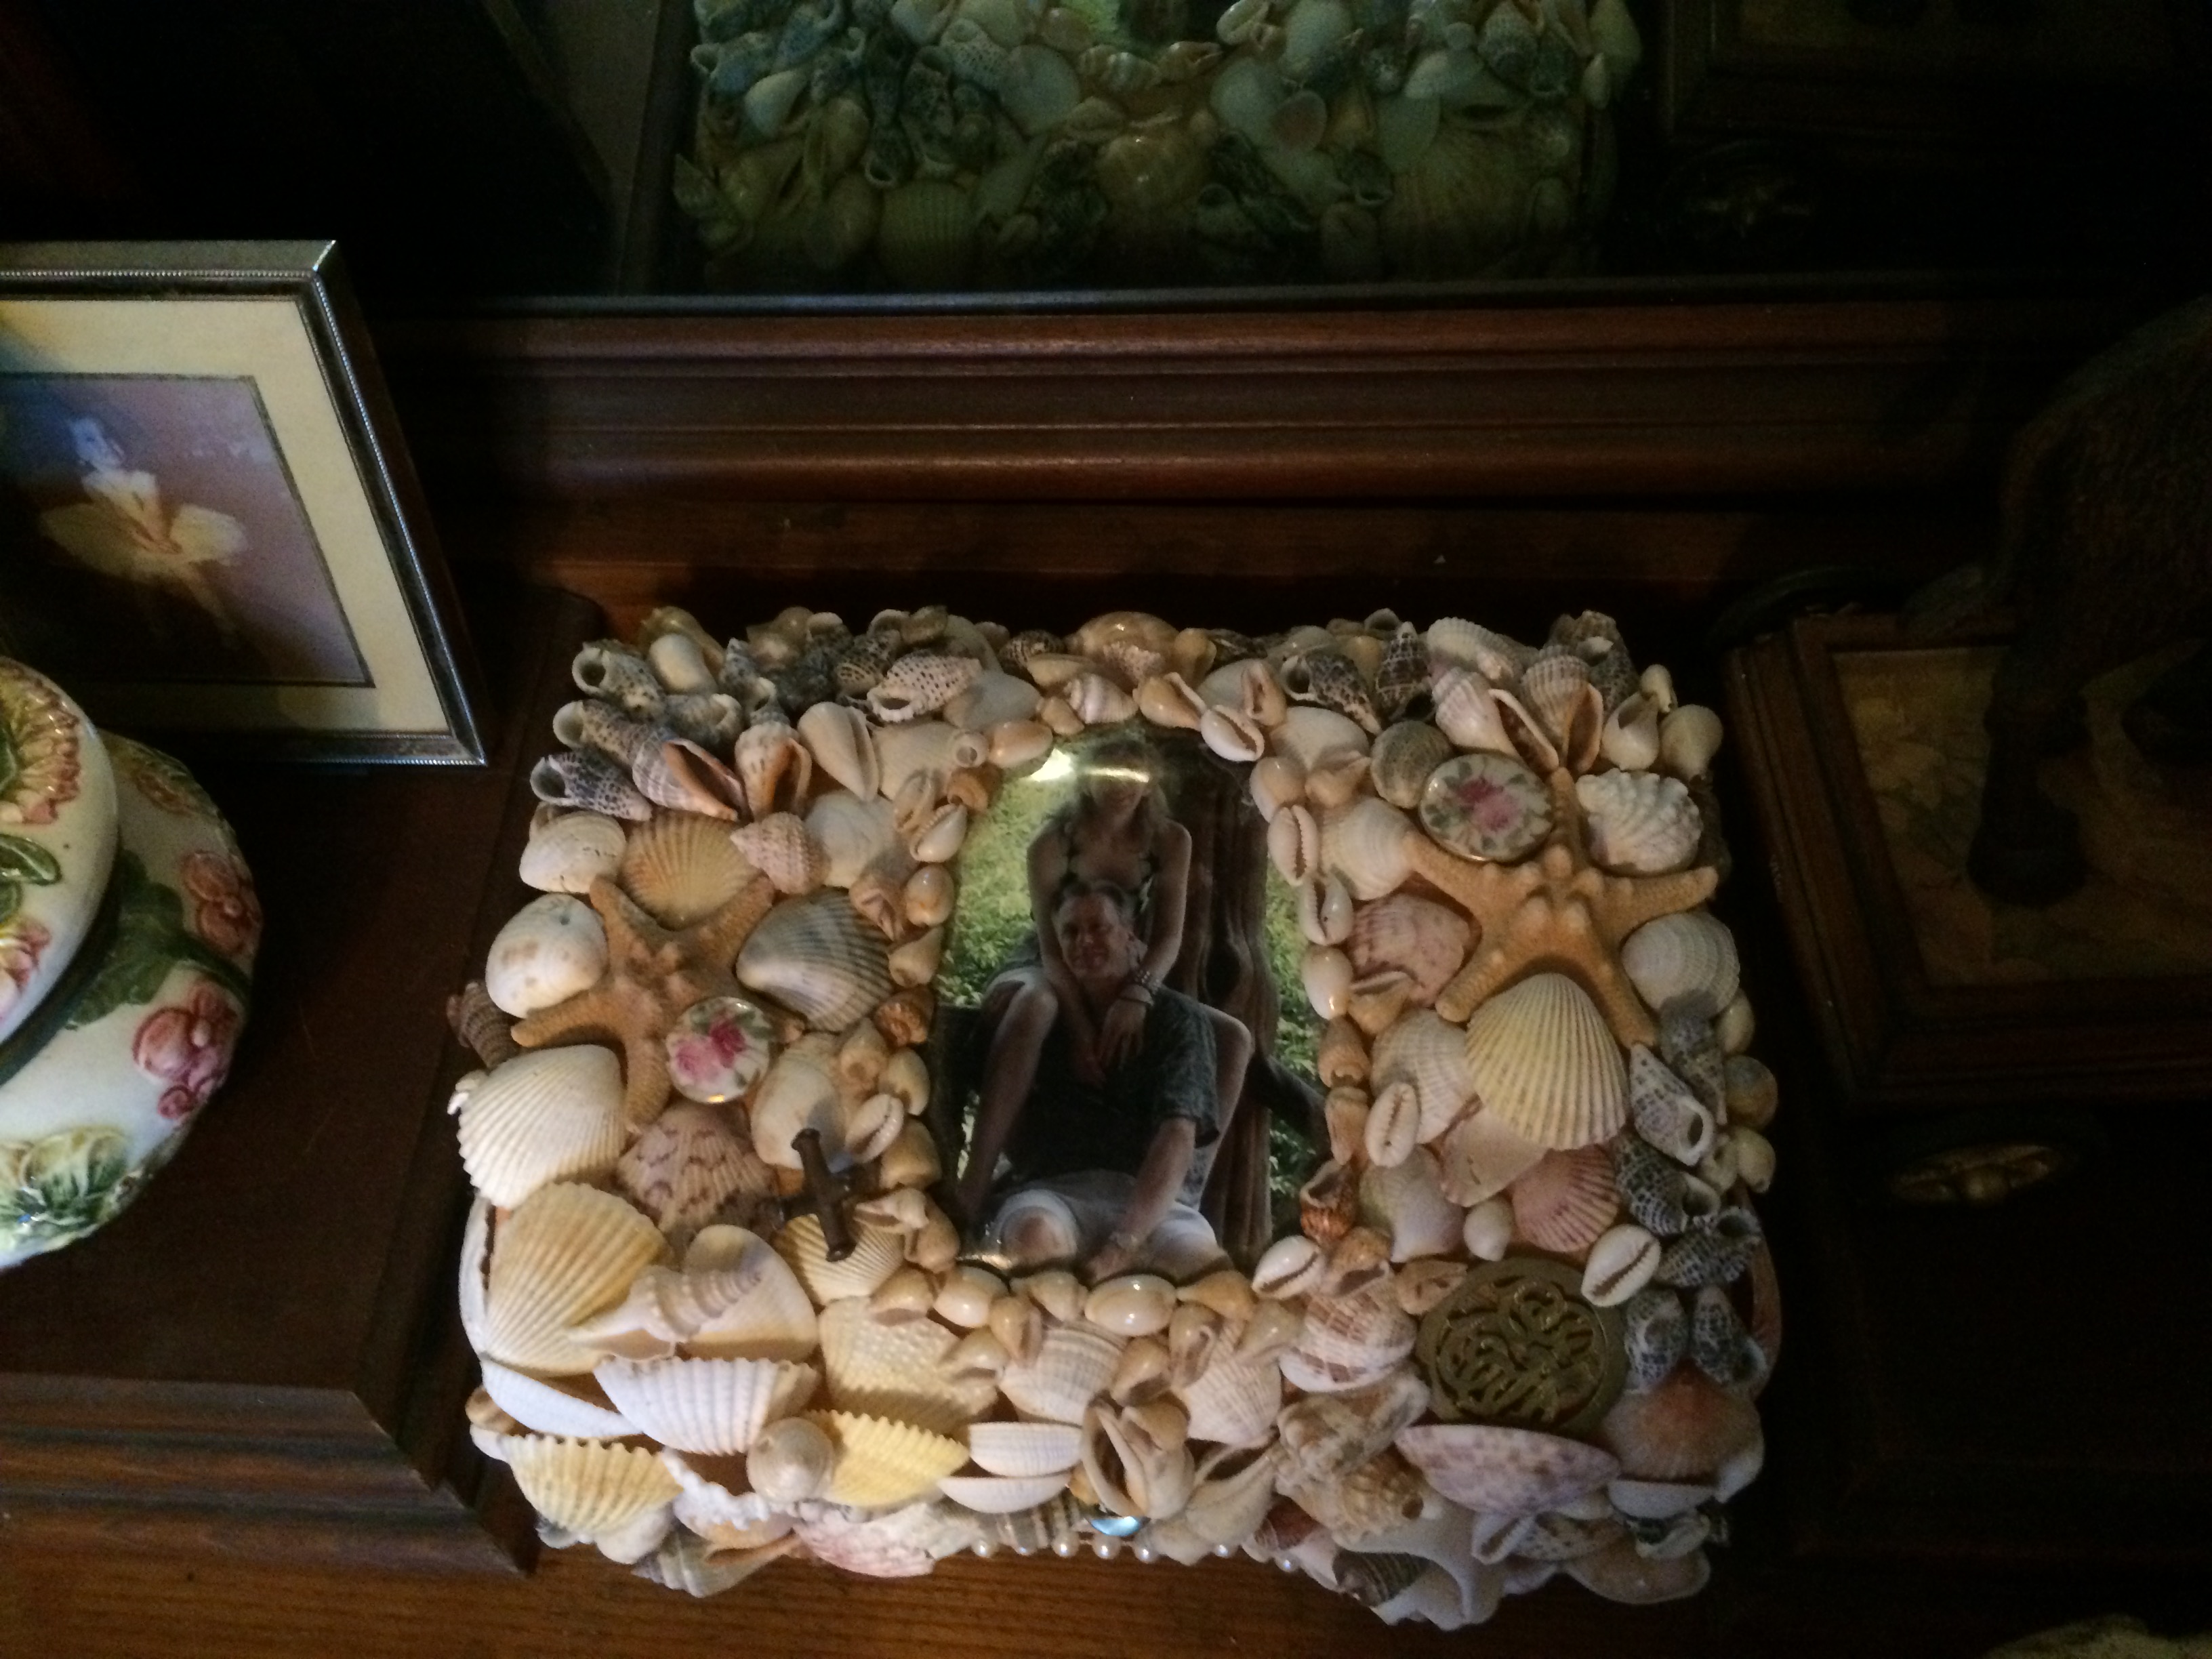
I worked with the putty in small sections at a time, fitting shells and adding tiny shells into small openings, filling as many gaps as I could find with more shells. This mirror was in pretty bad shape, so by covering it with the shells, the life was saved with a little hint of it’s history at the top.  The mirror too is timeless, and really fits into any style of decor be it eclectic to contemporary.  It has found a spot in my bathroom, and if I tire of it there, it will find another wall in the house to be appreciated.

colored shell mirror on bath wall

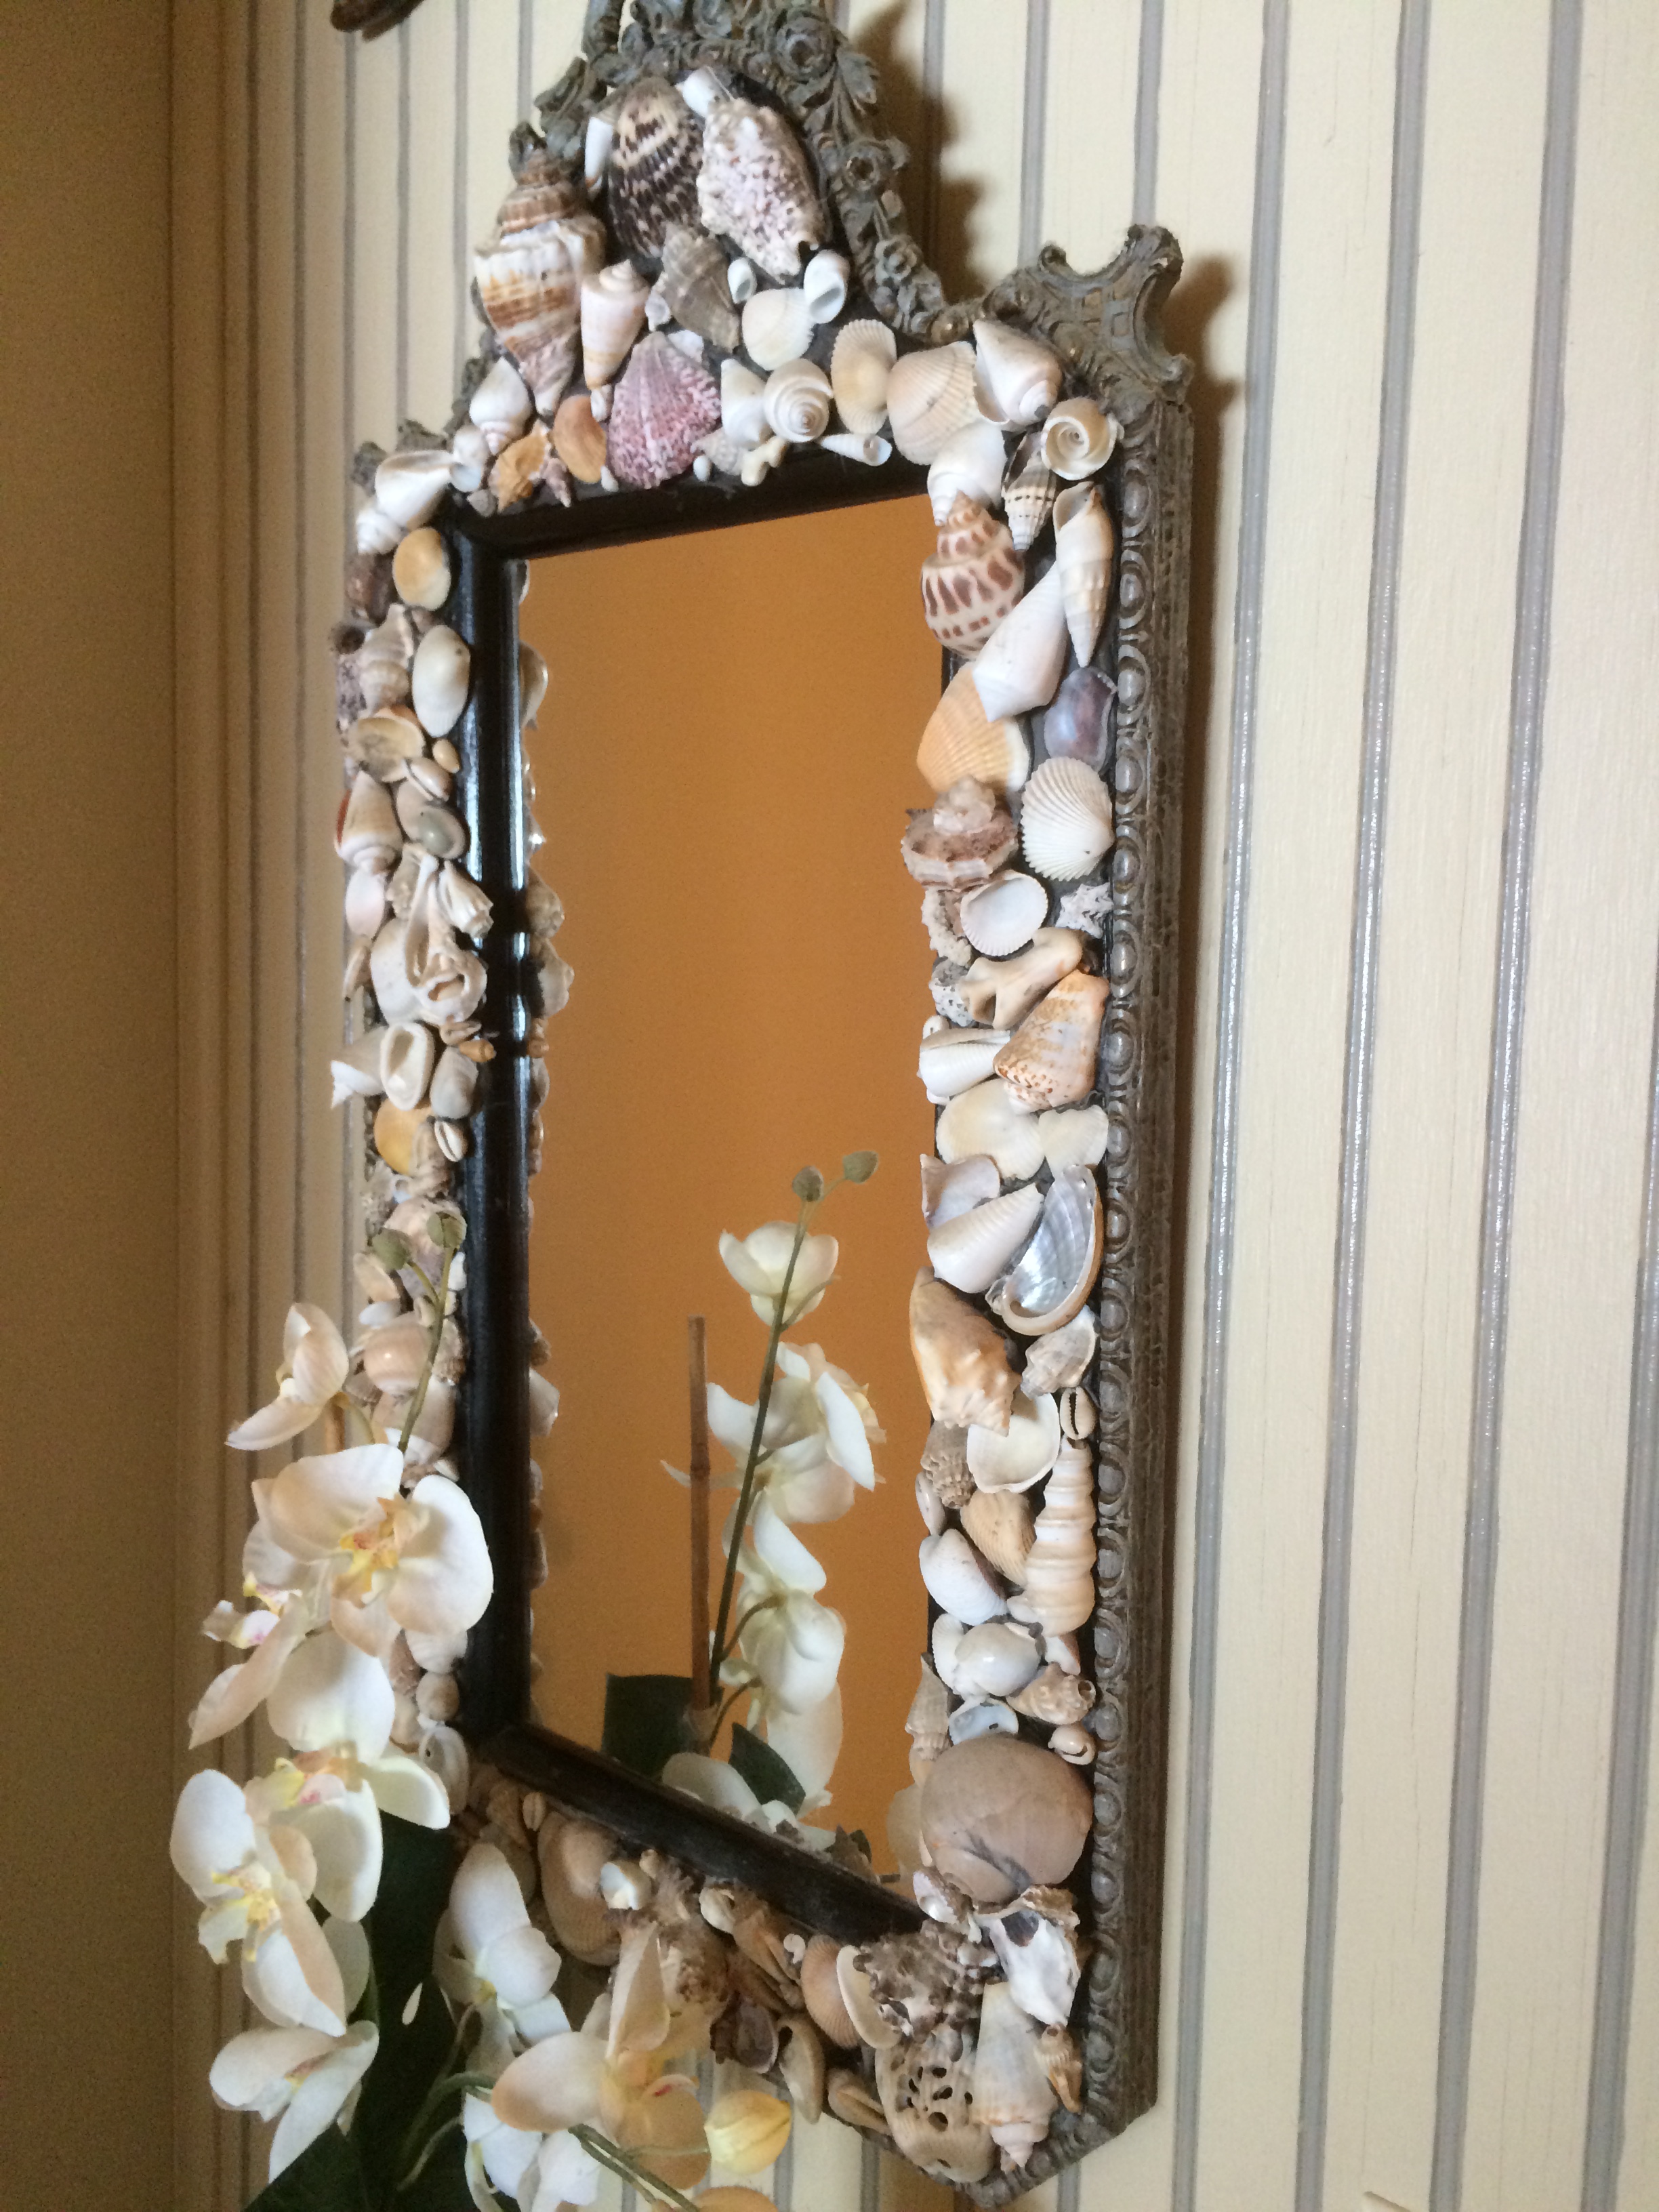
(And yes, the mirror is hanging on some bead board that I painted the wall color and then hand painted the seams of the bead board slats in gray….call me crazy, but for this accent wall in the bath, it works really well and didn’t take all that long to do.)

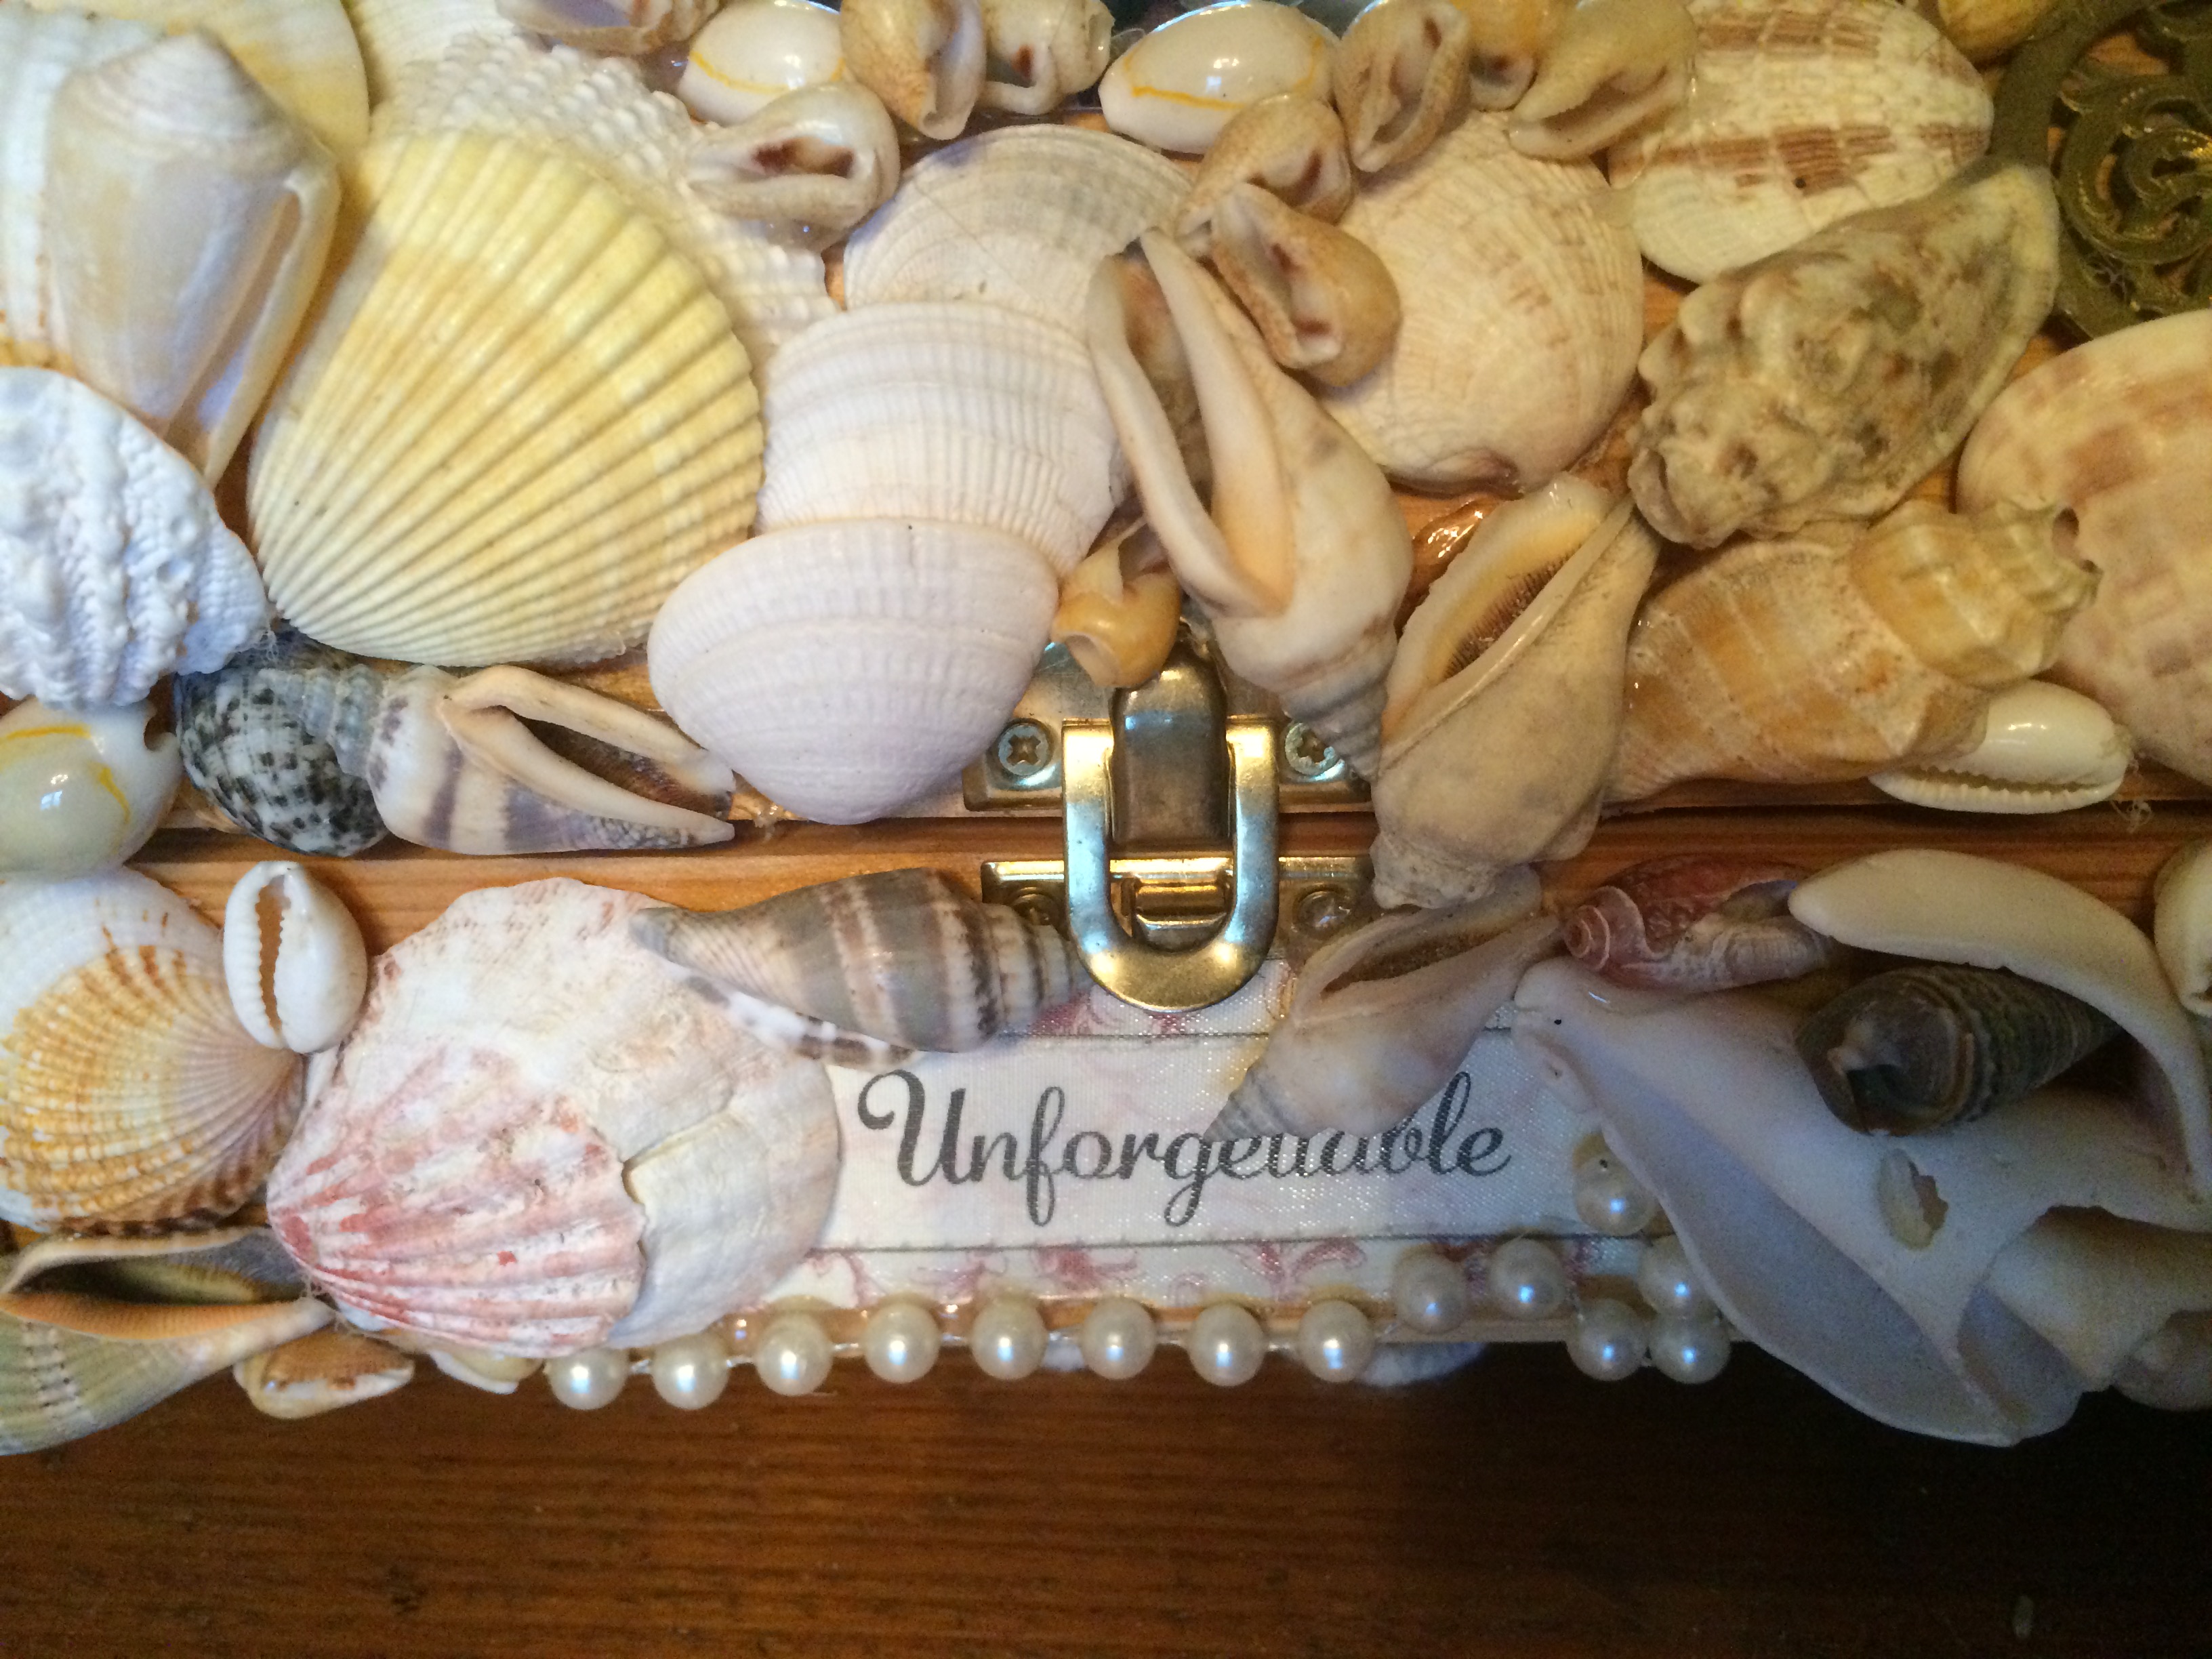
The last piece I did with shells, but certainly not the last piece I will use shells on, was a memento box I had covered in shells as a card box for my wedding.  This box now holds trinkets and memories and the shells encircled a favorite photo of ours on the lid.

shell memento box

Shells will always be a part of my home decor, and though I may not live by the seashore, the sea is remembered by the tiny treasures found on beaches and in thrift stores that share their natural beauty… off shore.

closeup shell memento box

To receive posts via email click HERE Subscribe in a reader or signup in Subscription box in sidebar.

“Rev” Up your Home Decor with Car Parts!

Taylor
21 Feb 2015
Art, Custom Design, DIY, Interior Design Room, Repurposed
Baldwinsville NY, Clay NY, coil, consultation, crankshaft, custom, decorator, designer, DIY, Home Interior Designs, junkyard, Liverpool NY, Man Cave, mirror, Phoenix NY, repurpose, reuse, side table, spring, Syracuse NY, tassel, TayRose Design, vase

I  have been known to find “art” in the most unexpected places.  I was designing a showcase home, to show how furniture and wall art can be made by using everyday items; thrown out items; stuff that was found at  the curb; or in thrift stores.  I didn’t have far to go for this design plan….

Have you ever been to a Pick & Pull?  Oh boy, first be sure you wear your grungy clothes and shoes, bring gloves and I didn’t know this, but be aware that prices are not cheap for many items.  That was my biggest surprise.

I wandered up and down aisles of discarded cars, smashed up cars, and parts laying on the ground.  It was eery walking around all of those car shells…. what stories they would tell-not good ones in most cases.

As I turned a corner, I saw this awesome sculptural piece of metal just sitting in the middle of the aisle like it was saying, “hey, here I am, just what you were looking for!”    I had no idea what part of the car it was, it was heavy, but I could still carry it, (oh, btw, you have to carry everything out yourself!)  The piece had beautiful rusty patina, and I thought it would serve perfectly as a side table base.  Now, if I could just carry it to the check out counter!

crankshaft piece from junkyard

I also found I think it was called an air cleaner that was metal, and I thought I could turn that piece into a wall art design.  So, I dragged my pieces to the checkout counter, had a bit of a sticker shock (I was very naive to costs, I thought being a junkyard it would be pennies to the pound or something similar…..oh no, more like $’s to the pound)  Anyway, I was happy with my purchases and now to get to work on creating my vision.

air cleaner mirror & vase

I started with the air cleaner.  I don’t have pictures of the process, but I can briefly tell you about it.  The air cleaner was black already, but I cleaned it up and spray painted it black again just to keep any rust at bay.  I found a round piece of mirror at the Dollar Store and glued it under the opening that was in the middle, then positioned it on the wall with the “arm” facing up so I could put some dried floral, then hung a tassel to complete the look.  This piece was for my client’s entry where we hung metal siding on one indented wall, then had a bench with custom pillows. He was thrilled- he loved the whole industrial look especially since being a race car driver, having car related “art” was what he had hoped for.

car coil vases

I also used some large coiled springs from his garage to place on both sides of the fireplace.  I inserted  large glass vases to hold floral sprigs.

For the side table, I found out that I had picked up a crankshaft from a car, and by turning it on end vertically, I was able to put a round glass top and bolt it on to a wooden round disk, found at Home Depot that I stained a dark brown.  I had cleaned up the crankshaft removing the grease, then sprayed it with a satin clear coat spray.  Super simple, and so interesting looking.  Being a small table, this table fits just about anywhere.  I love how something so industrial works inside a home.  This table would be perfect for a Man Cave, or set as I have it, in a corner next to a chair.

crankshaft table TayRose Design

Pick and pull parts from lots of sources to create unique items, and “Rev” up your decor!
To receive posts via email click HERE Subscribe in a reader or signup in Subscription box in sidebar.

Vintage Radio “Lights up” to a new tune

Taylor
08 Feb 2015
DIY, Interior Design Room, Office, Repurposed
Baldwinsville NY, bookcases, Clay NY, consultation, credenza, custom, decorator, designer, DIY, flicker bulb, Home Interior Designs, Home Office, lamp, Liverpool NY, Phoenix NY, radio, repurpose, reuse, Syracuse NY, TayRose Design, vintage

When I was designing this  home office, I was thinking about what I could put on the credenza that was going to be on the wall behind the desk.

office at Parade of Homes 2014 TayRose Design

At an auction I spied an old radio shell.  I loved the arched lines and vintage speaker fabric amazingly, in fairly good condition.  The knobs were missing, unfortunately, but I still thought I wanted to try and buy it and find a new purpose for this bygone piece.  I was able to get the radio, and it sat in my work room for a long time.  I even tried to sell it on Craigs List as is, but no one seemed to be interested.

old vintage radio shell


The design of the office was eclectic in feel, with framed old portraits, some beautiful turtle shells hung on the wall and wood with iron standing bookshelves.  There were old atlas books, and old cameras on the shelves, so when I remembered the old radio, I thought this would be a great addition to this office.  I didn’t want just the shell of a radio sitting there, I wanted it to have more of a purpose.  I looked at the back and removed the back panel of the radio….there was quite a bit of room in there, enough for a small lamp of some kind.  A lamp where the light could glow out through the speaker fabric on the front of the radio…and if the light flickered, like a candle….ooo so much the nicer!!

inside old radio shell

I cleaned out the inside of the radio really well and re-stained the radio shell after a light sanding.  Some of the wood veneer was chipped and missing, but most of the radio was in good shape, and that coat of stain made a wonderful difference.  All I had to do was set my small little lamp inside, add the flickering light bulb I found at the Dollar Store, and plug it in….the bulb was an orangey color, so it really looked like a flame, which was really just the animated touch that warmed up that already cozy office.

flicker bulb for radio


I was really happy with the outcome, so glad something that was just a shell of it’s former self, now stood renewed not with a tune but with a warm glow.

radio lamp in office

Footstool to server….riser to occasion

Taylor
02 Feb 2015
Custom Design, Dining Room, DIY, Repurposed
Baldwinsville NY, Clay NY, consultation, custom, decorator, designer, DIY, footstool, hand painted, Home Interior Designs, Liverpool NY, Parade of Homes, Phoenix NY, repurpose, reupholster, reuse, riser, serving tray, Syracuse NY, TayRose Design

During my usual scouting days at the Thrift Stores, I seemed to find quite a few small footstools. Some had storage and some had handles and some just spindley legs and all of them in need of some TLC. I couldn’t pass up the meager prices they were asking, and gathered them up knowing I would have a use for them sometime…and it didn’t take long before they solved a tablescape dilemma for me.
Interior design dining room  Parade Home by TayRose Design

I was designing for the Parade of Homes this past year, and since the formal dining room was the first room you noticed when walking through the front door, I wanted a real “wow” moment. The table setting would be over the top..not something that would be practical for a dinner with friends, but a really fun tablescape to keep on the table when not in use.
Tablescape Design dining room  TayRose Design

I had a china cabinet/buffet where I wanted to set various sized vegetable dishes and tureens, plus on the table, have different decor that I wanted to be at different heights so everything wasn’t all just sitting flat on the table. So, what could I use as a riser to lift up tableware so heights are staggered?…hmm…that stool over there is just the right height…I could reupholster the top to coordinate with my colors, and maybe paint the legs in a fun way.

Stool before with handles


So, over the next few days, I removed the old upholstery and replaced with new, adding some upholstery tacks along the edge for accent detail, painted designs on the wooden legs and handles, and sanded and restained the wood surface as needed. I even added wheels to the bottom of an extra storage stool lid I had leftover. storage stool for riser TayRose Design

The stools worked perfectly for risers both on the buffet and table. I was able to put dishes as well as centerpiece decor on top of the stools to create different heights but in a pretty way without having to stack books, or stick boxes under tablecloths. I love using my stools in different areas of the house, here is the after of that stool above where I reupholstered it and painted accent colors on the handles.   I use it to hold a tray of goblets ready for guests.
Stool holding goblets as riser TayRose Design

I will always look at a small footstool in the same way again…..

To receive posts via email click HERE Subscribe in a reader or signup in Subscription box in sidebar.

Accent Cabinet gets Island makeover

Taylor
30 Jan 2015
Custom Design, DIY, Interior Design Room, Kitchen, Repurposed
Baldwinsville NY, cabinet, Clay NY, consultation, countertop, custom, decorator, designer, DIY, Home Interior Designs, kitchen island, knobs, Liverpool NY, pegboard, Phoenix NY, Pier 1, pots and pans, recipe books, repurpose, reuse, Syracuse NY, TayRose Design

We all have read about similar dilemmas…small kitchens, wishes for that extra counterspace- dare we even dream of having room for an island?   

Kitchen Island cabinet TayRose Design

Well, I came across one of those kitchens…my own!  When I moved to my husband’s house, which was a small camp built in the 40’s on the river, I had to downsize from a 3 bedroom 2 bath house filled with furniture and decor I had been collecting for years.   I really had to think creatively on how to stretch what space I had in this kitchen.

Our kitchen is still a work in progress- a wish list for new cabinet fronts someday, but we did remodel ourselves adding a new back-splash and appliances with as much as we could at the time.   That is definitely another subject for a blog post…so on with the story..

During this whole semi-remodel, I really wanted something that would somehow partition the kitchen from the entry into the house since the mudroom comes right into the kitchen area.

Kitchen island storage view  TayRose Design

While out on one of my many shopping trips, this time at Pier 1, I was with my hubby (this doesn’t happen too often so fate was in our midst) we spied out of the corner of our eyes, this cabinet with an Asian theme which seemed to be just the right size.  Could this work?  Since it was on sale, and we were afraid it would be gone if we left it there to think about, we bought it and brought it home to try.  It was perfect, I loved it and I love the idea of repurposing an accent cabinet into a kitchen island.  Top Fabricators, the firm making our countertops http://www.countertopsbytopfab.com/had no trouble at all measuring and fitting the countertop onto the top of the cabinet….it fit like a glove!

I also wanted the island to be functional all the way around, so hubby got creative and got some peg board that I painted and we screwed to the back side facing the sink where I now can hang pots and pans at easy reach to the stove.  We also made great use of the ends of the cabinet, adding brass knobs over Chinese coins to hang up the pot lids, allowing for more room in the cabinets for other needs.  My recipe books are kept inside the cabinet and the drawers are perfect for our tools/junk, bottle openers, and cat treats.

Pot storage on Kitchen island

Although I didn’t have room for an island to sit at, I’m still very grateful for my island.  It not only didn’t take up much floor space, it gave me an additional surface for food prep, pot storage, and recipe book housing.

I’m so glad we opted to try an accent cabinet and not a standard kitchen cabinet for our kitchen…it’s more of a piece of furniture that greets you at the door and reveals it’s pretty practicalities!

To receive posts via email click HERE Subscribe in a reader or signup in Subscription box in sidebar.

  • 1
  • 2
  • 3
  • 4
  • 5
Recent Posts
  • Owl Inspired Theme Toddler Bedroom
  • Painted trunk blends with Decor
  • Create a “trunk” inspired look for a Nightstand
  • Decorate fireplace wall “naturally” on a budget
  • How to Inspire Design with Pinterest Photos
Archives
  • February 2018
  • January 2018
  • October 2016
  • January 2016
  • June 2015
  • April 2015
  • March 2015
  • February 2015
  • January 2015
  • December 2014
  • November 2014
  • June 2014
  • May 2014
Newsletter subscription form

Enter your email address:

Delivered by FeedBurner

Categories
  • Art
  • Bathroom
  • Craft Project
  • Custom Design
  • Dining Room
  • DIY
  • Entry
  • Holiday
  • Interior Design Room
  • Kids Room
  • Kitchen
  • Living room
  • Master Bedroom
  • Mudroom
  • Office
  • Repurposed
  • Theme Room
Houzz
Remodeling and Home Design
Instagram
Instagram
HomeTalk
Featured on Hometalk.com
Follow me on Facebook
TayRose Design

Promote Your Page Too
315.224.4142
© 2014 k.linndesign. All Rights Reserved.