• Shop
    • Antiques
    • Home Decor
    • Jewelry
      • Necklaces
      • Bracelets
      • Earrings
      • Rings
      • Pins
    • Upcycled handmade
      • upcycled womens tops
      • upcycled womens jackets
      • Upcycled womens pants
      • upcycled pillows
      • Upcycled Pickleball Shirts
      • upcycled purses
    • MacKenzie-Childs
      • MacKenzie-Childs Taylor Dinner Plate
      • MacKenzie-Childs Taylor Luncheon Plate
      • MacKenzie-Childs small oval dish
      • MacKenzie-Childs Taylor Bread & Butter
      • MacKenzie-Childs Taylor Mugs
      • MacKenzie-Childs Taylor Saucers
      • MacKenzie-Childs Taylor Breakfast Bowls
      • MacKenzie-Childs Taylor Berry Bowl
      • MacKenzie-Childs Taylor Chowder Bowls
      • MacKenzie-Childs Wallcourt pieces
      • MacKenzie-Childs Enamelware
      • MacKenzie-Childs Torquay dinnerware
      • MacKenzie-Childs MacLachlan Dinnerware
      • MacKenzie-Childs Taylor Serving Ware
      • MacKenzie-Childs Glass Goblets
      • MacKenzie-Childs glass tumbler
      • MacKenzie-Childs Glass Serving pieces
      • MacKenzie-Childs Decor pieces
      • MacKenzie-Childs Placemats & Coaster sets
      • MacKenzie-Childs Paper Products
      • MacKenzie-Childs Tile
    • Shoes
  • Home
  • About
    • I believe…
  • Gallery
    • Custom Design
    • Interior Design
      • Bath
      • Bedroom
      • Dining Room
      • Entry Way
      • Kitchen
      • Laundry
      • Living Room
      • Office
      • Mudroom
      • Themed Rooms
  • Color CCE
  • Services
    • Services
    • Design Process
    • New Construction
  • Journal
    • DIY
    • Repurposed
    • Art
    • Interior Design Room
    • Holiday
    • Theme Room
  • Press
  • Contact

From Garden Trellis to Master Headboard

Taylor
27 Jan 2015
DIY, Interior Design Room, Repurposed
arbor, Baldwinsville NY, Clay NY, consultation, custom, decorator, designer, DIY, eRegal Studio Photography, headboard, Home Interior Designs, Interior Design wall art, Liverpool NY, Lowes, Phoenix NY, repurpose, reuse, stain, Syracuse NY, TayRose Design, trellis

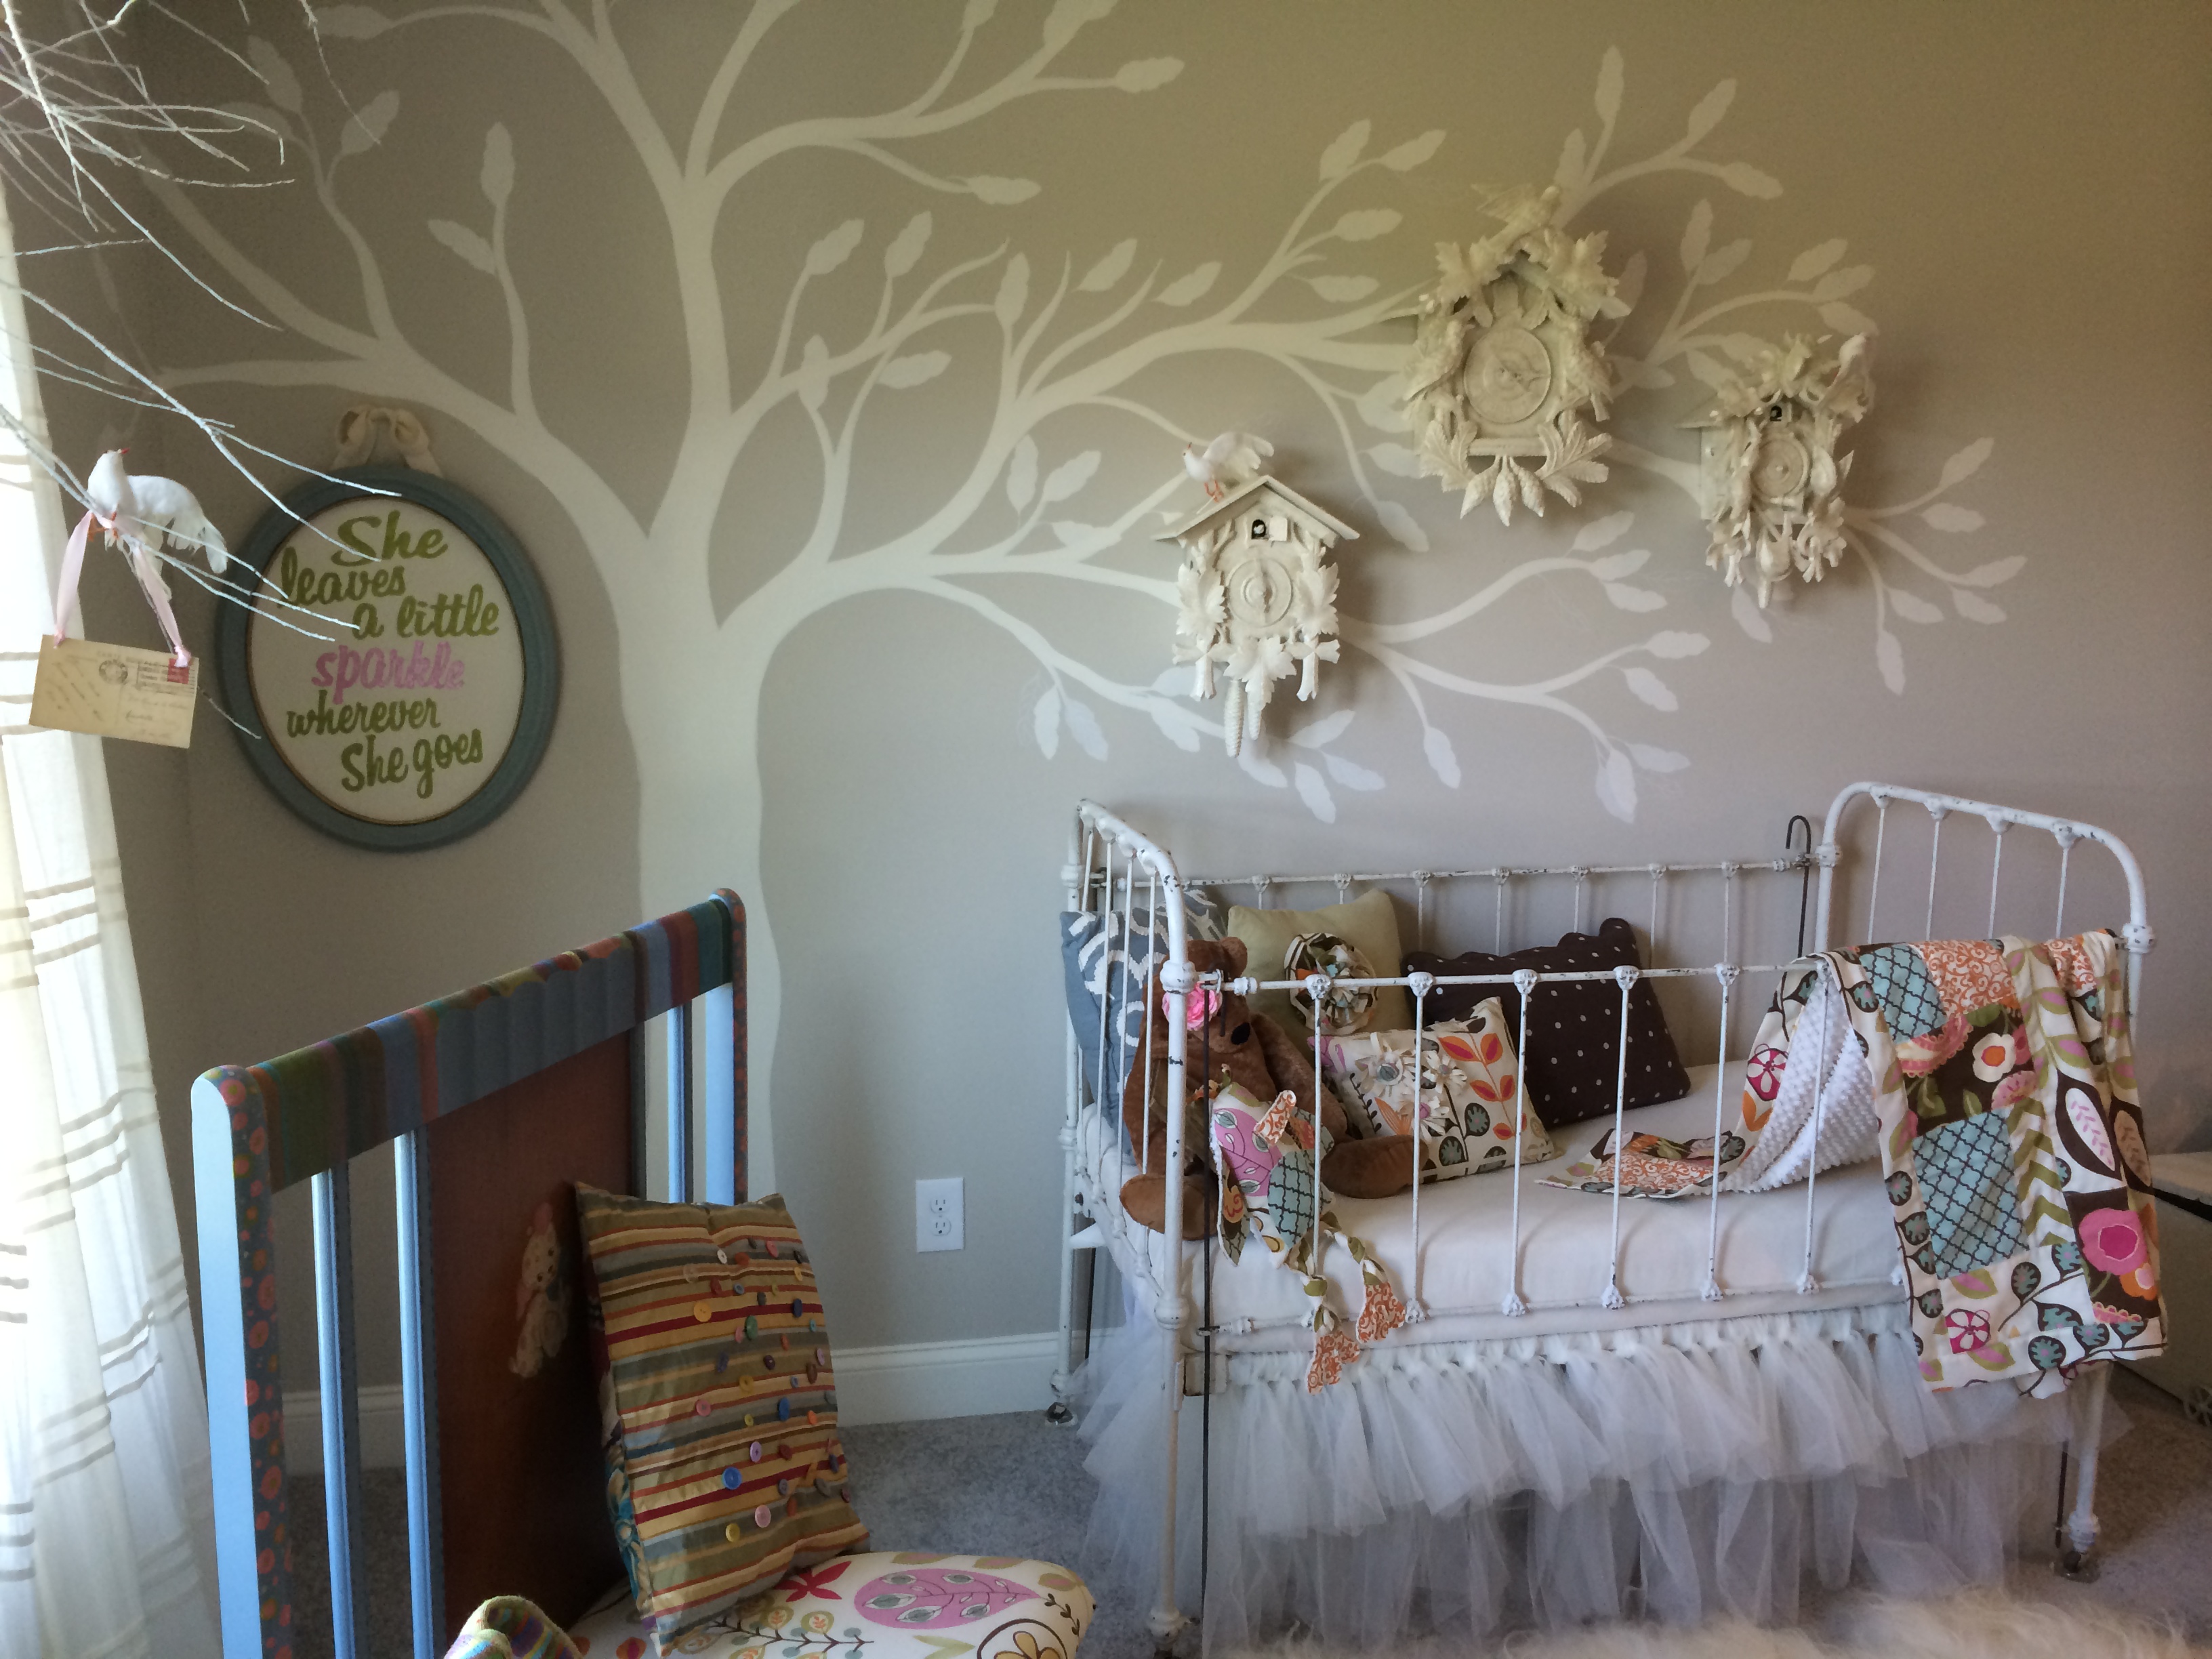
Ok, it’s time….time to re-style and re-design the bed.  The big, heavy, orangey colored oak bed set that my husband bought years ago, before I came on the scene, has just got to move on to greener pastures and let something interesting, clever and more in tune with the room style stand tall in it’s place.  arbor-headboard


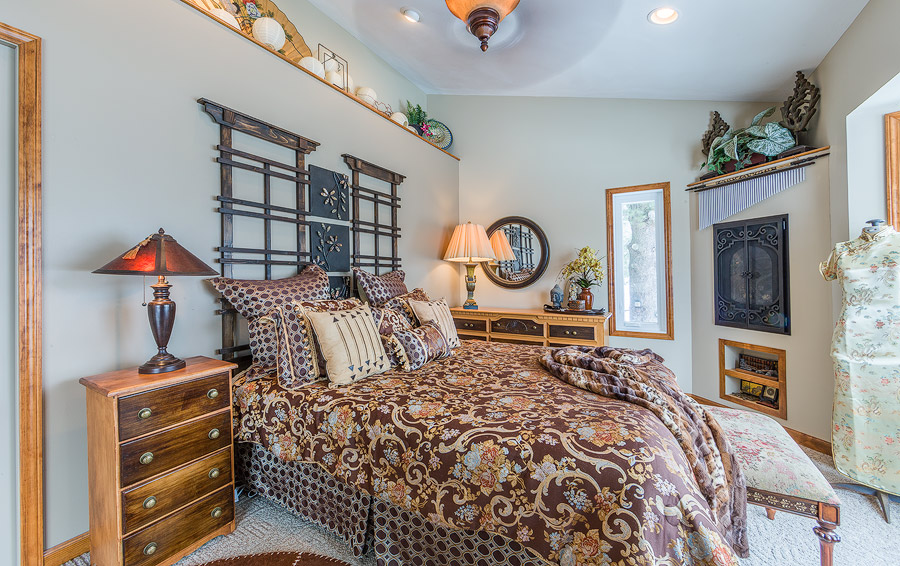
The bed did match the bedroom dressers that were given a new look written about here http://tayrose.com/2014/05/13/changing-up-a-dated-dresser-set/ but the style of the bed just didn’t fit in with the rest of the set now, so it has moved out to the shed for a future project.old headboard oak


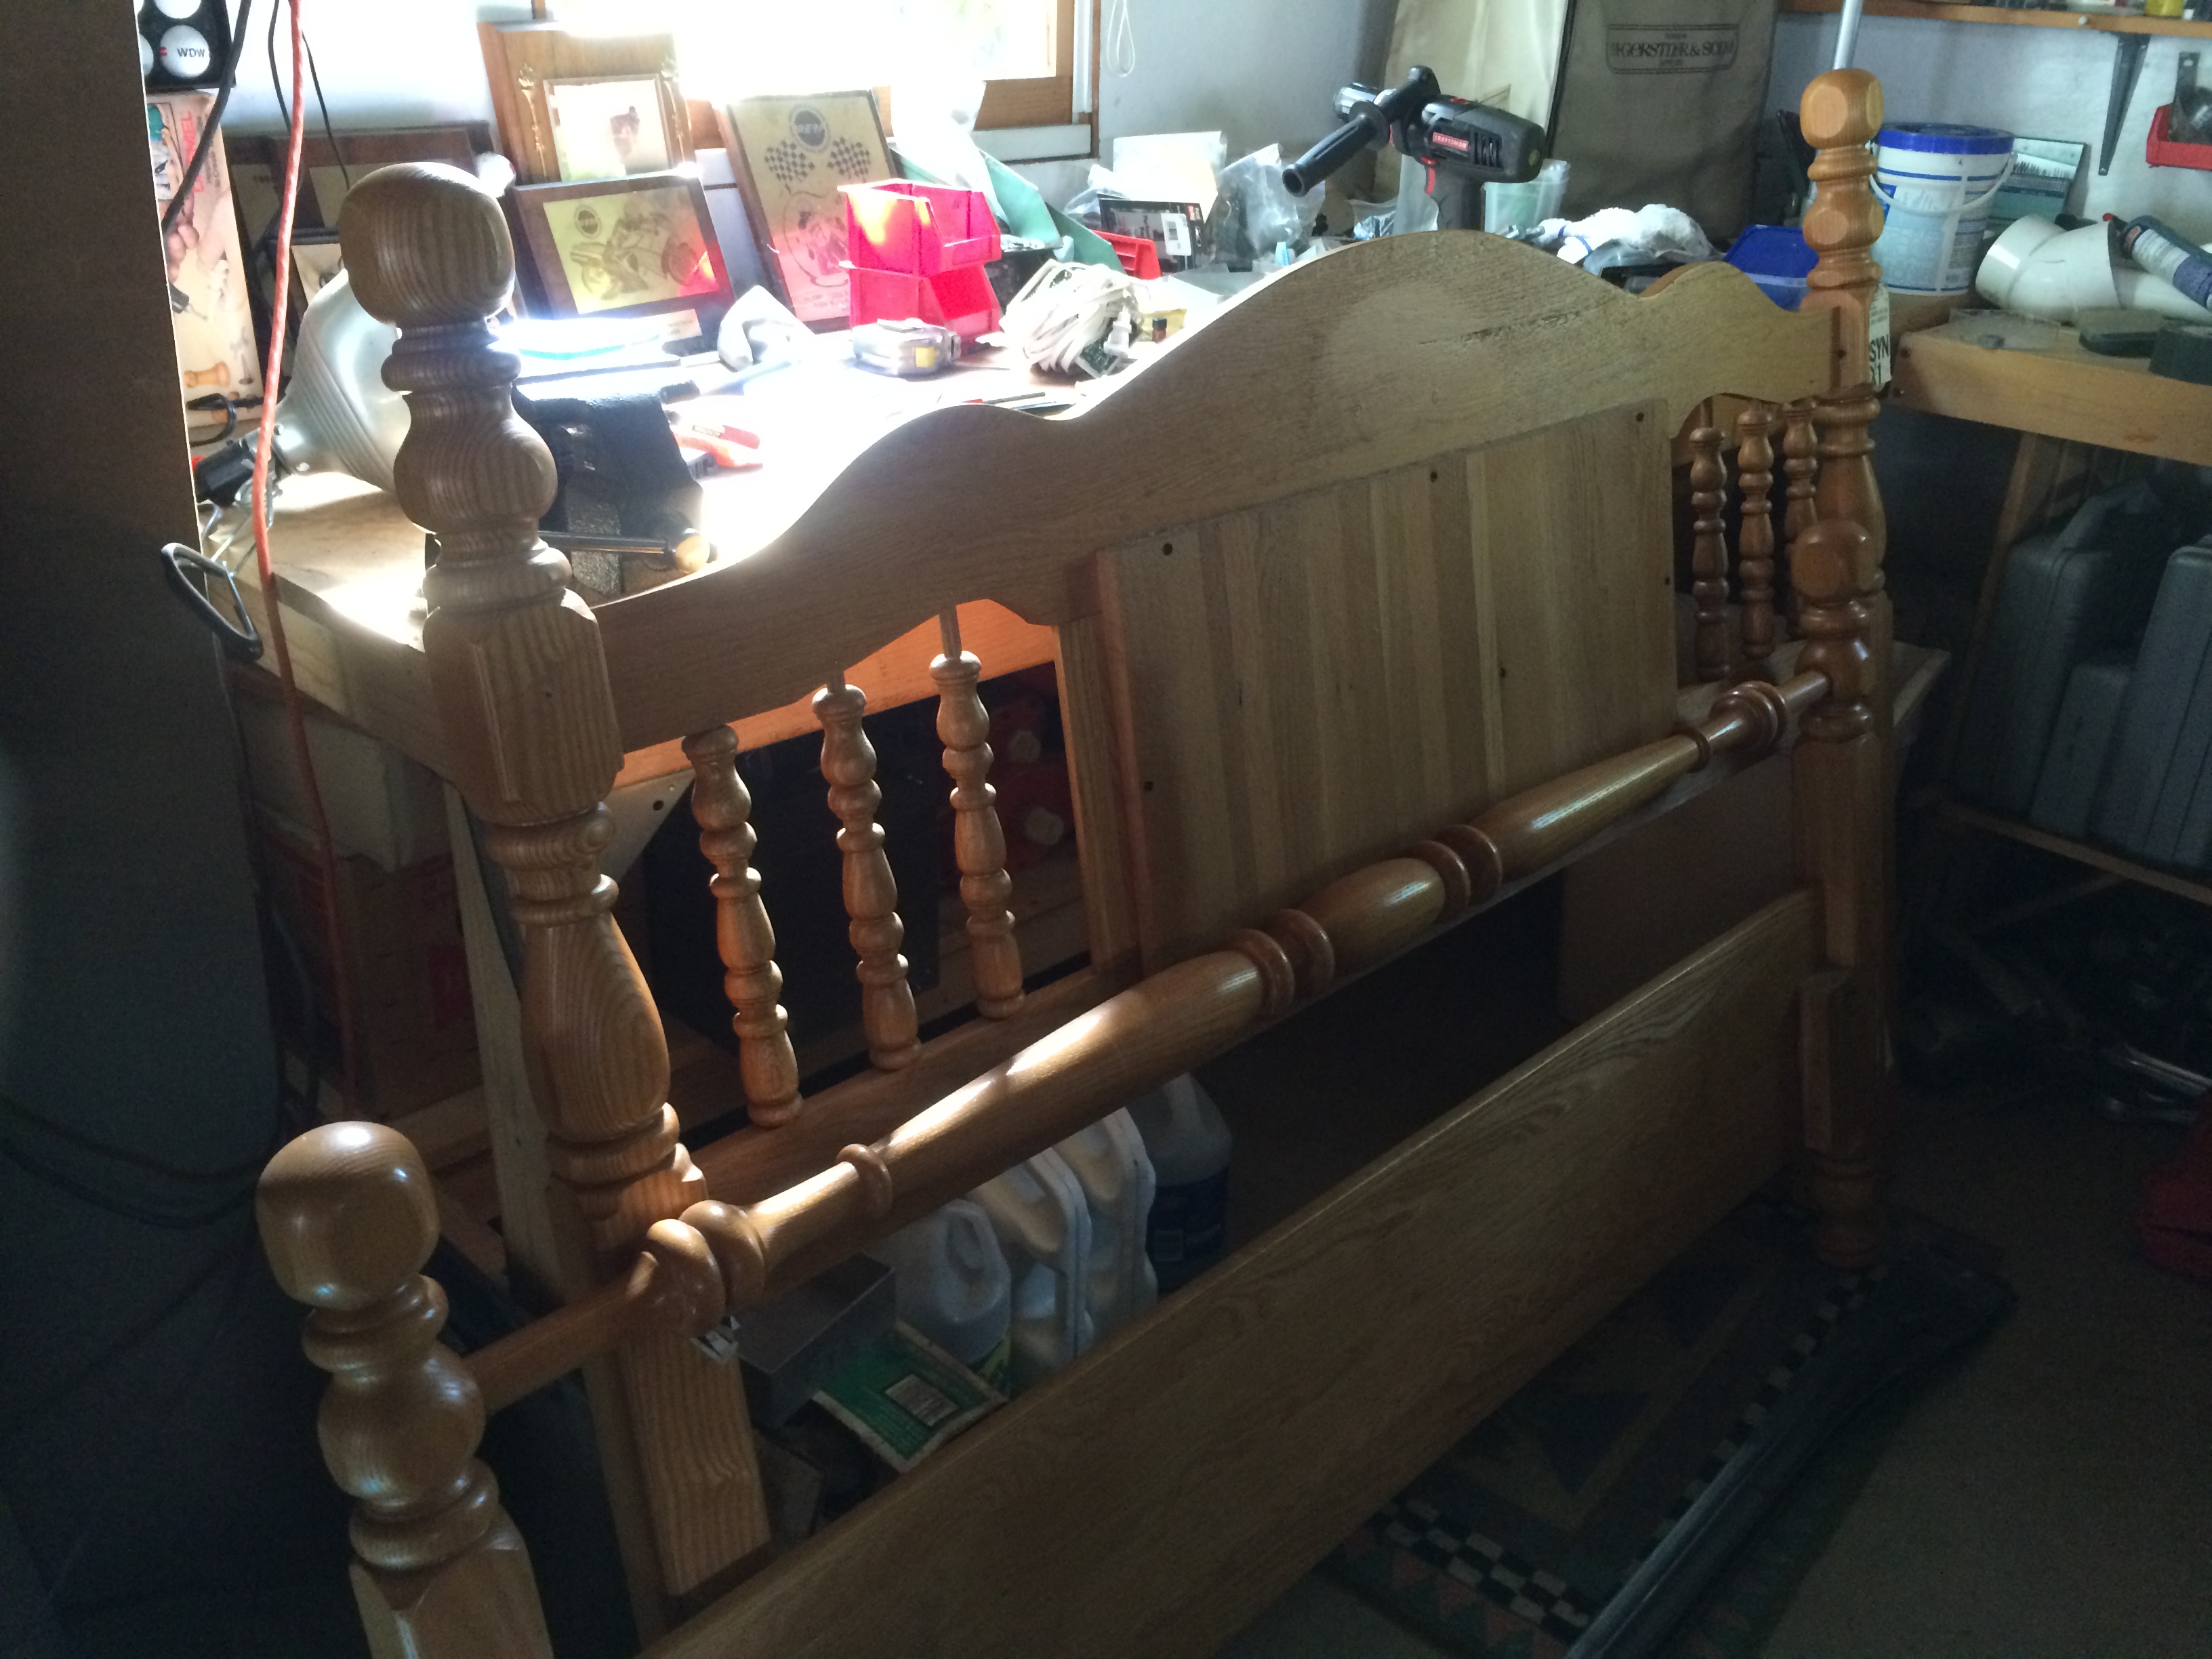
For the new headboard look, I wanted something tall, since we have vaulted ceilings, something with an Asian flair, something I could make that was budget friendly,  and not too difficult that would take weeks to make.  I remembered last summer while at Lowe’s shopping for plants, seeing these wooden trellis panels hanging on the back wall http://www.lowes.com/pd_6537-15173-8621262_0__?productId=3735495&Ntt=garden+trellis&pl=1&currentURL=%3FNtt%3Dgarden%2Btrellis&facetInfo=

There were several types, but the ones I really liked already had an Asian style to them, so I wouldn’t have to do anything but apply a finish to the raw wood and install.  I felt 2 panels would be wide enough for a Queen size bed especially if I split them up and hung wall art in-between.  So I bought them and brought them home.  I was doing the happy dance when I got them on sale at the end of the season so they met the budget friendly criteria…check, they had an Asian flair that I wouldn’t have to add…check….and if I stain them dark like the dresser fronts to match, how simple is that? Double check!!

garden arbor from Lowes


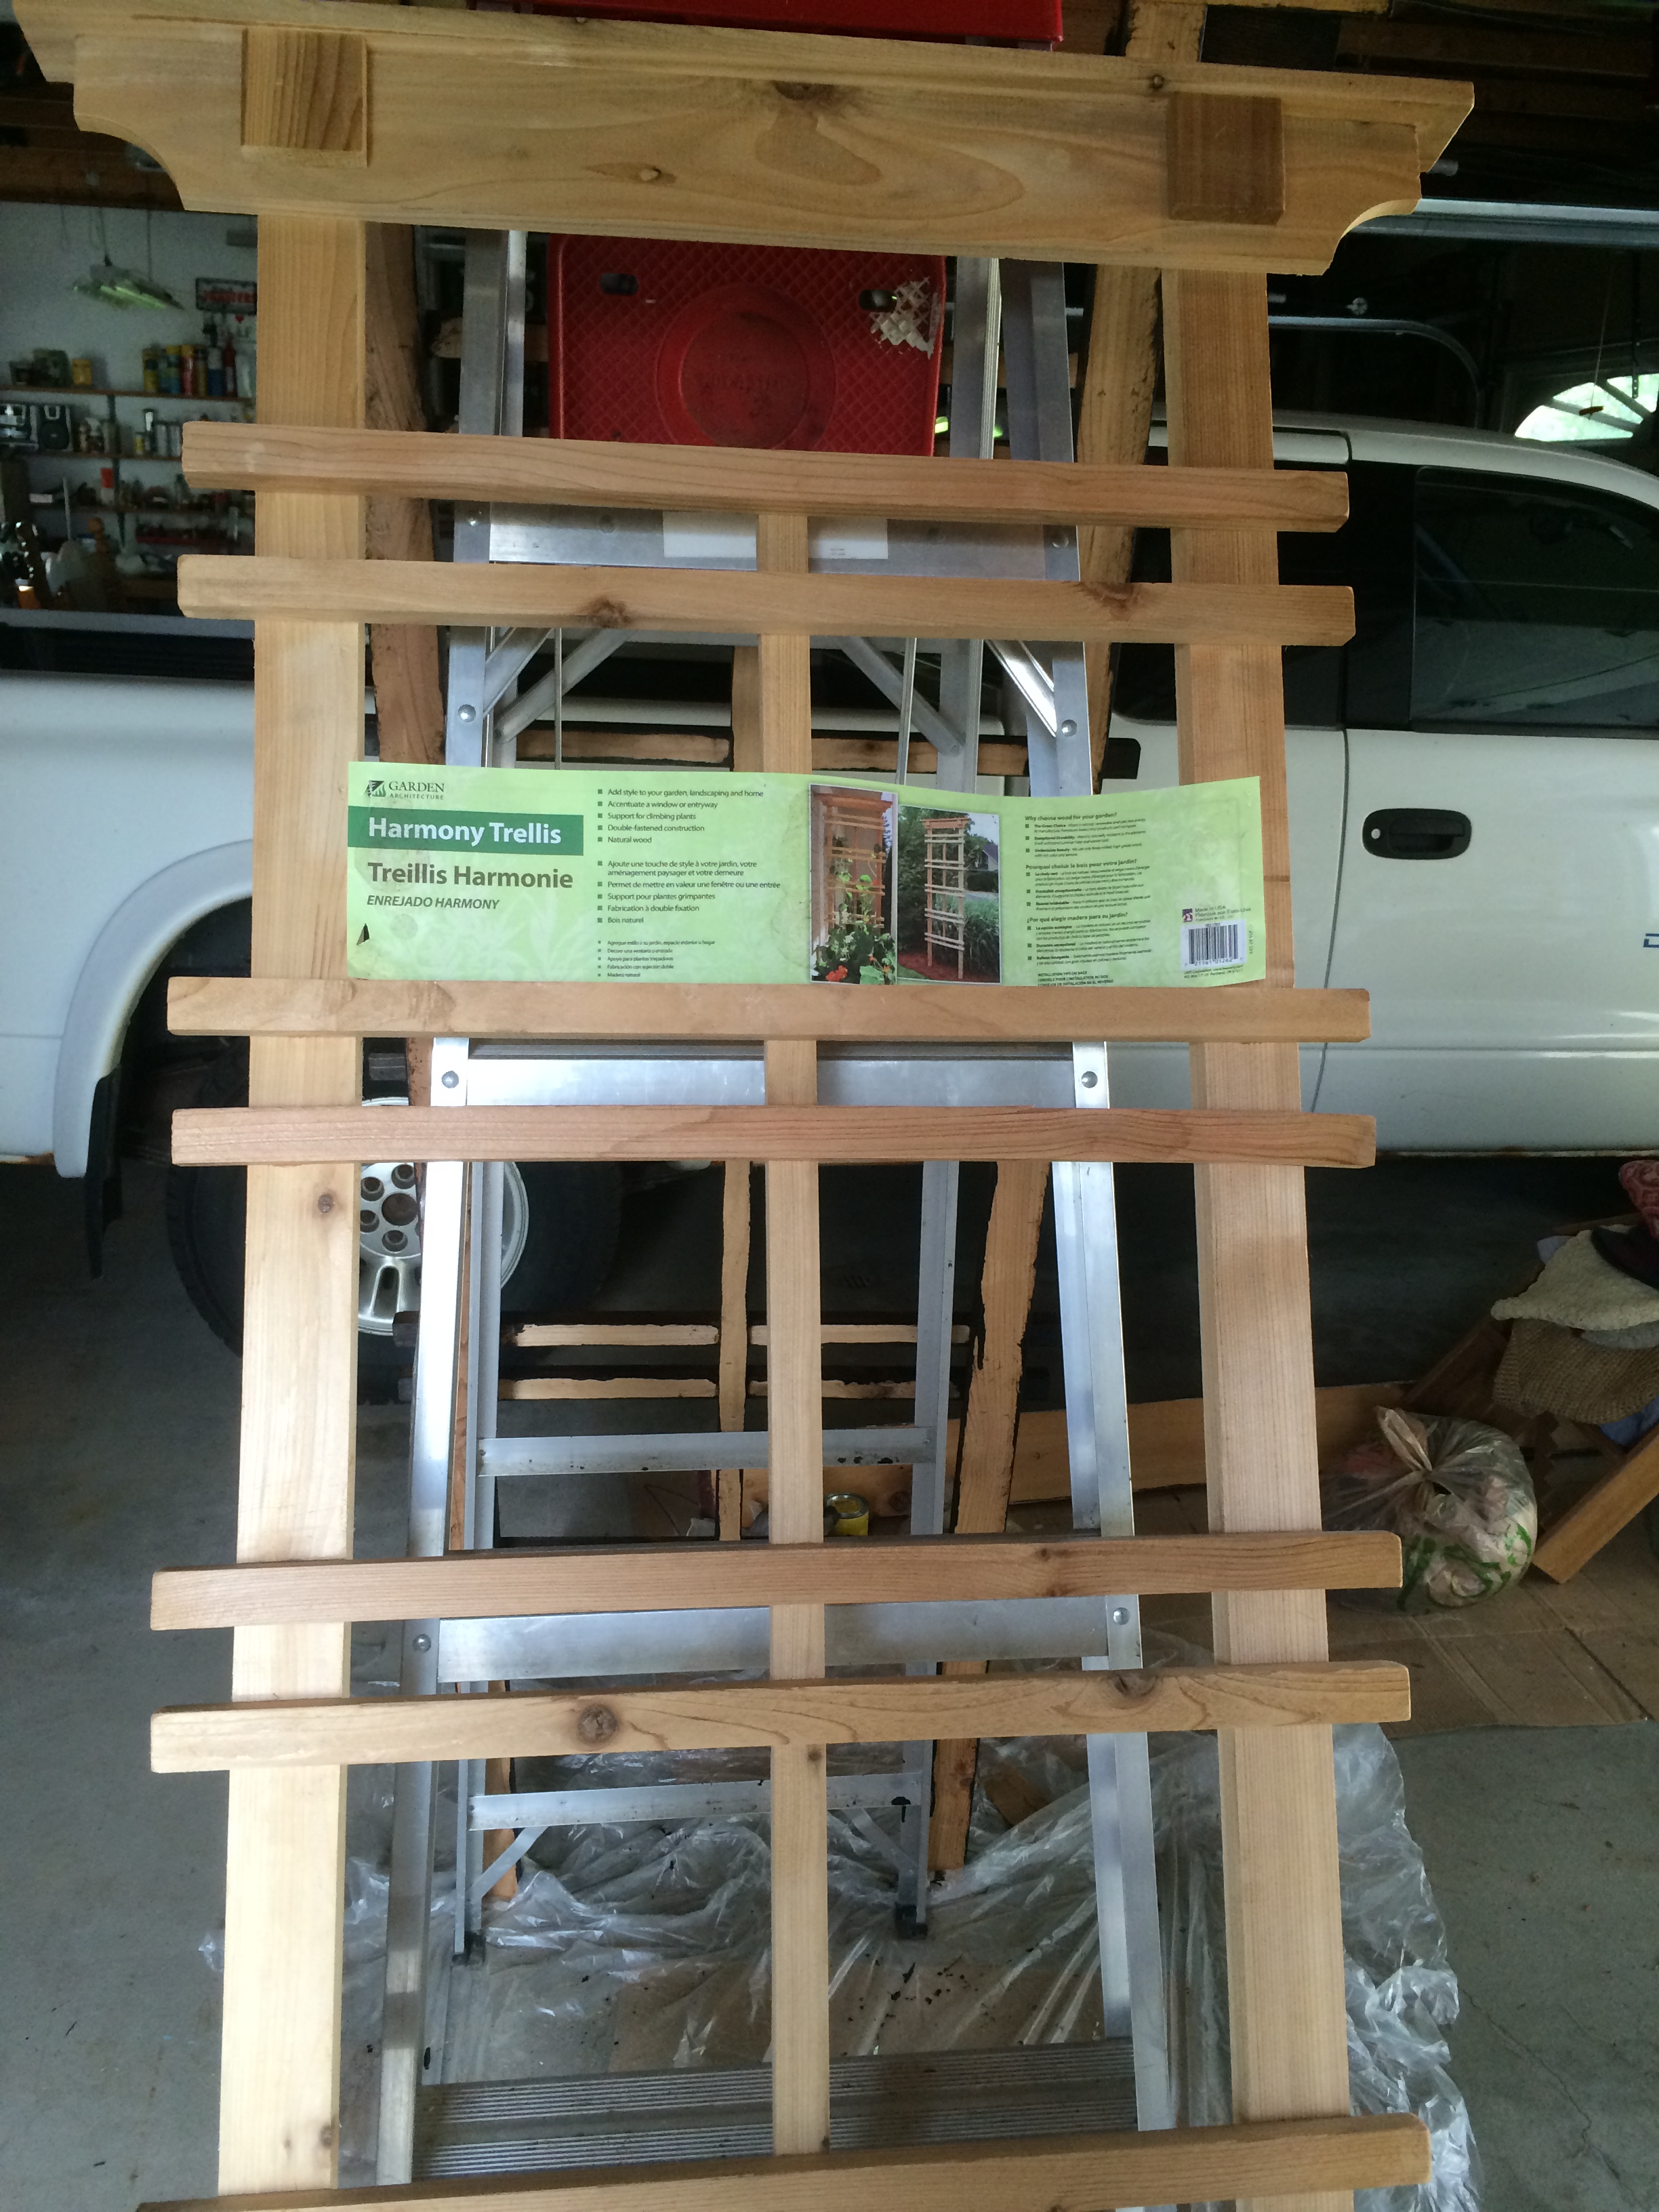
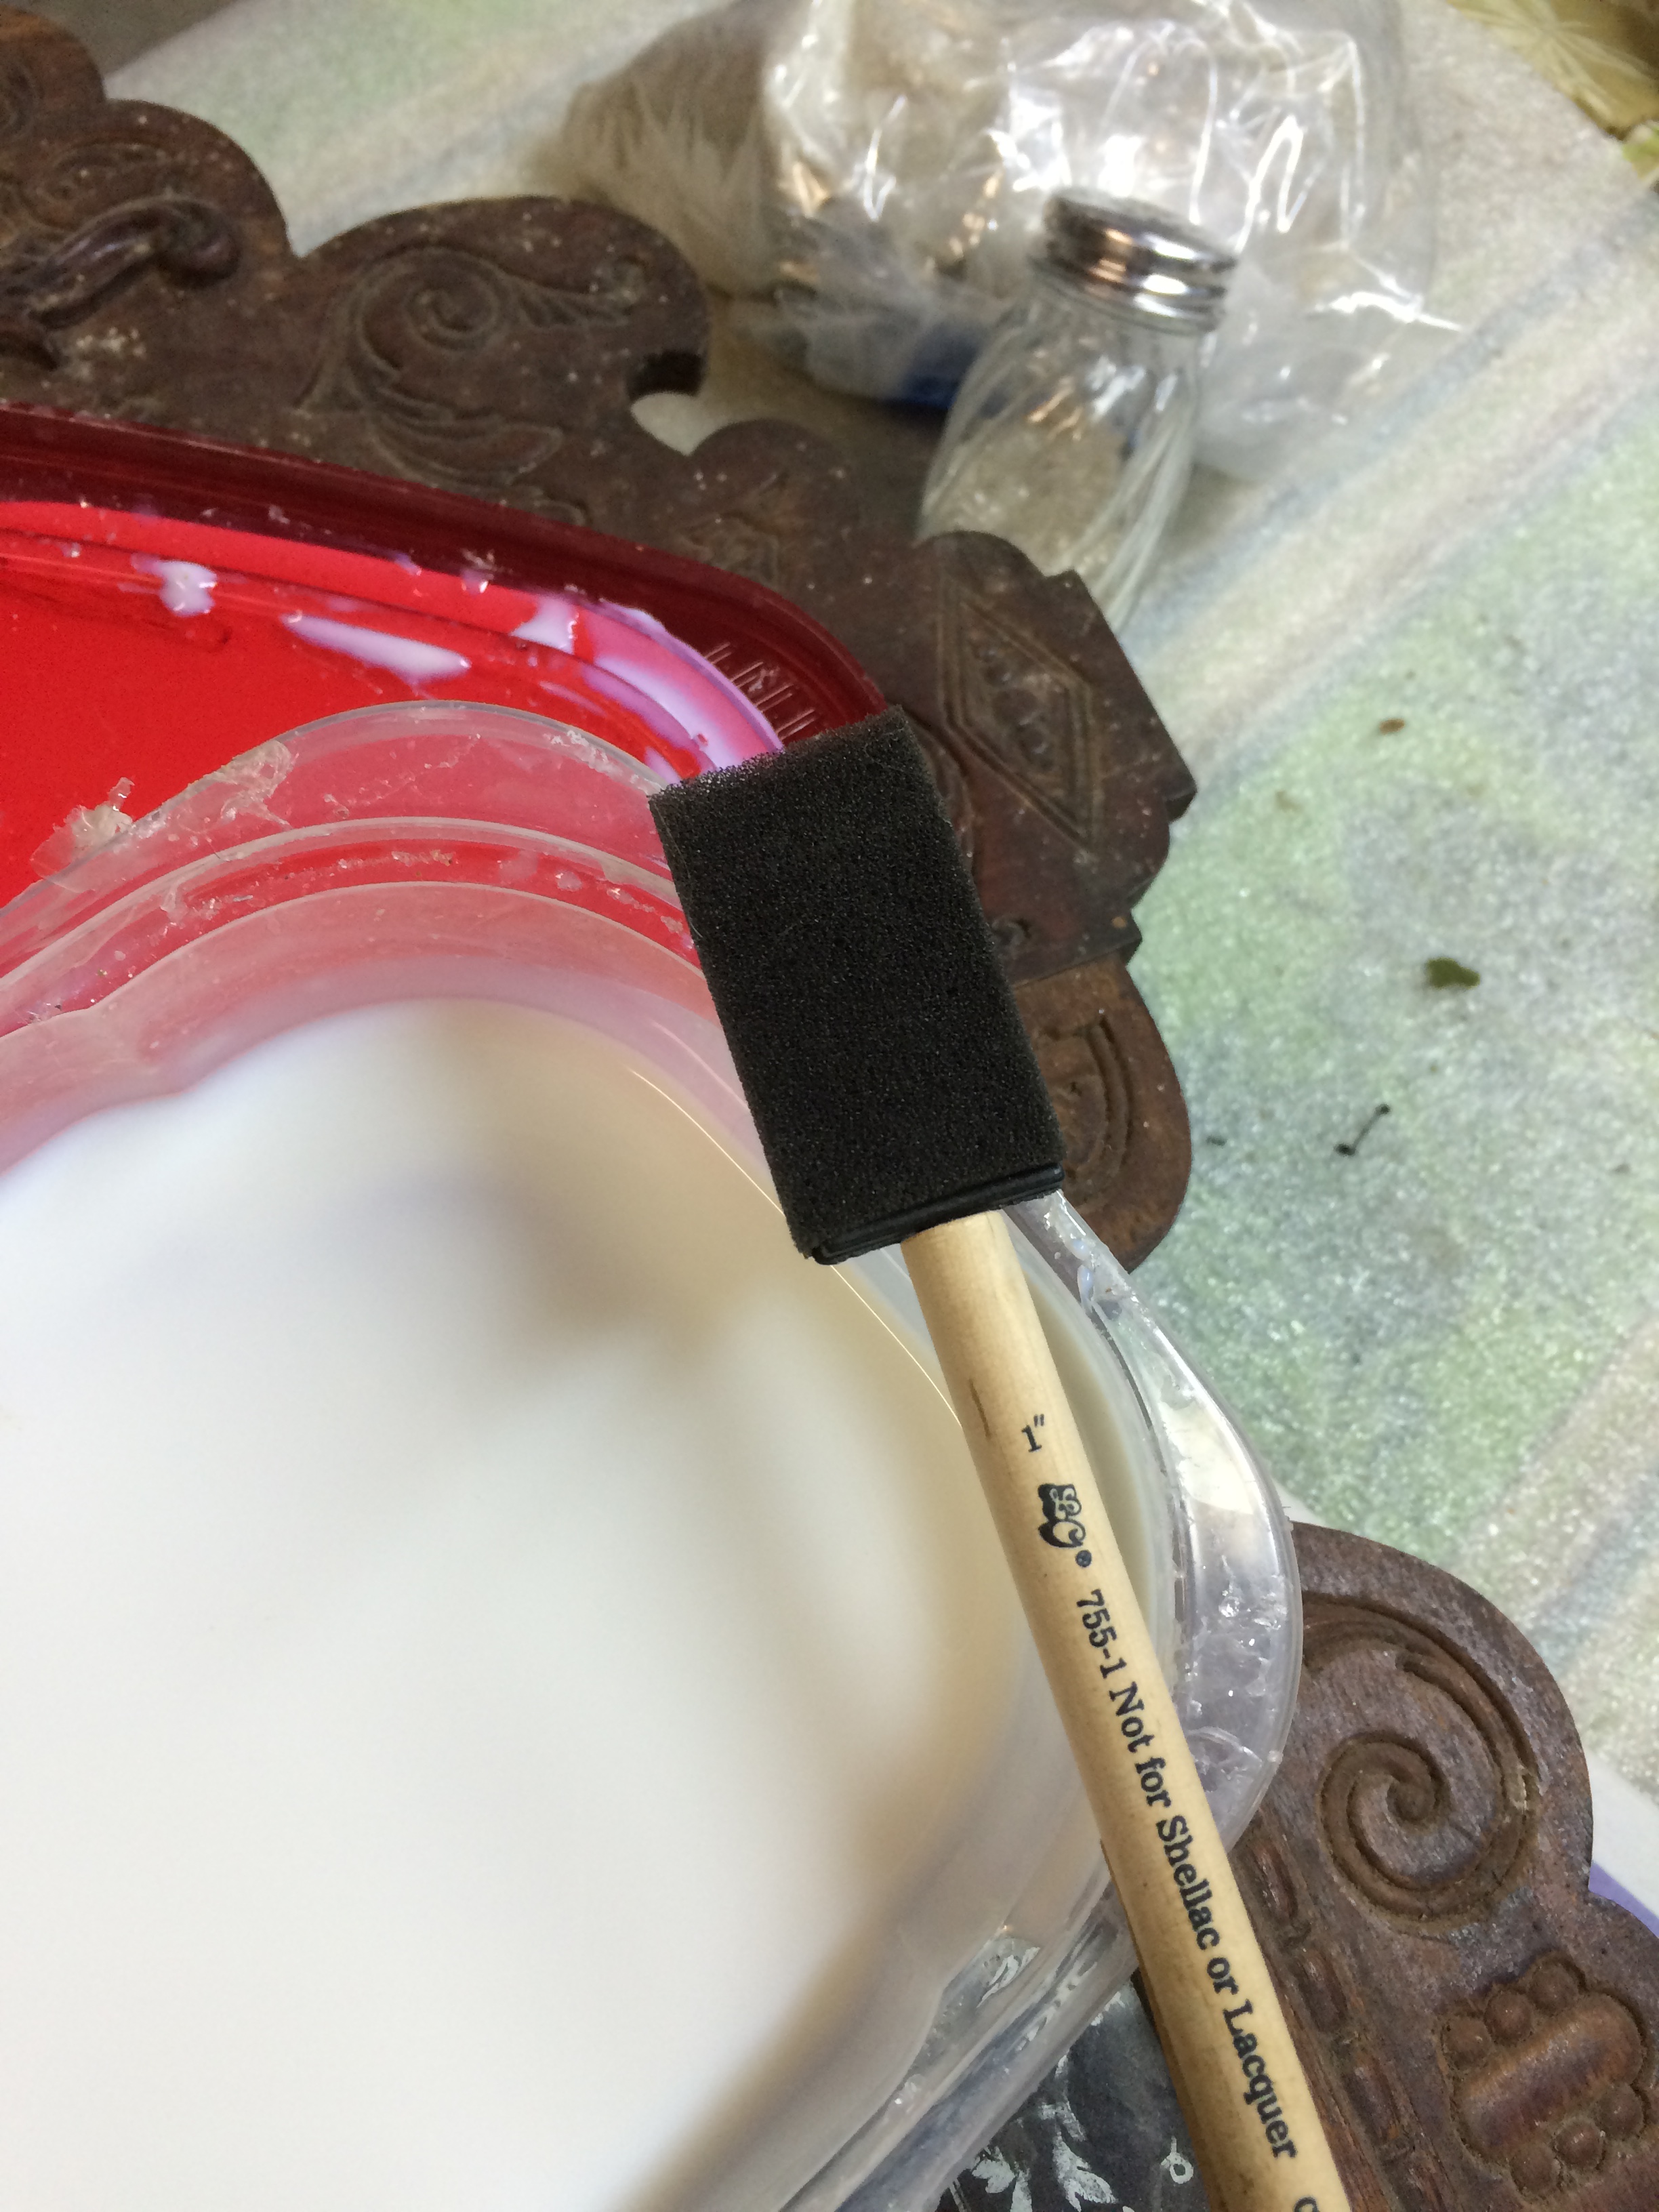
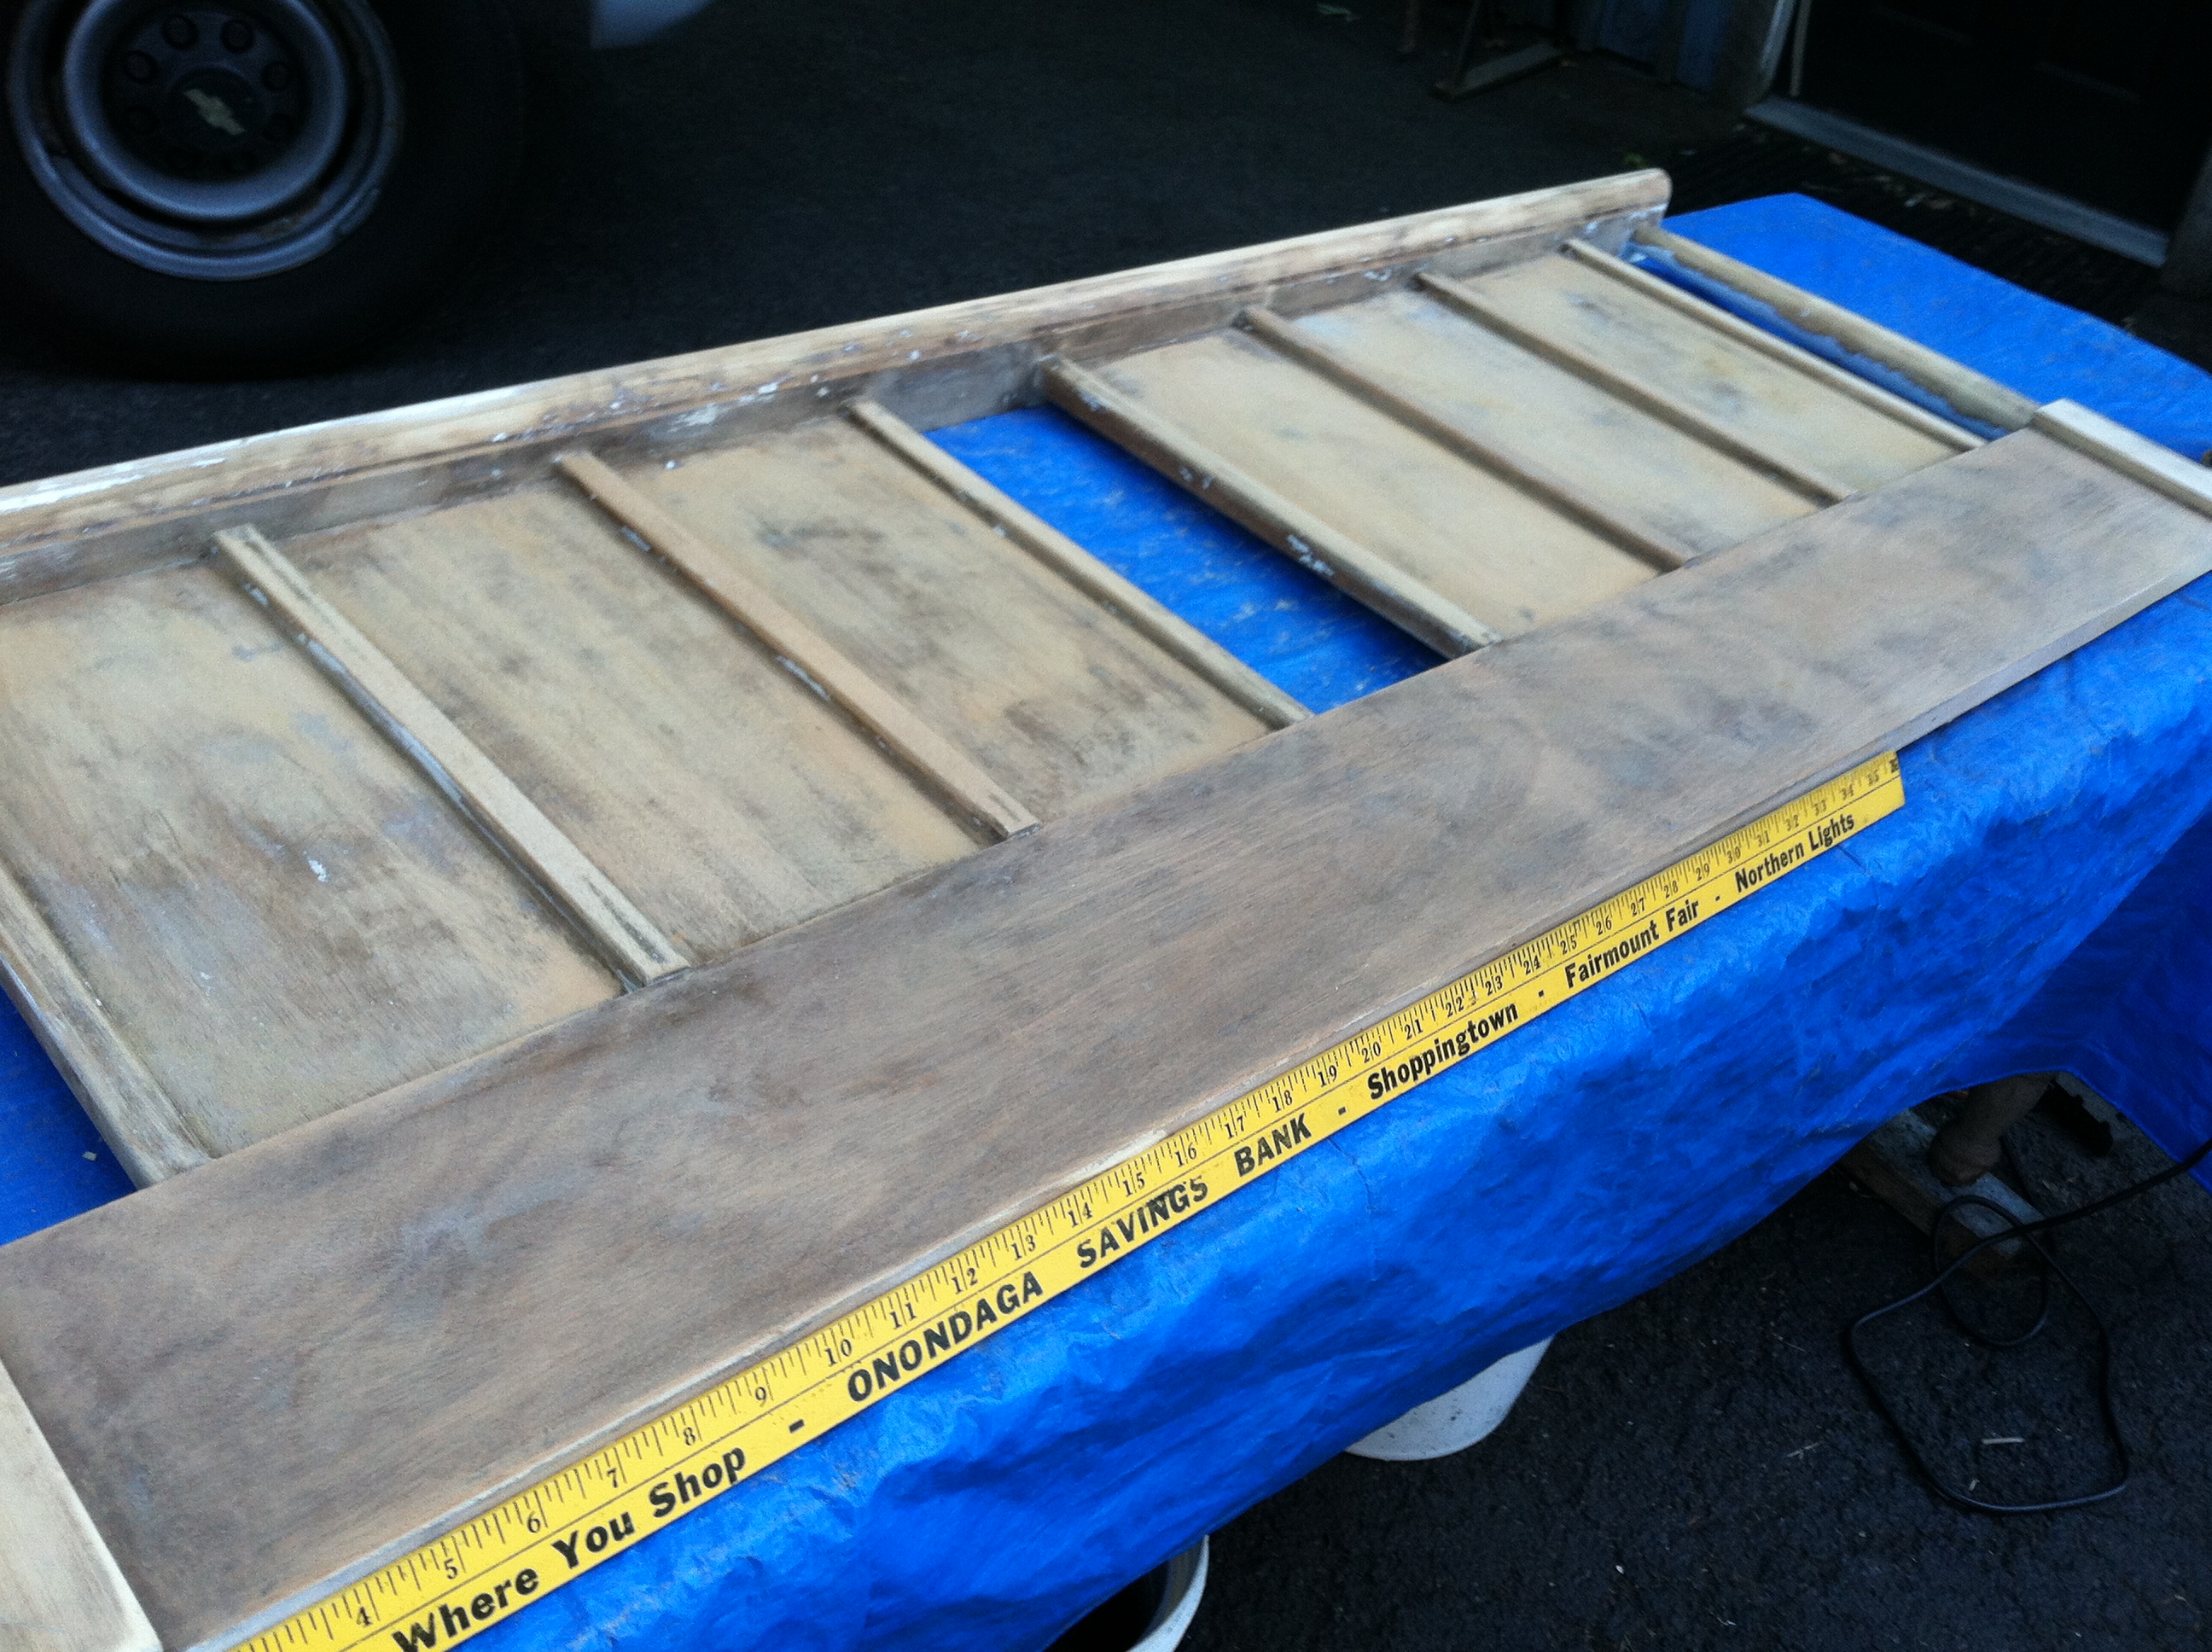
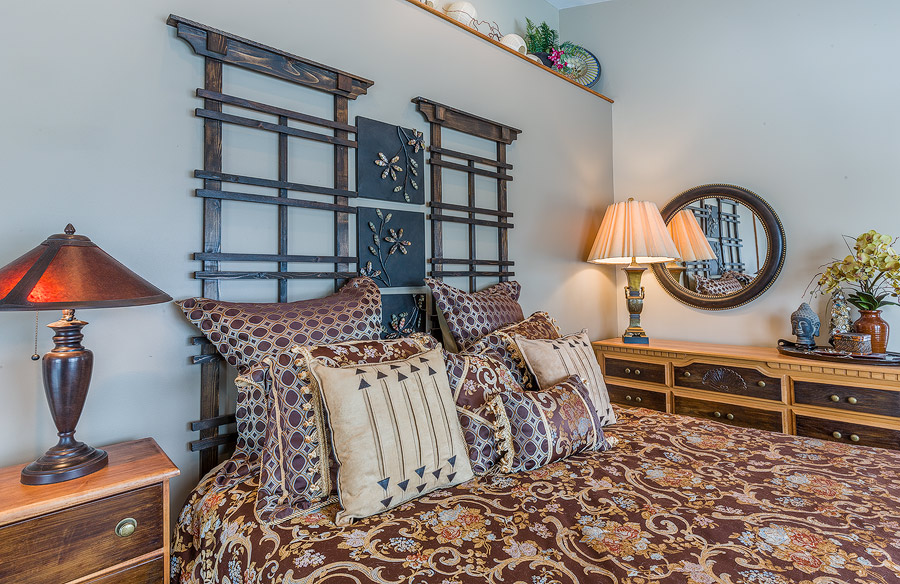
I used sand paper to lightly sand some of the rough edges and splinters, then proceeded to stain with Miniwax Jacobean color using a nylon bristle brush.  The soft wood really soaked up the stain which was great, but I did end up staining most of the parts twice for a darker coverage.  To install, I wanted them to be up high, so they are actually screwed to the walls and not attached to the bed frame itself.  I measured the wall pieces to be sure there was enough room on either side to hang the trellis so they didn’t hang past the bed width, then hubby screwed them into the wall.

arbor-headboard


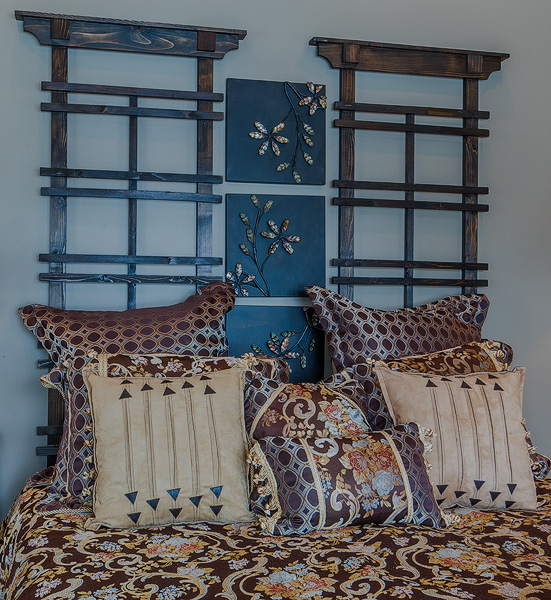
I realize there may be some of you that wonder why in the world did I remove the matching oak headboard set for a garden trellis screwed to the wall…and I say, why not?  This was a simple DIY project that really makes a statement in the room… like a new kid on the block that has made a new friend 🙂

arbor-headboard

To receive posts via email click HERE Subscribe in a reader or signup in Subscription box in sidebar.

Cuckoo for Nursery Wall Art

Taylor
21 Jan 2015
Art, DIY, Interior Design Room, Kids Room, Repurposed, Theme Room
Baldwinsville NY, birdhouse, Clay NY, consultation, cuckoo clock, custom, decorator, designer, DIY, German glitter, Home Interior Designs, Liverpool NY, Nursery, Phoenix NY, repurpose, reuse, Sarah Harris Design, Syracuse NY, TayRose Design, tree, vintage crib, Wall Art

I had a vision in my head of how I wanted the Nursery wall in the Parade of Homes to look…soft, sweet, something that could remain on the wall as they grew, and something sparkly…for I was designing the space for a baby girl, and they are sugar and spice and everything nice you know…and sparkly!

Nursery Parade House 2014-8777

I knew I was going to use a vintage iron crib (more for show during the Parade, I would suggest a white new crib for the baby) and a dresser that was painted in a soft color.  There would be soft carpeting on the floor, and I wanted to do a billowy, flowey, window curtain treatment.


painted dresser for nursery by 1829 Farmhouse


Sarah painting tree mural


I commissioned my friend who is a wonderful surface painter, Sarah of Sarahharrisdesigns.com to paint a wall mural of a large tree, where the branch would reach out over the crib so I could hang birdhouses in the branches.  I also wanted to have smaller birdhouses be part of the window treatment to hold up the curtain rod, which was both a wooden dowel and real branches that I had painted white.  So, how did the idea come about using birdhouses for the wall?

I was at a local auction and looking through all the box lots that were going up soon to be auctioned off, when I spied a box with several wooden cuckoo clocks that were all broken, some parts missing, the backs off of some, some with no hands or pendulums etc.  I knew right then that these will be my “birdhouses” that will sit in the branches of the wall mural in the Nursery.  Now, I want to mention right here, that I would never take a working cuckoo clock that had all it’s parts and deface it in any way, so I’m not telling you to run out and take your Grandfather’s clock off the wall and make it into a birdhouse….I found these parts, and rather than having them end up being in someone’s burn pile or in a landfill, I decided to save these parts and create art….oops, better raise my number up!

cuckoo clocks painted and drying

I won!  Got the box and happily brought them home to where I proceeded to clean them up and start to paint them all a nice white color.  The tree I wanted to be a white silhouette, so the “birdhouses” would look like part of the silhouette as well, plus the color balanced with the window treatments too.  As I mentioned above, I wanted to bring some “sparkle” into the room, so I went online and looked for some German glitter, ordered it and couldn’t wait for it to arrive.  After several coats of paint- I used some latex paint I had on hand-and after they were all good and dry I was ready to apply the glitter.  I wanted the houses to be covered in glitter, like a fairyland, so when the light from the windows streamed in, it would make the birdhouses glisten.

glue for cuckoo clocks


I experimented with several types of glue to apply the glitter with.  I tried a spray adhesive first, spraying small areas and then sprinkling the glitter on by hand.  The adhesive was just ok, it didn’t hold as much of the glitter I was hoping it would, so I switched to plan B which was taking white glue, (Elmers or Dollar Store brand) and I watered the glue down a little bit in a plastic tray and applied with a brush.  I also discovered at the Dollar Store a package of salt & pepper glass shakers which I filled up with the glitter and found this was much easier to use than sprinkling with my hands.  I kept gluing and sprinkling until I got the coverage I wanted and left them to dry.


German glitter for cuckoo clock

I thought to myself, transporting these babies without knocking off all the sparkles was going to be the challenge if I didn’t spray it with something to hold the glitter down.  I decided to bring out the spray adhesive again and spray over the whole house thinking that it would at least help with some of the glitter dropping.  The adhesive spray worked pretty well, and there was hardly any glitter at the bottom of the box after transporting.


After deciding where in the tree to hang my “birdhouses” over the center of the bed, they were easy to hang with a screw in the wall.  I was so happy to be able to repurpose the clocks into birdhouses, although, birdhouses painted and treated the same way would be perfectly fine as well.  I just like to challenge myself to see things in a different way and relish in the joy when I see how well my challenge was met!  Are you as “cuckoo” for cuckoo clock parts as I am?

Nursery design by TayRose

*To receive posts via email click HERE Subscribe in a reader or signup in the Subscription box in the sidebar.

Headboard gets new life as Message Center in Mudroom

Taylor
19 Jan 2015
DIY, Interior Design Room, Mudroom, Repurposed
Baldwinsville NY, Clay NY, consultation, cork, custom, decorator, designer, DIY, door knobs, headboard, Home Interior Designs, Liverpool NY, message center, mudroom, Phoenix NY, repurpose, reuse, Syracuse NY, TayRose Design

While planning the design for the Parade of Homes in 2012, I challenged myself to try and make a lot of the art and decor myself by repurposing as much as possible.  I had a small budget to work with so getting this model home to look appealing and attract attention, I would have to get creative.

I invited my friend Judi, to bring her creative input for several items, for she enjoys painting furniture and repurposing as much as I do.  I wrote several previous posts about some of the items I made, such as the sculptural chair shelves in the stairwell, and the frames hanging in the half bath.  This post is about how we took a vintage twin headboard and repurposed it into a memo/message center for the mudroom wall.

We had a small wall to work with and I needed something to hang over the built in bench.  I wanted something where notes, and school work could be posted,  dog leashes and a light jacket could be be hung, and maybe a quick look into a mirror while dashing out the door.  With repurposing in mind, I looked through anything on hand that was on the flat side, long and had sections for multiple family members.  A headboard was just the answer and will work perfectly for what I was envisioning.

Since we needed to paint the headboard, sanding was a must so that the paint has something to adhere to.  This headboard had some paint on it, so all of the old paint had to come off.  Several coats of paint were used in the same color as the wood trim in the room.   The center panel on the headboard was open, so that will be the perfect place to put the mirror.


Inside each panel, I was able to pick up some cork pieces that were just a little too wide, so they were cut to fit and glued into place.  Assorted vintage door knobs were screwed into the door under vintage inspired metal file drawer labels with each family member name.  A small wicker basket was hung to catch mail.

With the repurposing theme carried throughout the house, the visitors appreciated and pointed out all the transformations as they went room by room.

When trying to fill a need, you will be surprised at how all you need may be right in front of you…or maybe, you are sleeping on it!

* To receive posts via email click HERE Subscribe in a reader or sign up in Subscription box in sidebar.

Transforming a thrift find bedside lamp

Taylor
19 Jan 2015
Craft Project, DIY, Kids Room, Repurposed, Theme Room
Baldwinsville NY, baseball, bed lamp, Clay NY, consultation, custom, decorator, designer, DIY, hand painted, Home Interior Designs, lamp, Liverpool NY, Phoenix NY, repurpose, reuse, sport theme, Syracuse NY, TayRose Design, thrift find

When designing a room for a client, or just a room in your own home and you just can’t find the right lamp you are looking for, or maybe it’s out of your budget, try making the lamp yourself.

Now you may be saying right now, whoa…I’m not good at crafts or electrical, or coming up with ideas, or any other excuse that comes into mind -why not give it the ‘ol college try…Rah!

I did not go to art school, nor did I study art or design until I was way out of my school years.  I was studying to be an Elementary School Teacher.  Amazing how life veers us down different paths!  Anyway, my point is, you don’t have to have an art degree to attempt the following baseball lamp project.  All you need is a baseball, or a picture of one so you have the design in front of you.  The rest is just gathering the supplies: black acrylic paint, red acrylic paint, 2 small fine tip paint brushes with rounded tips, a paper plate or container to squeeze paint onto, container of water to clean brushes, rag.

To make this baseball lamp, I was looking for a small lamp that would mimic a baseball and fit on the nightstand in the sport theme room for the Parade of Homes I was designing.  I had already made the basketball shade for the floorlamp that would be in the corner (see my post on that here) http://tayrose.com/2015/01/07/transforming-a-student-globe-to-a-basketball-floorlamp/ .   I wanted to keep with the sports theme and I knew it would be almost impossible to find a football shape lamp, so fortunately, I found at a thrift store, the right size, color and shape.  SCORE!!  Even though the lamp had ridges, I didn’t care, it was the right shape, size and when I painted the seams and stitches, it will look like a baseball.

At first, I thought I would just draw the seams on the lamp with a felt tip marker, but the ridges on the lamp kept messing up the line so it was jagged, weak or missing all together as I drew, so I nixed that idea and wiped off the lines to start over.  I knew my lines and stitches were not going to be perfect, nor did I want them to be, I wanted the lines to look painterly and hand painted.  Those ridges proved to be very challenging in the end, and did I wish they were not there? Absolutely!  I was on a time crunch, and the texture those ridges brought to the lamp, I kind of liked.

Once the seams were painted with a black acrylic paint, I took a small brush, some red acrylic paint and proceeded to just flick stitches along the seam lines.  I had to stare at the photo of the baseball over and over again to figure out the way the stitches were sewn, for they were different on each seam.  Are my stitches straight and perfect?  no, are my seams perfect? no, but that’s ok, I was able to make a lamp that was just right for my design project, and once the Parade of Homes event was over, I could take it to the shop to sell.  Even if it doesn’t sell, I can remove the paint and I have a nice little white globe lamp…it all worked out and I think it was a home run!

*To receive posts via email click HERE Subscribe in a reader or signup in Subscription box in sidebar.


Baseball lamp in sport room by TayRose Design

Baseball lamp in sport room by TayRose Design


From Broken to Brilliant- Staircase Display Shelving with Chairs!

Taylor
13 Jan 2015
Art, DIY, Entry, Interior Design Room, Repurposed
Baldwinsville NY, chair, Clay NY, consultation, custom, decorator, designer, DIY, Handmade, Home Decor, Home Interior Designs, Liverpool NY, Parade of Homes, Phoenix NY, repurpose, reuse, Syracuse NY, TayRose, TayRose Design, Wall Art

While designing for the Parade of Homes in 2012, Pigliavento Builders was building in the development called “Riverwalk” which was near water and had lots of paths and walking areas around the community to take in the beautiful nature.
So, the colors I chose that year for the interior as well as the exterior of the house, were colors of water-soft grays, blues and greens and white. The entry was large and opened up to the 2nd floor, with a welcoming open staircase with landing to the left  and white painted spindles on dark stained wooden steps and railings.

Chair Sculptures on wall up stairwellS280068_B01_22

Chair Sculptures on wall

That open stairwell was really calling out to me for something unique, dramatic, and practical as well. I already had commissioned a young local artist to paint a large canvas for me of geese in flight that would hang up on the wall as you came into the foyer, bringing your eyes up to the lofty open area.  The chandelier held a large grapevine wreath I made, that set down over the top dripping with assorted prisms from vintage glass chandeliers. I wanted it to resemble a nest and it worked! On to the stairwell…. Read more!

  • 1
  • 2
  • 3
  • 4
  • 5
Recent Posts
  • Owl Inspired Theme Toddler Bedroom
  • Painted trunk blends with Decor
  • Create a “trunk” inspired look for a Nightstand
  • Decorate fireplace wall “naturally” on a budget
  • How to Inspire Design with Pinterest Photos
Archives
  • February 2018
  • January 2018
  • October 2016
  • January 2016
  • June 2015
  • April 2015
  • March 2015
  • February 2015
  • January 2015
  • December 2014
  • November 2014
  • June 2014
  • May 2014
Newsletter subscription form

Enter your email address:

Delivered by FeedBurner

Categories
  • Art
  • Bathroom
  • Craft Project
  • Custom Design
  • Dining Room
  • DIY
  • Entry
  • Holiday
  • Interior Design Room
  • Kids Room
  • Kitchen
  • Living room
  • Master Bedroom
  • Mudroom
  • Office
  • Repurposed
  • Theme Room
Houzz
Remodeling and Home Design
Instagram
Instagram
HomeTalk
Featured on Hometalk.com
Follow me on Facebook
TayRose Design

Promote Your Page Too
315.224.4142
© 2014 k.linndesign. All Rights Reserved.