While working on a client’s bedroom for their daughters, a need for a desk and chair for their youngest was requested. The desk would be in a separate room and would be part of a wall closet unit so the desk was taken care of, but a chair was still a need. I thought, every little girl would love to have a chair made just for them-one that would have their name on it and make them feel very special. So, I started to look through my furniture stash, and pulled out this vintage painted wooden kitchen chair that I had purchased at a garage sale a couple of years ago. I liked the curves of the chair and the legs had nice details so I could accent them in some way. Plus, the chair was on the smaller size, not a big bulky chair….perfect for a desk chair. Now, I just had to design how to transform this dowdy find with a makeover for a seat for a princess…. Read more!
I love designing themed rooms….it can be challenging…always a treasure hunt, and most likely, I always have to create something myself for I can’t find the item or it’s out of my budget. For several years now, I’ve been invited to do the interior design for the Parade of Homes here in Upstate NY. The Parade is a huge design project, choosing everything from the siding color to tile, and cabinet knobs, but also, picking out all the furniture and accessories. It’s a little different when there is no clients, so I’m pretty much designing for a “pretend” family…something that is neutral enough to please, and unique enough to attract attention.
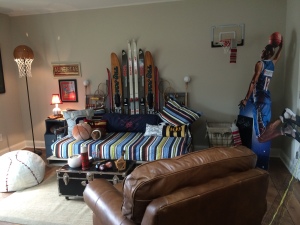
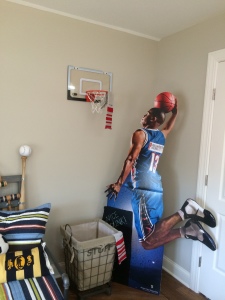
For the 2014 Parade of Homes in Clay, NY there was a large bonus room which I decided to design for a teen boy bedroom. My friend Judi from 1829 Farmhouse, owner of shop (Inspired in Liverpool, NY where bed is currently for sale) made the bed out of a pallet with pipe arms that we turned to the side so it was more like a sofa loaded up with lots of pillows. A trunk on wheels served as at coffee table; a found at a Flea Market of a large cardboard cutout sign of a basketball player laying up for a dunk that would be perfect when I place it next to the wall hoop positioned right over the laundry hamper….Nice Dunk!!
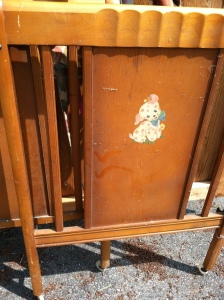
While out driving around one day, I came to a stop sign, and as usual, looked both ways before starting to accelerate into traffic. I spied to my right a pile of discards at the curb in front of a house. Instead of turning left, I pulled over to the right in front of the pile and eyed a vintage crib…remember the ones with the puppy and kitty decal on the wooden ends? Well this crib instead of decals were hand painted with the same vintage look of the old decals….these were coming home with me! Not sure what I wanted to do with it yet, but I’ll figure that out later. There were also a couple of broken dining room chairs where only the legs and seats remained…I threw them in the back of the car as well.
Little did I know then that these curbside treasures would come together in an idea for a Nursery I was designing for the Parade of Homes in 2014. I have a tendency of wanting to use something in a totally different way…a real repurposed project. For the Nursery, I was already using a vintage iron crib, a hand-painted dresser, some German Glittery Cuckoo clocks for the wall mural (see my other post about this project) so I needed something to fill in some space on the floor near the window. A chair….not just any chair, but a “crib” chair. A perfect perch to set a favorite stuffed animal, or a chair for supporting their first steps. Plus, I painted the back as a chalkboard, so this chair can grow into the next phase of their lives. Read more!
Christmas is a very special time of the year….people bustling to get ready for family and friends to share the day with, shopping to find that special gift, planning the meals with all the favorite passed down recipes, and most importantly, remembering the true Spirit of the day and rejoicing in all our blessings.
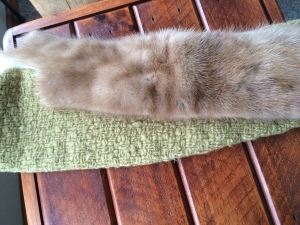
A few weeks before Christmas, while visiting my Mother-in-law, she proceeded to tell us about a very special coat she had received one Christmas that my Father-in-law and daughter had picked out as a gift for Christmas many years ago. That coat was a warm wool that had a real mink collar and she felt like a Queen whenever she wore it….she also received a matching mink hat, boots and long leather gloves! Can you picture this back in the 60’s? Having 6 kids, this splurge purchase was very rare and so cherished! Well, as she told the story with a gleam in her eye, she handed me the mink collar that she had saved over the years…so cherished, and said to me, ” I know you can do something with this if you want it “. At the time, I was in awe that she entrusted me with this treasure, and we had talked a bit about making a hat out of it, but that idea just didn’t seem like enough to honor this piece of joy. So, I left still in a quandry….
About a week before Christmas while driving home I had an epiphany….I usually get a lot of ideas while driving, lol…I kept thinking about the story of the coat and how I’m sure all 6 kids must have remembered that coat and the memories of her in the coat…so I knew that I had to make something with that fur collar that can be shared with all the siblings…but what?
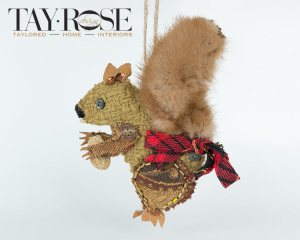
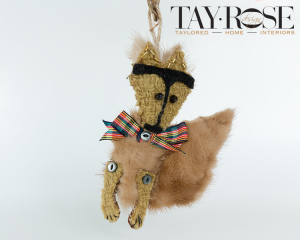
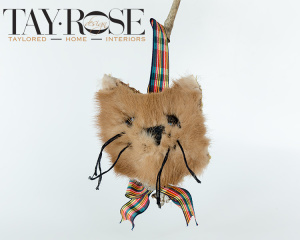
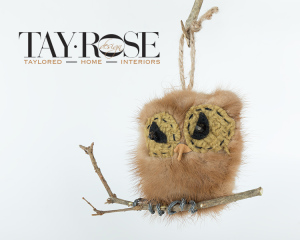
I had been thinking while driving about lugging down all the numerous storage totes full of Christmas decor from the garage rafters, and whether or not I was going to put up a tree this year, when the thought struck me….an ornament. I could make an ornament for each of the siblings using a part of the fur collar that can be brought out each year to remind them of how special their Mother felt with her cherished coat. All of a sudden my mind was racing with everything that had fur that I could hopefully create for an ornament….a squirrel, a cat, a fox, an owl…yes, yes, I think I can do it! I wanted each animal to have some meaning for each sibling (plus Mom gets to choose one for herself too of course!): one sister loves cats, another owls, my husband photographed a den of baby foxes for weeks, and the others all have squirrels that are fed at their feeders.
For 5 days I was sequestered in front of a table full of beads, fur, the gold wool collar scraps, felt, wire, embroidery thread, stuffing – making patterns and hand sewing ornaments. It took all my nerve to make the first cut into that beautiful collar, but once I saw the squirrel tail, and the cat face, and the fox tail and tummy, and the owl….there was only joy…time was my only enemy.
Since we were celebrating Christmas with my Mother-in-law and Sister-in-law, I had to get at least their ornaments finished, the other siblings lived far away and I knew they would get them after the holiday. As I was working, I looked around at the table heaped with supplies which was the table in our family room….my patient husband making a small space on the corner to set his plate down…and I thought, I better make all the ornaments now, for I’m in the groove, the supplies are all here, plus, it will be a special treat for my Mother-in-law to be able to see all the different ornaments her collar has made, and have a hand in choosing which ornament goes to what child. Great! With that mission in mind, I proceeded to work fervorishly and was able to finish the last one after midnight on Christmas Eve….another blessing.
To go along with the ornament I really wanted to repeat the story of her coat somehow and I asked my husband, who is a very good writer…he doesn’t think so, but he is…if he would write a little poem that I could include with each ornament. I thought I would roll up the poem like a little scroll and hang on the ornament as a keepsake. My husband did not disappoint…the next morning there was a poem sitting on my computer when I woke up and it was just what I had envisioned and knew he could produce, and it went like this…
“We hope you’ll find pleasure, in this little treasure, his pieces from years gone by.
Although he can’t speak, he’s really unique, we want you to understand why.
He’s like no other, a part of our Mother, that put a gleam in her eye.
You just have to think, she was pretty in mink, in a coat that made her sigh.”
I told you he was good!
All I can say is that every long hour and bloody poked fingers from the hand sewing was worth it when I watched with drawn in breath as she gently unwrapped each ornament. I knew at that moment, that these ornaments were the perfect use for that cherished collar! Don’t you agree?
Now I can’t wait to hear from all the sisters after receiving their bit of nostalgia!
To receive posts via email click HERE ![]() Subscribe in a reader or sign up in box on sidebar
Subscribe in a reader or sign up in box on sidebar
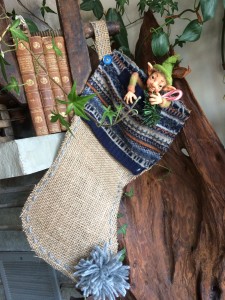
I had a request for a tutorial on how to make my quick and easy Burlap Christmas stocking. The instructions are listed below, but first, a little background.
I was at the shop,” Inspired”, in Liverpool, NY where I have many items that I have made, and some vintage finds. My friend Judi and her husband purchased the shop about a year ago and I’ve helped them tear down walls, put up walls, sand, paint, help with workshops and fill it up with goodies.
Well this past week while I was working there, I like to bring something to work on to while away the time during slow periods…on this day I brought from home some 8″ wide burlap ribbon that I had purchased from Michael’s about a year ago and had used as garland for my Christmas tree last year and had a roll leftover. I wanted something that would be quick and easy to put down in case a customer came into the shop.
