• Shop
    • Antiques
    • Home Decor
    • Jewelry
      • Necklaces
      • Bracelets
      • Earrings
      • Rings
      • Pins
    • Upcycled handmade
      • upcycled womens tops
      • upcycled womens jackets
      • Upcycled womens pants
      • upcycled pillows
      • Upcycled Pickleball Shirts
      • upcycled purses
    • MacKenzie-Childs
      • MacKenzie-Childs Taylor Dinner Plate
      • MacKenzie-Childs Taylor Luncheon Plate
      • MacKenzie-Childs small oval dish
      • MacKenzie-Childs Taylor Bread & Butter
      • MacKenzie-Childs Taylor Mugs
      • MacKenzie-Childs Taylor Saucers
      • MacKenzie-Childs Taylor Breakfast Bowls
      • MacKenzie-Childs Taylor Berry Bowl
      • MacKenzie-Childs Taylor Chowder Bowls
      • MacKenzie-Childs Wallcourt pieces
      • MacKenzie-Childs Enamelware
      • MacKenzie-Childs Torquay dinnerware
      • MacKenzie-Childs MacLachlan Dinnerware
      • MacKenzie-Childs Taylor Serving Ware
      • MacKenzie-Childs Glass Goblets
      • MacKenzie-Childs glass tumbler
      • MacKenzie-Childs Glass Serving pieces
      • MacKenzie-Childs Decor pieces
      • MacKenzie-Childs Placemats & Coaster sets
      • MacKenzie-Childs Paper Products
      • MacKenzie-Childs Tile
    • Shoes
  • Home
  • About
    • I believe…
  • Gallery
    • Custom Design
    • Interior Design
      • Bath
      • Bedroom
      • Dining Room
      • Entry Way
      • Kitchen
      • Laundry
      • Living Room
      • Office
      • Mudroom
      • Themed Rooms
  • Color CCE
  • Services
    • Services
    • Design Process
    • New Construction
  • Journal
    • DIY
    • Repurposed
    • Art
    • Interior Design Room
    • Holiday
    • Theme Room
  • Press
  • Contact

Accent Cabinet gets Island makeover

Taylor
30 Jan 2015
Custom Design, DIY, Interior Design Room, Kitchen, Repurposed
Baldwinsville NY, cabinet, Clay NY, consultation, countertop, custom, decorator, designer, DIY, Home Interior Designs, kitchen island, knobs, Liverpool NY, pegboard, Phoenix NY, Pier 1, pots and pans, recipe books, repurpose, reuse, Syracuse NY, TayRose Design

We all have read about similar dilemmas…small kitchens, wishes for that extra counterspace- dare we even dream of having room for an island?   

Kitchen Island cabinet TayRose Design

Well, I came across one of those kitchens…my own!  When I moved to my husband’s house, which was a small camp built in the 40’s on the river, I had to downsize from a 3 bedroom 2 bath house filled with furniture and decor I had been collecting for years.   I really had to think creatively on how to stretch what space I had in this kitchen.

Our kitchen is still a work in progress- a wish list for new cabinet fronts someday, but we did remodel ourselves adding a new back-splash and appliances with as much as we could at the time.   That is definitely another subject for a blog post…so on with the story..

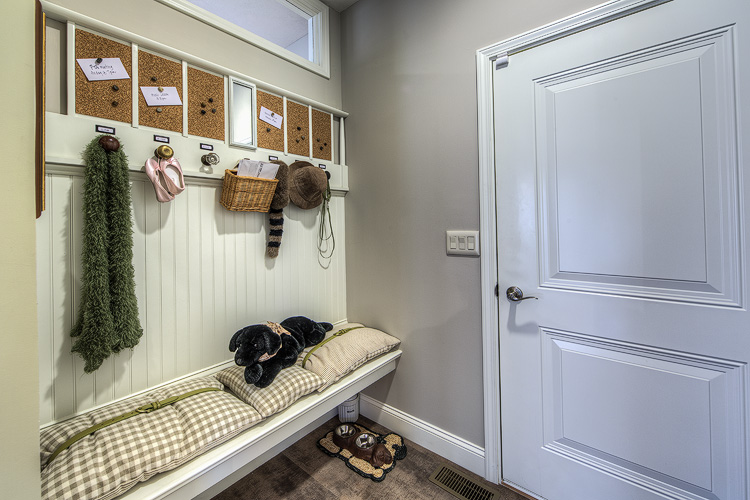
During this whole semi-remodel, I really wanted something that would somehow partition the kitchen from the entry into the house since the mudroom comes right into the kitchen area.

Kitchen island storage view  TayRose Design

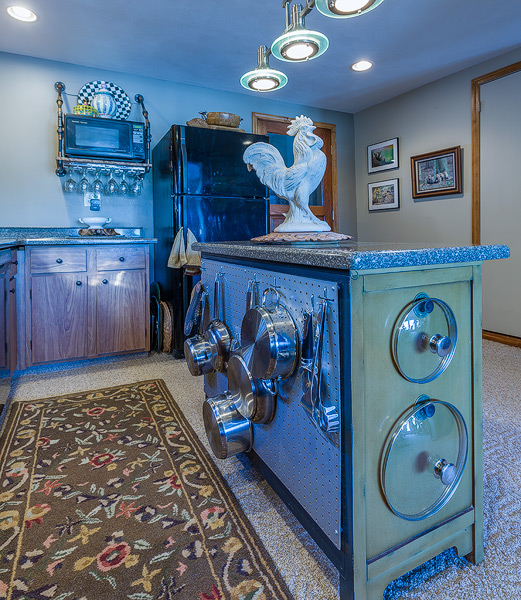
While out on one of my many shopping trips, this time at Pier 1, I was with my hubby (this doesn’t happen too often so fate was in our midst) we spied out of the corner of our eyes, this cabinet with an Asian theme which seemed to be just the right size.  Could this work?  Since it was on sale, and we were afraid it would be gone if we left it there to think about, we bought it and brought it home to try.  It was perfect, I loved it and I love the idea of repurposing an accent cabinet into a kitchen island.  Top Fabricators, the firm making our countertops http://www.countertopsbytopfab.com/had no trouble at all measuring and fitting the countertop onto the top of the cabinet….it fit like a glove!

I also wanted the island to be functional all the way around, so hubby got creative and got some peg board that I painted and we screwed to the back side facing the sink where I now can hang pots and pans at easy reach to the stove.  We also made great use of the ends of the cabinet, adding brass knobs over Chinese coins to hang up the pot lids, allowing for more room in the cabinets for other needs.  My recipe books are kept inside the cabinet and the drawers are perfect for our tools/junk, bottle openers, and cat treats.

Pot storage on Kitchen island

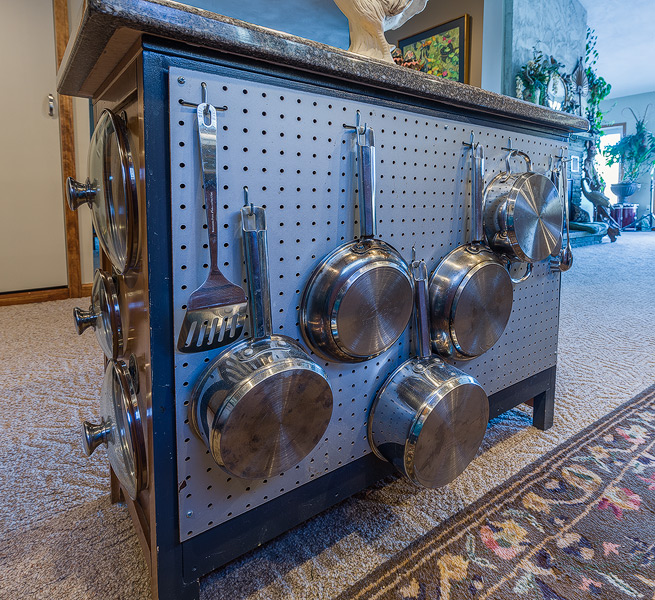
Although I didn’t have room for an island to sit at, I’m still very grateful for my island.  It not only didn’t take up much floor space, it gave me an additional surface for food prep, pot storage, and recipe book housing.

I’m so glad we opted to try an accent cabinet and not a standard kitchen cabinet for our kitchen…it’s more of a piece of furniture that greets you at the door and reveals it’s pretty practicalities!

To receive posts via email click HERE Subscribe in a reader or signup in Subscription box in sidebar.

From Garden Trellis to Master Headboard

Taylor
27 Jan 2015
DIY, Interior Design Room, Repurposed
arbor, Baldwinsville NY, Clay NY, consultation, custom, decorator, designer, DIY, eRegal Studio Photography, headboard, Home Interior Designs, Interior Design wall art, Liverpool NY, Lowes, Phoenix NY, repurpose, reuse, stain, Syracuse NY, TayRose Design, trellis

Ok, it’s time….time to re-style and re-design the bed.  The big, heavy, orangey colored oak bed set that my husband bought years ago, before I came on the scene, has just got to move on to greener pastures and let something interesting, clever and more in tune with the room style stand tall in it’s place.  arbor-headboard


The bed did match the bedroom dressers that were given a new look written about here http://tayrose.com/2014/05/13/changing-up-a-dated-dresser-set/ but the style of the bed just didn’t fit in with the rest of the set now, so it has moved out to the shed for a future project.old headboard oak


For the new headboard look, I wanted something tall, since we have vaulted ceilings, something with an Asian flair, something I could make that was budget friendly,  and not too difficult that would take weeks to make.  I remembered last summer while at Lowe’s shopping for plants, seeing these wooden trellis panels hanging on the back wall http://www.lowes.com/pd_6537-15173-8621262_0__?productId=3735495&Ntt=garden+trellis&pl=1&currentURL=%3FNtt%3Dgarden%2Btrellis&facetInfo=

There were several types, but the ones I really liked already had an Asian style to them, so I wouldn’t have to do anything but apply a finish to the raw wood and install.  I felt 2 panels would be wide enough for a Queen size bed especially if I split them up and hung wall art in-between.  So I bought them and brought them home.  I was doing the happy dance when I got them on sale at the end of the season so they met the budget friendly criteria…check, they had an Asian flair that I wouldn’t have to add…check….and if I stain them dark like the dresser fronts to match, how simple is that? Double check!!

garden arbor from Lowes


I used sand paper to lightly sand some of the rough edges and splinters, then proceeded to stain with Miniwax Jacobean color using a nylon bristle brush.  The soft wood really soaked up the stain which was great, but I did end up staining most of the parts twice for a darker coverage.  To install, I wanted them to be up high, so they are actually screwed to the walls and not attached to the bed frame itself.  I measured the wall pieces to be sure there was enough room on either side to hang the trellis so they didn’t hang past the bed width, then hubby screwed them into the wall.

arbor-headboard


I realize there may be some of you that wonder why in the world did I remove the matching oak headboard set for a garden trellis screwed to the wall…and I say, why not?  This was a simple DIY project that really makes a statement in the room… like a new kid on the block that has made a new friend 🙂

arbor-headboard

To receive posts via email click HERE Subscribe in a reader or signup in Subscription box in sidebar.

Ribboned sheers for Master Bedroom

Taylor
23 Jan 2015
Custom Design, DIY, Interior Design Room, Master Bedroom
Baldwinsville NY, cheap home decor, Clay NY, consultation, custom, decorator, designer, DIY, hand sewn, Home Decor, Home Interior Designs, Liverpool NY, Master bedroom, Phoenix NY, repurpose, reuse, ribbons, sheer curtains, Syracuse NY, TayRose Design

Ah, window treatments….just thinking about designing something fresh and new can be daunting for the Parade of Homes or for a client, and they can be inspired by bedding, a rug, pillow, a painting…which makes it such a relief when the answer presents itself.   While working on the Master bedroom design for the Parade of Homes, the budget for window treatments ran thin, so when it came to the Master,  I knew that I would end up doing something myself.  Master bedroom for Parade 2011 TayRose Design


I found online some beautiful rods that actually swing out when you want to let more light and air come in through the window, then swing the rod back to close the curtain over the window.  I ended up using 2 swing rods for each of the 2 larger windows, and opted for white sheers for a lighter feel for the room.  For the other 2 smaller windows, I split of pair of sheers for a draped swag and had trimmed the ends with black ribbon.  If I had had more funds I would have done cornices and shades for all the windows.

Swing-Arm-curtain rod for Master windows

The color scheme for the room, was black, cream, white, and gold.  The bedding was a white background with cream and gold and a black squiggle shaped design.  I knew I wanted to do something to the sheers, for I don’t do “solid” or plain very well…I love to layer, add texture, pattern etc most of the time. for to me, it’s more interesting and draws me in to a wonderful world!  I happened to be at the Dollar Store one day…I find myself there when looking for off beat items, and found rolls and rolls of narrow black ribbon.  I’m talking huge rolls…industrial rolls.  What a steal of a deal!  I wasn’t sure what I was going to do with all this mile of ribbon, but for a dollar, it was coming home with me!

Black ribbon for curtain projec

While I was laying out one of the sheer curtain panels across the table, I glanced over at the bedding.  My eyes kept going to the squiggle pattern, and then I looked at the black ribbon I just bought spewing out of the bag.  This was risky for I hadn’t tried this before, and the thought of hand sewing ribbon onto 4 panels of sheers…the little voice in the back of my head was saying, “are you crazy?”  So, with needle and thread and black ribbon in hand, I decided to tackle it and tack the ribbon free hand- patterning along the way, squiggling as I went up from the hem to about midway up the curtain.  I stood back to look, and I loved it…just enough pattern to balance the pattern from the bedding, but not too much design to take away from the light streaming through the sheers.  The Fabric Mill, who had been making the window treatments for me in the other rooms, graciously offered to add a black fabric edge at the bottom of the panels as a finishing custom touch, so sweet of them!   The panels were light and breezy, just what I was going for.

squiggle ribbon sheers by TayRose Design


I may not hand sew on every curtain project I design, but it does feel, that I usually do something to tweak them a bit….just to be a little bit more interesting!
To receive posts via email click HERE Subscribe in a reader or signup in Subscription box in sidebar.

Cuckoo for Nursery Wall Art

Taylor
21 Jan 2015
Art, DIY, Interior Design Room, Kids Room, Repurposed, Theme Room
Baldwinsville NY, birdhouse, Clay NY, consultation, cuckoo clock, custom, decorator, designer, DIY, German glitter, Home Interior Designs, Liverpool NY, Nursery, Phoenix NY, repurpose, reuse, Sarah Harris Design, Syracuse NY, TayRose Design, tree, vintage crib, Wall Art

I had a vision in my head of how I wanted the Nursery wall in the Parade of Homes to look…soft, sweet, something that could remain on the wall as they grew, and something sparkly…for I was designing the space for a baby girl, and they are sugar and spice and everything nice you know…and sparkly!

Nursery Parade House 2014-8777

I knew I was going to use a vintage iron crib (more for show during the Parade, I would suggest a white new crib for the baby) and a dresser that was painted in a soft color.  There would be soft carpeting on the floor, and I wanted to do a billowy, flowey, window curtain treatment.


painted dresser for nursery by 1829 Farmhouse


Sarah painting tree mural


I commissioned my friend who is a wonderful surface painter, Sarah of Sarahharrisdesigns.com to paint a wall mural of a large tree, where the branch would reach out over the crib so I could hang birdhouses in the branches.  I also wanted to have smaller birdhouses be part of the window treatment to hold up the curtain rod, which was both a wooden dowel and real branches that I had painted white.  So, how did the idea come about using birdhouses for the wall?

I was at a local auction and looking through all the box lots that were going up soon to be auctioned off, when I spied a box with several wooden cuckoo clocks that were all broken, some parts missing, the backs off of some, some with no hands or pendulums etc.  I knew right then that these will be my “birdhouses” that will sit in the branches of the wall mural in the Nursery.  Now, I want to mention right here, that I would never take a working cuckoo clock that had all it’s parts and deface it in any way, so I’m not telling you to run out and take your Grandfather’s clock off the wall and make it into a birdhouse….I found these parts, and rather than having them end up being in someone’s burn pile or in a landfill, I decided to save these parts and create art….oops, better raise my number up!

cuckoo clocks painted and drying

I won!  Got the box and happily brought them home to where I proceeded to clean them up and start to paint them all a nice white color.  The tree I wanted to be a white silhouette, so the “birdhouses” would look like part of the silhouette as well, plus the color balanced with the window treatments too.  As I mentioned above, I wanted to bring some “sparkle” into the room, so I went online and looked for some German glitter, ordered it and couldn’t wait for it to arrive.  After several coats of paint- I used some latex paint I had on hand-and after they were all good and dry I was ready to apply the glitter.  I wanted the houses to be covered in glitter, like a fairyland, so when the light from the windows streamed in, it would make the birdhouses glisten.

glue for cuckoo clocks


I experimented with several types of glue to apply the glitter with.  I tried a spray adhesive first, spraying small areas and then sprinkling the glitter on by hand.  The adhesive was just ok, it didn’t hold as much of the glitter I was hoping it would, so I switched to plan B which was taking white glue, (Elmers or Dollar Store brand) and I watered the glue down a little bit in a plastic tray and applied with a brush.  I also discovered at the Dollar Store a package of salt & pepper glass shakers which I filled up with the glitter and found this was much easier to use than sprinkling with my hands.  I kept gluing and sprinkling until I got the coverage I wanted and left them to dry.


German glitter for cuckoo clock

I thought to myself, transporting these babies without knocking off all the sparkles was going to be the challenge if I didn’t spray it with something to hold the glitter down.  I decided to bring out the spray adhesive again and spray over the whole house thinking that it would at least help with some of the glitter dropping.  The adhesive spray worked pretty well, and there was hardly any glitter at the bottom of the box after transporting.


After deciding where in the tree to hang my “birdhouses” over the center of the bed, they were easy to hang with a screw in the wall.  I was so happy to be able to repurpose the clocks into birdhouses, although, birdhouses painted and treated the same way would be perfectly fine as well.  I just like to challenge myself to see things in a different way and relish in the joy when I see how well my challenge was met!  Are you as “cuckoo” for cuckoo clock parts as I am?

Nursery design by TayRose

*To receive posts via email click HERE Subscribe in a reader or signup in the Subscription box in the sidebar.

Headboard gets new life as Message Center in Mudroom

Taylor
19 Jan 2015
DIY, Interior Design Room, Mudroom, Repurposed
Baldwinsville NY, Clay NY, consultation, cork, custom, decorator, designer, DIY, door knobs, headboard, Home Interior Designs, Liverpool NY, message center, mudroom, Phoenix NY, repurpose, reuse, Syracuse NY, TayRose Design

While planning the design for the Parade of Homes in 2012, I challenged myself to try and make a lot of the art and decor myself by repurposing as much as possible.  I had a small budget to work with so getting this model home to look appealing and attract attention, I would have to get creative.

I invited my friend Judi, to bring her creative input for several items, for she enjoys painting furniture and repurposing as much as I do.  I wrote several previous posts about some of the items I made, such as the sculptural chair shelves in the stairwell, and the frames hanging in the half bath.  This post is about how we took a vintage twin headboard and repurposed it into a memo/message center for the mudroom wall.

We had a small wall to work with and I needed something to hang over the built in bench.  I wanted something where notes, and school work could be posted,  dog leashes and a light jacket could be be hung, and maybe a quick look into a mirror while dashing out the door.  With repurposing in mind, I looked through anything on hand that was on the flat side, long and had sections for multiple family members.  A headboard was just the answer and will work perfectly for what I was envisioning.

Since we needed to paint the headboard, sanding was a must so that the paint has something to adhere to.  This headboard had some paint on it, so all of the old paint had to come off.  Several coats of paint were used in the same color as the wood trim in the room.   The center panel on the headboard was open, so that will be the perfect place to put the mirror.


Inside each panel, I was able to pick up some cork pieces that were just a little too wide, so they were cut to fit and glued into place.  Assorted vintage door knobs were screwed into the door under vintage inspired metal file drawer labels with each family member name.  A small wicker basket was hung to catch mail.

With the repurposing theme carried throughout the house, the visitors appreciated and pointed out all the transformations as they went room by room.

When trying to fill a need, you will be surprised at how all you need may be right in front of you…or maybe, you are sleeping on it!

* To receive posts via email click HERE Subscribe in a reader or sign up in Subscription box in sidebar.

  • 1
  • 2
  • 3
  • 4
Recent Posts
  • Owl Inspired Theme Toddler Bedroom
  • Painted trunk blends with Decor
  • Create a “trunk” inspired look for a Nightstand
  • Decorate fireplace wall “naturally” on a budget
  • How to Inspire Design with Pinterest Photos
Archives
  • February 2018
  • January 2018
  • October 2016
  • January 2016
  • June 2015
  • April 2015
  • March 2015
  • February 2015
  • January 2015
  • December 2014
  • November 2014
  • June 2014
  • May 2014
Newsletter subscription form

Enter your email address:

Delivered by FeedBurner

Categories
  • Art
  • Bathroom
  • Craft Project
  • Custom Design
  • Dining Room
  • DIY
  • Entry
  • Holiday
  • Interior Design Room
  • Kids Room
  • Kitchen
  • Living room
  • Master Bedroom
  • Mudroom
  • Office
  • Repurposed
  • Theme Room
Houzz
Remodeling and Home Design
Instagram
Instagram
HomeTalk
Featured on Hometalk.com
Follow me on Facebook
TayRose Design

Promote Your Page Too
315.224.4142
© 2014 k.linndesign. All Rights Reserved.